Guys, we put our soul into the site. Thank you for that
that you are discovering this beauty. Thanks for the inspiration and goosebumps.
Join us on Facebook And In contact with
All children love to draw. But sometimes things don’t turn out the way a child wants. Or maybe he doesn’t have enough familiar ways to express himself? Then you can inspire him to experiment with different techniques, among which there is sure to be a favorite. After this, your child will probably want to invent something new.
website I have collected the most interesting techniques for you.
Dot patterns
First we draw the simplest squiggle. Then using cotton swab and paints (gouache or acrylic) we make intricate patterns as the soul pleases. It is better to pre-mix the paints and dilute them slightly with water on the palette.
Frottage
A technique familiar and loved by many since childhood. We place an object with a slightly protruding relief under a sheet of paper and paint over it with pastel, chalk or an unsharpened pencil.
Foam prints
Having dipped a sponge in thick gouache, the child can draw landscapes, bouquets of flowers, lilac branches or animals.
Blotography
One option: drop paint onto a sheet and tilt it in different directions to create an image. Second: the child dips the brush into the paint, then places the blot on a sheet of paper and folds the sheet in half so that the blot is imprinted on the second half of the sheet. Then he unfolds the sheet and tries to understand who or what the drawing resembles.
Hand and foot prints
It's simple: you need to dip your foot or palm in the paint and make an imprint on paper. And then use your imagination and add a couple of details.
Paint patterns
For such an application you need to apply a thick layer of paint onto the paper. Then, using the opposite end of the brush, scratch patterns on the still wet paint - various lines and curls. When dry, cut out the desired shapes and paste them onto a thick sheet of paper.
Fingerprints
The name speaks for itself. You need to paint your finger with a thin layer and make an imprint. A couple of strokes with a felt-tip pen - and you're done!
Monotype
A design is applied to a flat, smooth surface (for example, glass) with paint. Then a sheet of paper is applied, and the print is ready. To make it more blurry, the sheet of paper must first be wetted. Once everything is dry, you can add details and outlines if desired.
Scratch
The highlight of the work is that the drawing needs to be scratched. A sheet of cardboard is densely shaded with spots of multi-colored oil pastel. Then you need to mix black gouache with soap on a palette and paint over the entire sketch. When the paint is completely dry, use a toothpick to scratch the design.
Air colors
To make the paint, mix a tablespoon of self-raising flour, a few drops of food coloring and a tablespoon of salt. Add a little water to the consistency of thick sour cream and mix well. The paint can be placed in a pastry syringe or in a small bag. Tie tightly and cut the corner. We draw on paper or regular cardboard. Place the finished drawing in the microwave at maximum mode for 10-30 seconds.
Marbled paper
Paint a sheet of paper yellow acrylic paint. When it is completely dry, paint it again with diluted pink paint and immediately cover it cling film. The film needs to be crumpled and gathered into folds, since they are the ones that will create the desired pattern. We wait until it dries completely and remove the film.
Painting with water
We draw with watercolors a simple figure and fill it with water. Until it dries, we put colored blots on it so that they mix with each other and form smooth transitions like this.
Prints of vegetables and fruits
Vegetables or fruits need to be cut in half. Then you can cut out some kind of pattern on it or leave it as is. We dip it in paint and make impressions on paper. For prints you can use an apple, potato, carrot or celery.
Leaf prints
The principle is the same. We smear the leaves with paint and make prints on paper.
Learning to portray animals is useful knowledge for children and adults. It will be useful first in kindergarten, school, and the second - for creating knitted patterns, fabric appliqués, and decorating cakes.
How to draw a penguin?
See how to create this flightless bird.
For this you will need:
- a simple pencil;
- eraser;
- paper.
Such beautiful drawings with a simple pencil create. Because then it will be possible to erase unsuccessful and auxiliary features and draw new ones. Therefore, do not press too hard on the pencil.
- Draw a small circle - this is the head of the penguin. It is crossed by the oval body of this animal, but at the bottom make this figure straight.
- At the next stage, draw 2 rounded features - the first is almost parallel to the back of the head, and the second is to the left side of the body. If you then want to do the drawing in color, these features will help keep the face and belly white and the individual elements black.
- Next, we draw the underdeveloped wings of the penguin bird, two small ovals at the bottom of the body, which will soon turn into the paws of this animal.
- You will make them more realistic in the next step. To do this, draw 3 toes on each paw. A small circle on the face will become the eyes of this bird, and it will also acquire a beak.
- It remains to show that his fur is quite fluffy. To do this, make several small lines on the tummy, back, and back of the head. Draw the crest. Add an eyelid and pupil to the eye.

Here's how to draw a penguin simply and easily. You can also create other animals using the same technology without any problems.
How to draw a pig?

- Draw an oval shape. At its lower part, draw a circle that will become the pig’s head. His little snout is depicted on the right side of this circle.
- Draw his 2 front legs, one back, and his lop-eared ears.
- Mark the animal's hooves, cheeks, and outline its eyes. At the next stage, draw in them the pupils, as well as the eyebrows, mouth, and nostrils.
- The look of the mischievous pig is completed by its curled tail.
How to draw a donkey?

Having learned this, you and the children will be able to start illustrating the cartoon about Winnie the Pooh.
- First, draw a figure similar in outline to the number 8 - this is the head. The circle will soon become his body. An elongated neck connects these parts.
- Draw the ears that look like small wings next. The two oval eyes will get pupils and eyelids in the next step. Then draw the nose and nostrils.
- All that remains is to depict the bangs, crest, legs of the donkey and his tail.
How to draw a lamb?
The image of this animal can also be used for applique. But make a fur coat from fur or glue curls from pieces of thread onto the base, twisting them.

Photos show how such simple drawings are created step by step.
- First draw a small egg-shaped shape that will become the lamb's head. And the body is a slightly larger oval.
- To make drawing the horn easier, first draw a small circle on the side of the head. And then draw a spiral horn in it. The second one is located on background and is not completely visible.
- Four rectangular legs end in hooves. Curly bangs will add charm to the animal.
- Draw his dreamy eyes, curly fur, nostrils, and tail.
Fish

If you are thinking about how to teach drawing small child, then show him how this sea creature is created.
- Draw a semicircular line at the top and bottom, connecting them on the right and left. Draw the lips on one side and the tail on the other. Separate the junction of the face with the body with a semicircular line, draw a round eye on the muzzle.
- In the next step of step-by-step drawing, add an eyelid to the eye and draw two fins.
- All that remains is to draw the pupil and scales using wavy lines. Using small strokes, make the fins and tail more realistic.
How to draw a cat?
You will learn this in 5 minutes.

Draw a circle - this is the head blank. It is crossed by the ovoid body. Use an eraser to erase the intersection of these two parts.
Draw the front and hind legs. Also, use an eraser to remove the places where they intersect with the body. Draw a tail.
At the third stage, add ears to the cat, make the muzzle more protruding by drawing an oval at the bottom of the circle.
You already practically know how to draw a cat. All that remains is to erase the auxiliary lines, draw a small triangle inside the right ear, draw the eyes, nose, mustache, toes and the tip of the tail.
Winnie the Pooh
The hero of the cartoon and book of the same name is quite easy to draw.

- First, draw 2 identical shapes - they are something between a square and a circle.
- At the next stage, erase the place where they intersect and add front and hind legs to the hero.
- It's time to draw Winnie the Pooh muzzle and ears. Draw eyes, nose, claws. The mouth, like the cartoon character, is slightly on the side. Which adds charm and originality to it.
How to decorate a cake with fondant in the form of a design?
To do this, you can use the image of any character that you just learned to draw or depict another character, for example, an owl.

To assemble this cake, take:
- sponge cakes;
- oil, custard or from whipped cream;
- white mastic for cake;
- food colors in three colors;
- black currants or raisins;
- water;
- silicone rolling pin;
You can make your own food coloring using blackcurrant, spinach and beet juice.

The same dyes will be needed to give the desired shade to the mastic. But first you need to assemble the cake. Layer the cakes with cream and place one on top of the other. Place the cake in the refrigerator for an hour, then roll out the white fondant and cover the cake with a sheet of this sweet flexible material.
The fondant will adhere better if you coat the cake with buttercream first.
Trim off excess mastic and add more. It needs to be divided into 3 parts, add a little food coloring into each. Roll out the mastic into a layer. Attach a template of an owl or any other character to it, cut it out according to this template.
Dip a pastry brush into water, moisten some of the fondant on the cake, and attach the owl blank here. Glue them all in the same way.

Roll out round eyes from the remaining white mastic. Place a blackcurrant or one raisin in the center of each to make pupils. But first soak the raisins for 20 minutes in warm water so that it becomes soft.

It is not necessary to make eyes on all the blanks; perhaps some owls have their backs turned to the viewer.

Typically, a cake with mastic should be left in a cool place for a day to dry, after which it can be served.
This is how simple drawings will help you decorate a cake. If you want to become the designer of your home, don't forget about accessories. And you don't have to buy it expensive paintings. You can make them yourself, this master class will help you. Such canvases are created very simply, but look impressive.
DIY stone paintings for beginners

To create such a hand-made masterpiece, use:
- smooth stones such as pebbles;
- queen shell;
- artificial moss;
- transparent Titanium glue;
- thin tree branches;
- plywood;
- colored paper;
- paints.
If you are doing this for the first time, then it is better to first mark the locations of the elements with a simple pencil.
Designate where the lovers will be. Glue 3 almost identical flat pebbles to create a guy, and his head using light pebbles.
For the girl’s body, head and legs, use one pebble each; make a skirt out of a “queen” shell, after breaking off the “antennae” with pliers.
This picture is perfect for those who are relaxing at the seaside or have brought some shells and smooth pebbles from there from vacation. Such a panel will be a wonderful reminder of a vacation on the seaside.
You can take twigs from a tree growing in your yard, but it is better to use dry ones. Process them with pliers, removing excess.
Attach a relatively straight trunk to a picture of stones with Titan glue. In the same way, glue small twigs that will become tree branches. Cut out the leaves for it from green paper, and the birds from another colored paper.
Complete the elements of wood and plants with paints. Glue the moss as grass, after which you can frame the work and start a new one.

This simple picture created also quickly. It will require:
- plywood or thick cardboard;
- frame;
- threads;
- flat stones;
- glue.
girl holding Balloons by strings, and they themselves are made of round pebbles.
If you are relaxing by the sea, walking along the beach, look for a heart-shaped stone, you will need it for your next romantic picture.

The oblong pebbles will become the characters' arms and legs, the round ones will become their heads, and the oval ones will become their torsos. Glue a fancy dry branch down the panel - it will become a path on which the lovers stand.
Place a sprig of dried flowers in the guy's hands or make them out of colored paper. This stone painting will be another pleasant reminder of a wonderful summer holiday on the south coast, just like the other.

For each cat you will need a pair of pebbles of the same color, but different in size, to make the body and tail. If you cannot find an identical one color scheme, just paint the stones in desired color. When the coating has dried, glue the blanks onto a thick base, having previously painted it or glued a sheet of light cardboard.
Draw the cats ears and grass. Glue twigs that will become a tree and a couple of small pebbles that will turn into birds.

By the way, you can dwell on their creation in more detail. After all, by creating simple drawings step by step, you will also depict birds.
How to paint birds in watercolors?
In just a few minutes you will be able to draw a jay. To do this, take:
- a sheet of thick paper;
- a simple pencil;
- watercolor;
- brush.
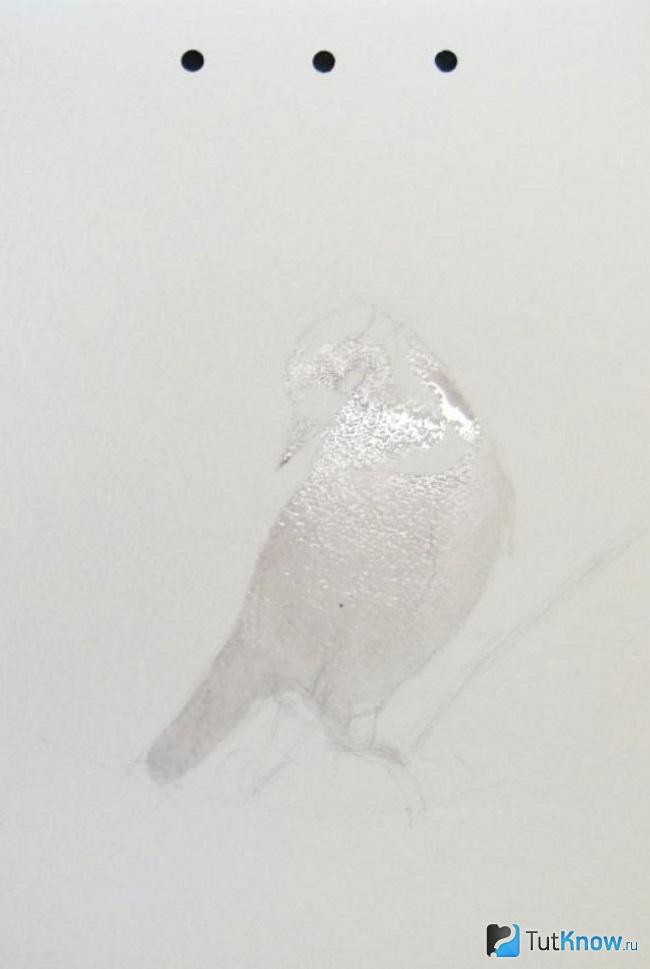
This step by step drawing watercolor involves using blue and black shades in the second step. Using paint of these colors, highlight the eye, chest, outlines of the jay's back, tail, and head.

Before this, you need to barely identify these fragments; at the next stage, highlight them more confidently. Use light gray to draw the jay's plumage.

At the next step, act even more confidently, because everything will work out for you! Create a background, let it be green bushes in the background, yellow flowers, sky and a branch on which a bird is sitting.

The last stage is the final one. Make the bird more realistic by doing a few strokes of black and gray paint on its chest, side, and head. Highlight the background by adding green and yellow watercolors. You can also draw a blue sky behind the jay.

Here's how to paint with watercolors step by step. Now you can create simple canvases with a simple pencil, paint, and even using stones. Create, dare, and you will certainly succeed!
How to draw simple drawings for beginners, see here:
admin
Most likely, everyone periodically has the desire to draw something, and not just a doodle, but so that everyone likes it. Especially often, such a desire appears when looking at a beautiful and talented picture. It would seem that it’s so difficult? I want to learn how to draw coolly with a pencil, so I take paper and draw a masterpiece. But when it comes to implementation, then difficulties arise: either the center is shifted, the scale and aspect ratios are incorrect, or the details did not work out. How to quickly learn to draw with a simple pencil, if immediately, due to one’s own ineptitude, the desire to create masterpieces disappears?
Remember that even the most talented masters did not learn immediately: everyone has gone a long way in order to improve their skills and delight others with beauty. This is preceded by more than one year and more than one month of hard work - very little time will pass, and now we are already drawing well simple pictures and people.
The pencil is considered the most simple tool for drawing, so it’s worth starting your training with it.
It takes some getting used to carry a pencil and notepad with you in order to make sketches. Only hard work and perseverance will help you achieve your goal. But what to do if, apart from desire and some abilities, there is nothing?
Drawing: how to draw something beautiful and easy for beginners
So, to draw pictures, you need to know where to start. remember, that For beginners, a pencil is the most convenient tool. This is because it is easy to erase, and if the line is wrong, it can be changed. Moreover, there is different types pencils, with the help of them you can easily create a beautiful drawing.

The main advice for future artists is never do not start drawing with complex and large paintings until you learn how to depict details. You are unlikely to succeed, and the desire to draw again will simply disappear.
First learn to portray individual items. To do this, highlight one element from the others with your eyes. Then visually evaluate the shape and size. Next, highlight where on the paper it is best to place it, taking into account the size and shape. Don’t forget that tall elements are positioned along the length of the paper, and wide elements are positioned along the width.
In addition, keep in mind that a real object is usually larger than a piece of paper, so you need to draw it, taking into account aspect ratio and scale. Is not simple task for a beginner. Therefore, to develop skills, below there will be suggestions simple exercises, which will help allocate space for the drawing.
Drawing exercises
In these drawing exercises we draw objects as diagrams, without creating small parts- this is something that a beginner can draw simply and beautifully. Here it is important to see how objects are created using simple figures and their dimensions are taken into account. By acquiring such skills, in the future you will be able to automatically find the location and size of the picture.
Exercise No. 1: so the first task is that you need to draw an object not from natural size, and from the picture. This greatly simplifies the task, since there is no need to select an element and find a place to place it - everything has already been done. You need to reproduce the same thing, but in a different size, so that it does not become a copy.
Repeat similar exercises with other images, developing an understanding of proportions and space.
Let's draw a mountain. First, take a close look at the picture. Visualize it on your sheet. Now draw a straight line. This will be the foundation. Study the shape of the hill and its slopes. If the mountain has equal sides, then depict it as a regular cone, whose height is less than the width of the base. To understand how many times the parts differ in size, you can take a ruler, but the main thing is to be able to do this by eye. In this situation, the proportions of height and width are 1:3.

To get the aspect ratios right, create a vertex first. Find a place on the horizontal line where you will place it. Create 3 equal segments on the line. Next, find the middle and draw a perpendicular. Then mark the top of the mountain at a distance of 1 division from the base. If the image matches, everything was done correctly. Now try to create the same mountain, but in a different size.
Do not forget that to correctly determine the aspect ratio of an object, you need to start by dividing the base into equal parts, and then move on from there. A task like this will teach you to accurately determine ratio of various elements of objects. And this is the basis of drawing.
Exercise No. 2: another challenge is that it is required to depict a mountain with different proportions of width and height. Here they will be 1:4, and the top deviates at right side. The task is more difficult, but not impossible.
First, repeat the steps of the first exercise: draw a straight line, dividing it into equal parts (here 4). Then there is a peculiarity - the vertex will not be in the center of the segment. It seems to be above the third segment, so we draw from it perpendicular line. Then the top is laid off. Usually, when creating a drawing, the base is divided by 2 or 3, rarely by 5.
Exercise No. 3: this exercise will require depiction on one sheet profiles of different mountains, which have different vertices in location and height. Don't be afraid, the task is not too difficult. Imagine each hill separately, mentally draw a dotted line to the bases. And then you will understand that the first exercise is simply repeated several times.
Another skill - skills to draw straight lines without tools. This is not too easy, it will require training. First draw vertical line using a ruler. Now practice, trying to create maximum parallel by hand. A similar exercise is repeated with the horizon.
Mastering shading
When creating masterpieces with a pencil, you will need to master shading skills for the volume of an object. It will show where the shadow falls and where the light falls. Start with simple shapes: cube, ball, cone, etc. In addition, if you look closely, you will notice that these figures have penumbra.

In order to obtain a smooth transition from light to dark, you will need pencils with different densities. After mastering this skill, you will easily learn how to draw three-dimensional details. For classes, you can choose interesting and stylish drawings for beginners - not very complex, but beautiful, they will delight you with the results and maintain confidence in your abilities.
How to draw a person correctly
If you have achieved success in previous tasks, then let’s figure it out now, how to draw a person. This is not the easiest task. Let's consider step by step drawing. First try creating people on paper who are standing - this is important for distinguishing between aspect ratios.
Draw a vertical line and build off of it to create a mesh, i.e. the main lines of the waist, shoulders, head, arms and legs. But how do you understand the size of these lines? When drawing from life It is important to use a pencil as a measuring tool. For example, you want to determine the distance from the waist to the head. Take a pencil, visually align its tip with the level of the crown, then mark on it where the waist is located. Transfer the size onto paper. This way you can measure all the items.
Drawing people is a difficult task. Start by creating the base, then draw in the details.
To test yourself, remember that the body is visually divided into 8 parts. One part is equal to the size of the head. In representatives of the stronger sex, the body length is 3 heads, and the border is located on the chest, chin, crotch and belt. The legs are 4 heads, and the center is near the knees. The width of the shoulders reaches 2 1/3 the size of the head. The length of the arms reaches 3.5 times the size of the head. Female proportions differ - the body is more elongated, and the hips are considered the widest part.

If you have determined the proportions of a person, drawn marks, then give shape to the body. To do this, all elements are drawn in the form of cylinders and ovals. If you like everything, then draw the outline. Now all that remains is to create the details - fingers, hair, face, clothes.
How to draw a portrait
The greatest difficulty is creating portraits. The difficulty is that to obtain a similarity you will need to correctly draw all the details and features. So, let's figure out how to draw a portrait for beginners.
First tip: think about what can be easily drawn or copied from a photo with a pencil? Separate areas of the face: nose, eyes, lips from different angles, even ears. Then move on to creating the full image. For beginners there will be easier work Based on the photo, you can gradually move on to personal observations, sketches and sketches from life.
Tip two: Start by creating an oval shape for the head. Then draw a vertical line down the center. She will divide the face into equal parts. Then divide it into 2 parts horizontally - this is the line where the eyes are located. The eyebrows are located in line with the upper edges of the ears.
Third tip: The length of the nose can be determined as follows: divide the gap between the eyes and chin by 2 - this is the location of the tip. Its width corresponds to the gap between the edges of the eyes. These relationships are not an axiom, but most often faces are drawn this way.
There is a certain concept of facial proportions that can be taken as a basis.
When positioning the parts of the face, you need to create the contour of the lips, nose, ears, and hair. If you are satisfied with the details, then start drawing. Now all that remains is to add the finishing touches.
Graffiti style
If you like lettering, then you should consider . There are different directions and stylistic exercises for drawing words, letters, phrases. And to understand in what specific direction you will create, you will need to study them all.

Practice on paper first. Create a word. The letters need to be placed at a distance corresponding to ½ the height of the letter, because they will need to be outlined. Now give each letter volume and convexity with shading.
Selecting Tools
The choice of tools and sheets plays a significant role in drawing. So, what devices to choose:
There are different types of pencils. A simple pencil happens With different levels softness. They are often designated by Latin letters: B - the softest, H - the hardest, and HB - hard-soft pencils. Besides this, there are also numbers from 2 to 9. These show the tone;
a beginner will need different pencils with different hardness. In addition, when drawing you will need soft eraser;
paper plays an important role. It is better to use thick white sheets - they can withstand corrections. A grainy sheet is suitable for a pencil because the shades are visible on it.
We looked in detail at how to learn to work with a pencil and how to draw something beautiful at home, but now let’s sum it up. Let's look at some brief tips on how to get better at drawing - the list, of course, is far from complete, but it sums up the experience:
Create sketches.
This is the main point. Required to create per day at least 5 sketches. It's worth doing your best here. Take advantage of every chance to create drawings: on the road, in the office, at home. This improves your skills, develops imagination, and the ability to understand size relationships. Drawing storyboards and comics is useful.

Copy the works of masters.
Imitate the masters, it develops taste. Do 1 copy every 3 months. This should include the originals good artists. Try to get as close to the source as possible, study not only the techniques of the masters, but also the cultural features of that era.
Experiment, don’t be afraid of mistakes and don’t put off creativity until later. This way you will soon learn how to create masterpieces.
Draw from memory.
Even when drawing from life, you have to create an image from memory. Besides, it is important to draw small elements from memory- this will improve visual memory and imagination.
Repeat mistakes.
People often quit at the first problem: they are afraid of repeating the mistake. But you shouldn't do this. If it doesn't work, start again. Don’t avoid mistakes; they are worth taking a closer look at - perhaps this is where your individuality lies.
You shouldn't draw from a photo.
Yes, at first this is the only way to train, but then you shouldn’t do it. The lens is not able to convey the full depth of forms.
Take a break.
Don't concentrate on one thing it's important to be able to switch. If something doesn't work out, take breaks. Start different drawings, change points of view, technique.
Conclusion
Even if drawing with a pencil or paints (pastels, watercolors, oils, etc.) is a completely new area of life for you, don't be afraid to set goals, both modest and global. It is important to remember why you decided to learn drawing: will it become future profession or a hobby, do you want to please your friends or relatives with a landscape or portrait as a gift, have you just decided to master a new creative niche?
Fears of your own inability do not give you peace, constantly buzzing in your ear, “You won’t succeed anyway”? Don’t put off ideas and plans for later, gradually purchasing boxes of pencils and paints or spending weekends looking for that “best paper” in stores. Make your wishes come true today- just take a notepad and pencil and start making, albeit not very skillful, but at least your own sketches.
January 23, 2014Pencil drawing lessons step by step are activities that will help you master drawing techniques, regardless of your abilities or age. Drawing is really easy!
PopularDon't believe that you can draw beautifully? Of course, only a real artist can really paint a magnificent oil portrait, but even Small child will soon be able to replicate the character of his favorite cartoon on paper if he takes drawing lessons for children on our website.
Just think how happy your baby will be when you tell her that from today we are learning to draw with a pencil! Why pencil? You need to start with something simple. And the easiest way to start is with light pencil drawings. Gradually you will master more and more complex skills. And, as a result, you can move on to working with paints. Drawing for children will become a favorite pastime and will gradually introduce kids to amazing world bright images and favorite characters.
Fundamentals of pencil graphics taught in art school, you and your child will learn much faster if you go through the pencil drawing lessons step by step on our website. We managed to create activities that even kids can handle! With us, learning is simple and fun, step by step you will understand that drawing is very interesting.
Learning to draw with a pencil
The first drawing lessons for children are designed with the help of adults. Help your child grasp the pencil correctly, support his hand while drawing the very first lines. Little artist You should get a better feel for how much pressure you need to apply to get the right thickness of line. Then let him draw simple line segments himself. different directions. Afterwards you can move on to simple shapes such as a circle, rectangle, etc.
Gradually, the child’s drawing skills will be strengthened, he will be able to come up with more complex plots himself, fantasize and embody his fantasies on paper. But you need to start with the baby with the simplest objects or characters that are well known to him. When purchasing everything you need, please note that for the first lessons to the young artist You will need a thick, soft stylus that leaves a bright mark with virtually no pressure.
Pencil drawing lessons step by step for children
Talent is given to every person by nature, but developing any abilities must begin with early childhood. By helping children learn to formulate images into pictures, you are doing them a great service. Drawing with a pencil step by step is not only interesting, but also very useful for young children. The impact of development has already been proven fine motor skills hands on mental abilities and psycho-emotional sphere at a very early age. Working with a felt-tip pen or pencil, the baby becomes calmer, more balanced, and develops a beautiful aesthetic taste, a sense of harmony develops in relation to the entire surrounding world. This is also true for adults: when we learn to draw with a pencil, our nervous system resting. Isn't this the best cure for endless stress?
Why is it so important for parents to also learn art lessons for children? Help your child! Your baby, most likely, will not be able to cope with the first tasks on his own; he is very small and, most likely, has not yet mastered many skills. It is difficult for him to hold a pencil in his pen; he has not yet learned to calculate the force of pressure on the paper, or to correctly navigate within the boundaries of a paper sheet. The started drawing may not fit on the paper, and the baby will begin to get nervous. It is important not to miss this moment, but to help the child skillfully organize classes, then drawing will become a favorite pastime.
Pencil drawing lessons are staged in such a way that the child sees only objects familiar to him. They systematize the little man’s existing experience and gradually expand his worldview, introducing him to new phenomena of nature and life. Perhaps now the baby will take a new look at the world, and you will help him with this.
The basis artistic arts— drawing with a pencil, or to be more precise, sketching with a pencil. After basic exercises with a pencil (for example, on a stroke), you need to take up sketching in order to acquire drawing techniques, use your hand and understand how certain things are drawn. How lighting and shadow are drawn, how to create a “skeleton” of a drawing and attach detailing to it. We offer you pictures for sketching with pencil: beautiful and easy images that will help develop all of the above. The pictures are collected all over the Internet, both Russian and foreign.
The author of the collection was engaged in drawing on entry level. Drawing was not easy for me, but my diligence paid off. The pictures presented in this collection are suitable for both beginners and advanced beginners. Get ready to scroll down for a long time, because there are more than 60 pictures in the selection! You will surely find something to your liking and skills.
A large selection of beautiful and easy pictures for sketching with a pencil
A simple outline of a camel-ship of the desert for sketching in pencil.
A beautiful and easy to draw silhouette of a cat.
Kawaii hamster with highlights on his eyes. But they don't make it much more difficult to draw. Beautiful and simple drawing!
Outlines of an anime cat for drawing, easy to draw even for a beginner.
The frog is a small animal with few curves. Try to work the shadow as closely as possible to the original, and you will get an excellent copy.
Another frog with more detailed eyes and muscles. But have you already trained on the previous frog?
A simple and surprising volume. Surprise him even more by drawing him well!
It’s very simple to draw this cat’s face; the main thing is to immediately estimate the lines of symmetry and mark the ovals. There's nothing complicated about the drawing itself (except maybe the eyes), so just make it symmetrical.
Elementary pencil drawing of a bird. You can not stop there and continue to detail it by adding feathers and shadows.
How to draw an elephant: step by step instructions.
Pencil drawing for advanced beginners. The face of a lion cub from a Disney cartoon.
Zebra is the perfect animal to draw with a simple pencil. We suggest drawing this zebra, which does not have complex detailing. Lightweight and beautiful image!
Large bear for sketching. The main thing here is to follow the rhythm and direction of the stroke. The bear should be combed, as in the original. If you can draw a nickel as cool as the original, then you're not so bad at drawing!
A drawing without detail, but which will require a confident hand and a clear delineation of space. You can first draw the cup more freely, applying a lot of extra strokes, and then remove them with an eraser.
An owl under a blanket with a cup of hot drink. Great autumn drawing It will work if you develop it and detail it. But for this you need to draw at least one like this! You know what to do.
Cute kitten is playing. An excellent drawing in terms of anatomy and shadows, although a minimum of strokes were used. The cat is alive! You can also convey this in a drawing, try it!
A ballerina with a minimum of detail and a very abstract figure, and even with eyes closed. A real gift for a sketcher.
Panda looks out of a cup. You can make the shadows better than in the original, but you have a basis for sketching.
Scrabbles cat in an original drawing style. Big eyes, on which it will be very convenient for you to practice glare. Also the shadow and the rhythm of the stroke are very important here. Notice how the stroke becomes more frequent where the shadow thickens, and how it thins out in the illuminated place.
Fox from Zootopia, depicted in a slightly casual style. You can first portray him in severe negligence, and then remove the excess.
A beautiful drawing for sketching in pencil: a pretty girl has a Pikachu sitting on her shoulder. But it has a minus: it is not so simple. You'll have to try hard to draw it well. But there's not much detail, so go ahead!
An easy way to draw a horse.
A simple way to draw Winnie the Pooh in the Russian style.
Vinny in an overseas, Disney style. Both options are cute and easy to draw with a simple pencil.
A cute kitten with virtually no detail, easy to draw.
Lace-up boots with heels. Try sketching just one shoe first.
A sad but funny owl sits on a branch and waits for you to start sketching it with a simple pencil.
A simple landscape, without unnecessary detail. But there is something to practice in applying shadows and being steady with your hand.
Little penguin for sketching.
Little squirrel with a potion in his hands. Eyebrows are the final touch in conveying emotions, just like expression wrinkles at the bottom of the picture.
Stylish, beautiful street pattern. Sketching it in pencil will be the first step to depict something similar in paint in the city.
A cute girl's face in profile, not burdening you with unnecessary detail. Only contours, only basics.
Waist and legs of a ballerina. There must be very subtle work with shadows here. Do everything in your power: eraser, fingers, movements barely touching the sheet of paper.
A bullfinch sits on a branch.
Another bird on the branch. Here you will have to try to shade the bird properly. Notice where and how the lines become denser and darker.
A great picture for sketching that will develop your skills. No special detail, just playing with strokes and darkening.
A picture to practice drawing bird feathers. The ideal angle for these purposes.
Key from DeviantArt.com; A watermark will not interfere with copying from this picture.
Landscape with two boats, trees, silhouettes of mountains in the background. Easy picture, but requiring initial training
Half detailed house. Try to draw at least half of it. Notice how the roof tiles are made. Rocks are less of a problem here.
Cute parrots communicate, and you copy them, because they are really light and beautiful.
Cool drawing with an abstract silhouette of a girl with curves.
Landscape with trees, stones, bridge and mountains in the background. The picture is easy, does not require any super technical skills, but tests your diligence and perseverance.
Flower buds for sketching


