Master class for children 5-8 years old “Beauty Christmas Tree”
Ostanina Victoria Aleksandrovna, teacher of the Children's Preschool Educational Institution DS KV "Raduga" SP "Silver Hoof"
Target: Making New Year's crafts.
Tasks:- learn to draw a Christmas tree;
- learn to use available materials in your work;
- develop Creative skills children;
- learn to be careful when working with gouache and glue.
Purpose: Drawing is an interesting process. This master class will allow creative people it’s easy to draw a winter beauty, and for educators and teachers working with preschool and younger children school age, will serve as a guide to teaching your students a simple and understandable way to draw and decorate crafts for the New Year.
Description: The master class will show everyone a simple option for drawing a Christmas tree and then decorating it. In our work we will use available materials, which will make our craft accessible to everyone: white napkins - for making snow on the legs of the Christmas tree, and tinsel - bright sparkles to complement the image. The process of making crafts is accompanied by detailed photo.
Materials: white sheet of paper, colored cardboard, gouache, brushes No. 5 and a glue brush, scissors, a simple pencil, eraser, glue stick, PVA glue, silver tinsel, white paper napkins.

Progress:
Soon soon New Year
He will come to visit the children.
Soon, soon in every home
The Christmas tree will light up!
The lights will sparkle
Just a miracle - look!!!

In anticipation New Year's miracles I really want to make my home a little brighter, a little more interesting. Every adult remembers his childhood, when he had the opportunity to take paints and brushes and draw a wonderful Christmas tree with toys and a bunch of gifts under it, hang it on the wall and delight everyone with his creativity. As adults, we lose this opportunity due to lack of free time or indecision, because not all of us know how to draw beautifully and are sometimes embarrassed by it. But we have a unique opportunity - to give the children around us the opportunity to believe in themselves and draw a wonderful Christmas tree and decorate it with improvised materials, and in the end it will turn out beautiful New Year's craft, capable of decorating our home and giving it a festive atmosphere. Feel free to take your gouache brushes and start painting!!!

And as a parting word to us, a wonderful poem by Tatyana Volgina, because this is exactly the kind of beautiful Christmas tree we will now make:
“It’s winter before the holiday...
Winter before the holiday
For a green Christmas tree
White dress herself
I sewed it without a needle.
Shaked off the white snow
Christmas tree with a bow
And stands more beautiful than everyone else
In a green dress.
Green suits her
Yolka knows this.
How is she on New Year's Eve?
Well dressed!”
1. Let's start by making the background. To do this, we need a white sheet of paper and a bright background, such as red. We need the white sheet to be smaller than the red piece of cardboard. To do this, use scissors to cut 2 centimeters from both sides of the white sheet.

2. Now let’s place it on a red piece of cardboard.

We won't glue it yet, we just checked how it looks.
3. Now let's start drawing. We need to draw the base. To do this, using a pencil and a ruler, draw a large triangle with a convex base, stepping back approximately 2 centimeters from the top of the sheet and from the lower corners. It’s just important not to draw the lines clearly, try to choose soft pencil and do not press on it - the lines should be slightly noticeable, we will erase them later.

4. Now we will divide the triangle with transverse lines into 4 equal parts in height.

5. Now let’s draw arcs instead of straight lines, our Christmas tree should turn out beautiful! On the outer sides of the Christmas tree the lines are concave, and on the transverse lines the arcs are curved down.

6. Now erase the extra lines.

7. To draw, we will need green gouache, a glass of water and a brush.

8. We put gouache on the brush and apply long strokes, as shown in the photo.

9. We try to apply the strokes evenly, placing them slightly on top of each other at the beginning, and at the bottom of the tree exactly next to each other, trying not to leave gaps so that the tree turns out fluffy.

10. Now we draw the second tier of branches in the same way as the first.

11. Now the third tier. We make sure that the strokes overlap the transverse arcs and maintain the same length of strokes.

12. Now we draw the top of the head. We start strokes from one point, trying to make the top of the head sharp. The Christmas tree is ready.

13. Now, using the very tip of the brush, we will make the Christmas tree fluffier. Using small strokes, apply short needles to the top of the Christmas tree.

14. We continue to draw the needles of the Christmas tree. You can take gouache of a darker shade. Using short vertical strokes, apply needles along the bottom of each tier.

15. The Christmas tree is ready.

16. Using pencil glue, glue our drawing onto a base of colored cardboard.

“Here it is, our Christmas tree,
In the brilliance of radiant lights!
She seems more beautiful than everyone else
Everything is greener and lush.
A fairy tale hides in the greenery:
The white swan is swimming
The bunny slides on a sled
The squirrel gnaws nuts.
Here it is, our Christmas tree,
In the brilliance of radiant lights!
We are all dancing for joy
On New Year's Day under it!
Such wonderful words were written by Valentina Donnikova and they perfectly describe our beauty.
But to complete the look, let’s add some sparkles and white fluff!
17. To make snow we will need white paper napkins. We tear them into small pieces.

18. Roll into small balls.

19. Now, using a brush, apply PVA glue in the form of droplets onto the Christmas tree.

20. Now we place the resulting lumps on the droplets of glue and press lightly. Let it dry and a snowball fell on our Christmas tree.

21. Now a little magic and sparkles will appear on our Christmas tree!
Take silver tinsel and scissors. Carefully cut off the ends of the tinsel.

We try not to scatter them, but put them in one pile.

22. Now, using a brush, apply PVA glue, but not in dotted droplets, as before, in small horizontal strokes.

23. Now pour silver sparkles onto the glue. After you have sprinkled the sparkles, you can turn over the leaf with the Christmas tree and shake off the excess sparkles, and then sprinkle them again on the glue that is visible.

The Christmas tree is ready!


Such a wonderful Christmas tree will be a worthy exhibit at the exhibition children's creativity.
If you ask any child which holiday is his favorite, then, without a doubt, any child will answer you: “It’s New Year!” New Year is one of the most famous and favorite holidays for both children and adults! We are all waiting for a miracle from New Year's Eve, some kind of magic, we believe that everything will change. What about the expectation of gifts? What could be more exciting than this? The New Year comes to us with snow, cold weather, and the smell of tangerines and Christmas tree needles is everywhere. Today we will learn to draw required attribute this holiday - christmas tree with gifts! Someone puts a live Christmas tree, spruce or pine in the house. And some, in order to preserve living trees, prefer artificial Christmas trees, which are currently very similar to natural ones. Drawing a Christmas tree is not at all difficult. Just follow our tips, look carefully at the pictures and get to work.
Stage 1. Using a ruler, we will draw auxiliary lines for our future Christmas tree. One vertical and two horizontal - shorter at the top, where the very top of the tree will be, and longer at the bottom, where its base will be.

Stage 2. Now let's start drawing the outline of our forest beauty. Stepping back a little from the top horizontal line, we begin to mark the branches of the tree on both sides of the vertical. We try to arrange them carefully, symmetrically, so that our Christmas tree will ultimately be beautiful and fluffy. This will be like the back layer of branches.

Stage 3. Now we will draw the front layer of the Christmas tree legs. We place it in front of the previous one. These branches seem to overlap the back layer of branches and make our Christmas tree even more fluffy and spreading. Don't forget to mark the top of the tree by sharpening it along a vertical line.

Stage 4. We place Christmas tree decorations - balls - on the branches of our Christmas tree different sizes. We simply draw circles of different diameters on the branches. These toys must be placed evenly throughout the tree so that there are no empty areas and our tree is beautiful and elegant. Below under the tree you need to draw gifts for the kids. Gifts are wrapped boxes containing various items that children want to receive for the holiday. They are drawn like this. Using a ruler, mark a vertical line and two oblique lines extending from it at a certain angle at the top. Then connect them together. The result is a cube shape. On the sides of these cubes we draw lines of future bows that will be used to tie the boxes.

Stage 5. Now we draw a star on the top of our Christmas tree. It is five-pointed. In order to draw it straight, you can also use a ruler. The main stages of drawing a star have already been given. Below we will draw the trunk of the Christmas tree and decorate it with a large bow. The bow consists of two identical parts, which we place symmetrically on both sides. We also decorate the upper edges of gift boxes with large tied bows like roses or flowers. We draw everything with smooth lines. The edges of the bows go down onto the boxes.

Stage 6. Now you can shade the boxes a little and give them a certain color. On the bantu around the trunk we will also mark stripes.

Stage 7. Finally, let's start decorating the Christmas tree. Naturally, the Christmas tree only comes in green. different shades. The trunk is brown or gray. We make the balls on it multi-colored. The star can be red, yellow, blue. Gift boxes - according to your taste and desire. Look how beautiful christmas tree We did it! It would be New Year soon!

A decorated Christmas tree brings a festive mood to the house even in the absence of snow and frost. You can also draw it on paper if it is not possible to place an evergreen tree in the room. She will have non-standard shape, but the decorations will be traditional - plain glass balls, a ribbon bow and long golden beads.
Necessary materials:
- album sheet;
- eraser and pencils.

- Christmas tree with pencils
Christmas tree with pencils
Stages of drawing a Christmas tree:
1. Our forest beauty will be very unusual, because the shape of the trunk should be drawn at the initial stage in the form of an arcuate line. At the bottom we will add a small pot that is used for flowers.

2. At the top of the arc-shaped line, draw a chic bow, which will replace the central star. From the decoration we draw lines to the sides to determine the shape of the Christmas tree.

3. Draw the branches of the Christmas tree, which will consist of five levels.

4. Decorate the Christmas tree with round balls and beads, which we attach from one branch to another. We also draw the trunk in the form of vertical lines and around it there is a little artificial snow in a pot.

5. First of all, we use a light green pencil, which we use to paint over the prickly branches of the Christmas tree. Carefully apply strokes to the areas around the beads and Christmas balls.

6. Use red and burgundy pencils to paint over the chic bow at the tip of the tree, the pot and a small number of Christmas balls.

7. But let’s create the beads themselves in a golden color using yellow and orange pencils. We will also make several spherical toys for the Christmas tree in this color.

8. Use a brown pencil to paint over the tree trunk, and also work out the shadow on the red areas of the drawing.

9. Paint the Christmas tree with a darker shade of green, and create a shade of soft blue on the artificial snow at the base of the tree.

10. Now we use a sharpened black pencil so that every detail in the drawing has a neat and clear outline. In addition, we use it to create shadows in all areas of the winter illustration. If possible, very small details in the form of beads can be worked with black gel pen or 0.1 mm liner.
 Source: Drawing the contours of a Christmas tree
The finished drawing of a Christmas tree for the New Year will bring good mood and a charge of fresh emotions with its original look and bright colors.

If you find clear diagrams on how to draw a Christmas tree step by step with a pencil or paints easily and beautifully, then even those who have minimal artistic talent will be able to create a New Year’s tree. Among all the crafts and drawings that can be made for the New Year 2018, drawing a Christmas tree is the simplest.

IN this material we have given the two simplest ones step by step method How to quickly and easily draw a Christmas tree yourself. Even a child can master this scheme. But, if your baby is still too small, then you can draw the Christmas tree yourself and give your child his creation to color.
Important! If the task is to give friends, colleagues and family something special, made with your own hands, then you can create beautiful cards in tandem with your child or children. Have to take beautiful leaf paper, draw a Christmas tree on it with a pencil, and give the children paints, markers, crayons or other materials so that they can color it to their taste.
How to paint a Christmas tree in watercolor
A decorated Christmas tree with all kinds of tinsel and Christmas tree decorations creates a pre-holiday winter time Christmas mood. That's why it's so important to learn how to draw an evergreen tree with decorative elements for the New Year.
Necessary materials:
- watercolor;
Container with water;
Thin brush;
Pencil;
Eraser;
Ruler;
Liners 0.7 and 0.1 mm.

Stages of drawing a Christmas tree:
1. To create a Christmas tree, you should draw auxiliary lines for the design. To do this, first, using a ruler and pencil, draw vertical line. From its top we draw lines to the sides. So we get the frame of the Christmas tree on which we will hang beautiful star.

2. On the left side we begin to draw the branches of the Christmas tree.

3. We will also draw them with right side. Below we will add wide branches and artificial snow, which should look three-dimensional.

4. We begin to decorate the forest beauty and for this we take wide ribbons. We “lay” them carefully over the entire surface of the branches. Under the top of the tree, where there is already a star, add a voluminous bow.

5. Let's complement the empty spaces on the tree with beautiful lush bows, Christmas tree decorations in the form of glass balls and Christmas mistletoe. We distribute everything evenly to beautifully fill the branches of the evergreen tree.

6. Use light green watercolor to create the first layer on the Christmas tree. Use a brush to paint all the branches, including the top and lower branches at the base.

7. Mix an emerald green shade of paint with a drop of black on the palette. We get a dark shade with which we create a shadow on our Christmas tree.

8. Using strokes of blue paint diluted with water, we create a light shade of snow under the Christmas tree. Then we will intensify the color in some parts and clear the brush of blue paint, because now we should take yellow watercolor. So sunny color create Christmas decorations round shape and a star at the top of the tree. Now mix red, burgundy and dark brown watercolor to get a new shade for the ribbons and bows.

9. Using liners, we create a decorative outline and work out the details, creating volume and texture in the drawing with strokes.

10. This is how we get a watercolor drawing of a Christmas tree for the New Year. But painting with paints is not so difficult! Is not it?!
How to draw a Christmas tree easily and beautifully with a pencil

First, you can try to draw this simple tree. If it becomes difficult, you can turn to other diagrams, detailed photographs of which are given within this material.
To implement this method of drawing a Christmas tree, which is described, you will need to draw a triangle. Then make the top and downwards in waves to create the semblance of branches.

All that remains is to draw the missing parts of the tree, and then simply erase the auxiliary triangle of the tree, which was originally taken as a basis. Now draw a trunk, bucket or pot where our New Year's beauty will stand.
We constantly write “New Year’s beauty,” so don’t forget to additionally decorate your Christmas tree with garlands and New Year's toys, rain. All that remains is to color the sketch of this beautiful Christmas tree.
In order to use this method to cope with how to draw a Christmas tree step by step
pencil, easy and beautiful, you should start simply with a vertical line. It will immediately indicate the height and size of the tree. The height of this line is the height of the tree. It turns out that the longer the line, the longer and larger the tree will be.
Now you need to draw a star on the top of the line - this is the top of the New Year's tree. A standard-sized Christmas tree should have three levels. You should start from the top. It is drawn directly under the star in the shape of a mountain. Add jagged ends to this level. Now draw the second part of the tree, also make it jagged. The last, lowest and largest mountain remains, which imitates the needles and branches of a fluffy beauty. All that remains is to draw the trunk, which will be visible only at the bottom of the tree. Now decorate the New Year's beauty at your own discretion.

This is a beautiful and simple drawing. Of course, during the time of bright and magical New Year holidays, you can’t leave people bored just like this. Take paints, colored pencils, crayons and start decorating the Christmas tree so that it finally really becomes festive and elegant.
No. 3 (paints)
In this method, we will consider not how to draw a standard Christmas tree, but how to depict a stranded tree. Despite the fact that these trees differ little from each other. In the picture, the spruce will look more natural and natural. It’s as if they took it from the forest and immediately put it on our drawing.
Interesting! There are many myths about the appearance of spruce. For example, someone draws its shape based on an oval, others believe that only rectangles should be chosen, and still others insist on a triangle.

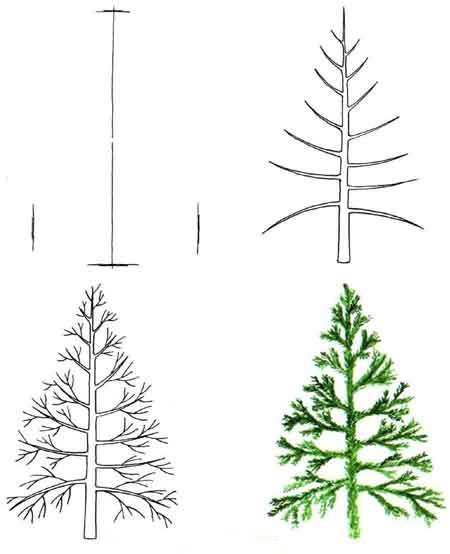
First you will need to determine the height of the tree and its general outline. Here you should focus on the pyramid and remember that at the top the tree is narrow, at the bottom it will be as wide as possible. Also, the higher the branches grow on the spruce, the shorter they will be on the trunk. So, first you need to distribute the branches on the trunk. It is better to start with the top branches, the first
order.
The lower the branches fall, the more massive they become. You can even use it to color them, green color more saturated, dark shade. You need to consistently draw branch by branch, draw small branches. But this is the only way to really achieve a real similarity between the tree in the drawing and what can be found in the forest. We offer.
These are the main options for how to draw a Christmas tree step by step with a pencil, easily and beautifully. If it is not clear from the description in words, you should just look at the photographs provided. There shouldn’t be any difficulties in drawing a cute Christmas tree. Have a good trip and may the New Year be beautiful and bright, and may the decorated painted Christmas trees delight you with their positivity and pleasant appearance.
I have chosen carefully several schemes for drawing a Christmas tree various levels of difficulty. Choose the one you like best.
Some of the schemes are in this video!
Method 1
Although the method is the most difficult, but this Christmas tree quite cute. And considering that all kinds of gifts are conveniently nestled under it, it’s absolutely wonderful. This diagram demonstrates how to draw such a Christmas tree step by step.
Method 2
And this is the real one forest beauty, lush, luxurious and so beautiful! I hope the diagram won't be too complicated for you.

Method 3
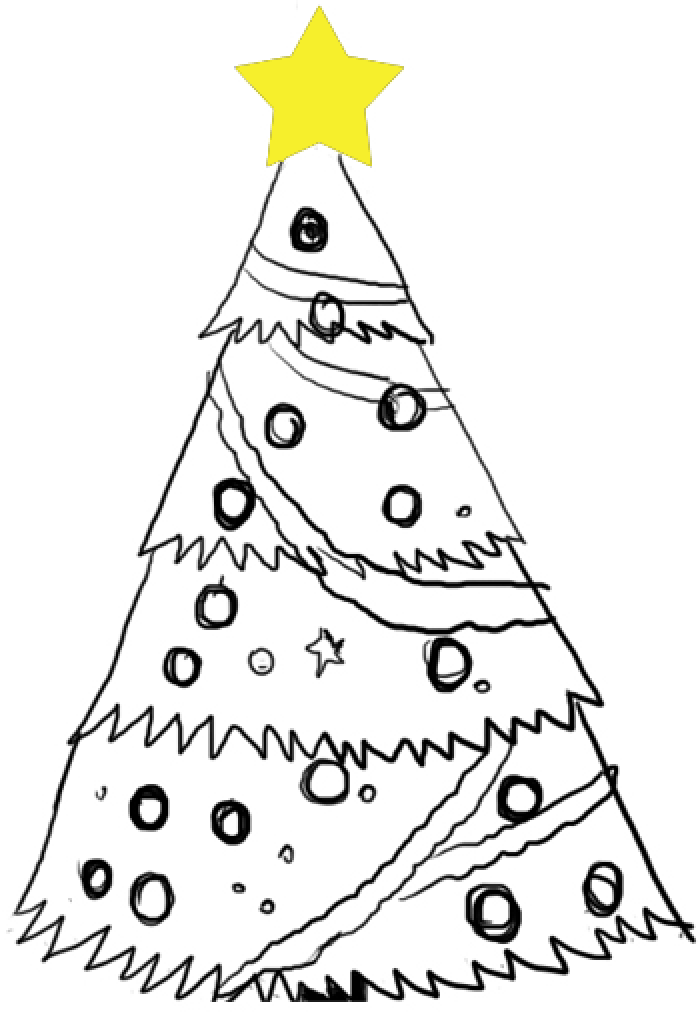
Here is another New Year tree with big asterisk. You shouldn’t forget about her either. This decoration has already become traditional!


Method 4
This diagram shows in great detail the process of creating a small New Year's masterpiece. First you need to draw a triangle, and on its top a beautiful star.

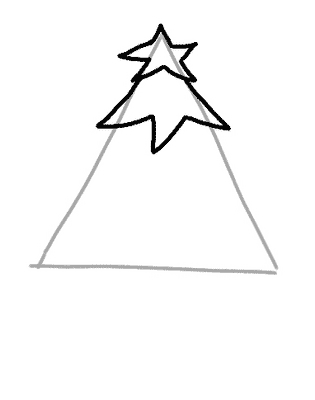
The Christmas tree needs to hold on somehow. I suggest putting it in a bucket.

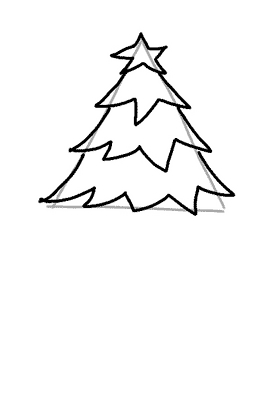
All that remains is to add some decorations, toys, bows and, of course, color. Carefully color the Christmas tree. That's all!


Method 5
This tree is based on a large triangle. Attached to it stand, branches, decorations.

Method 6
Another good scheme and again with gifts=)

Method 7
And this one is not bad, slender, curvy, easy to perform. But it's your choice!)

Method 8
The last diagram will help you learn how to draw a Christmas tree in the most naturalistic form.
It seems we have sorted out the Christmas trees. If you don't really love paint, you can make it from paper, cardboard or fabric. Interesting tips regarding how to do this you will find in.
Preparing for each New Year makes us think about everything in advance accessible ways transforming your home. To be honest, we are adults and don’t really rack our brains over various tricks related to holiday decor. We take money and go shopping in specialized stores, which provide a huge selection of New Year's products for every taste on the eve of the celebration. However, we should not forget about our children. After all, these are little creators of everything beautiful and interesting who strive to make the annual holidays much brighter, more original and unusual. Therefore, it is not enough for them to simply install a beautiful Christmas tree, hang a scattering of shimmering garlands and transform the whole thing with various shaped and colored toys. They want to decorate their home, classroom or kindergarten with hand-written drawings depicting your favorite fairy-tale characters, a sea of happiness, friendship and immense fun. Look at this marvel and your soul rejoices! But what if you and your baby are new to this work. Then we invite you to read our article, in which we provided 10 photo ideas on how to simply and beautifully draw a Christmas tree for the New Year 2019 step by step, using pencils, felt-tip pens and paints for this purpose. If any difficulties suddenly arise in the process of painting, our master classes will come to your rescue.
Christmas tree No. 1
This version of the drawing for the New Year 2019 will be quite simple and accessible for children's creativity. A little effort and, of course, patience, and your Christmas tree will outshine everything around you during the holidays. If your child preschool age, then it’s worth helping him in this work. With common efforts you will certainly achieve success. There are practically no difficulties in this process, plunge headlong into it art and see how beneficial it will be for your baby. So let's get started:
- Draw with a simple pencil triangle. Decorate the top of the triangle with a small star.
- Then break the triangle into three parts and make the upper part of a coniferous tree, which will consist of three branches - zigzags. Please note that it is not necessary to draw the branches too precisely, not quite straight lines will look even better. The ends of the branch lines must be connected to the star.
- After this, we finish drawing two more rows of spruce branches, and in each subsequent row of branches one more is added.
- You can make a small bucket under the last row of branches and attach it to the tree using two lines, which will become the trunk of our Christmas tree. The bucket can be decorated with a simple ornament in the form of simple multi-colored lines - straight or wavy; it is permissible to draw a surrounding ribbon with a small bow. It all depends on your imagination. Then, using an eraser, remove the auxiliary lines.
- On each branch of the forest beauty, draw a ball, also using wavy lines to depict multi-colored rain, several small lines converging at one point can symbolize carved snowflakes on the branches of the Christmas tree. Give the star at the top of the tree a sparkling effect. Our beauty is ready and it’s time to start decorating. We dress the Christmas tree itself in green. It is better to decorate the star with yellow, and transform the balls with an abundance of rainbow colors.
- Our dazzling Christmas tree is ready for the New Year 2019! Even if it doesn’t turn out exactly the same as shown in this picture, still praise your child and hang his New Year’s masterpiece on the wall. Let your baby feel like a real artist.


As a clear example, we bring you our video tutorial to make the work easier for little novice artists.
Video instruction: drawing a Christmas tree with a pencil simply and easily
Christmas tree No. 2

This version of the drawing with the image of a Christmas tree for the New Year 2019 is more suitable for children of school age, since small parts twigs used in this creative work, can only be displayed by adult children with some drawing experience.
Work process:
- Initially, you need to depict the trunk of a tree. Draw a vertical line from which draw down a little curved lines. Each of them should be a different size: small at the top, a little larger towards the middle and long at the very bottom.
- Let's start our art: draw small needles on each of the branches. We also complement our beautiful spruce with simple toys - balls, animals, beads, stars, bells and other elements of New Year's decor.
- After all the main elements are drawn, use an eraser to remove all unnecessary contours and auxiliary lines.
- Now we color the resulting drawing. Near the Christmas tree you can make holiday boxes with gifts.
- If you draw a Christmas tree against the background of nature, then its branches can be decorated with small snowflakes or a small snow cover - using a blue pencil, make a thin background on the surface of the fluffy branches. Near an elegant coniferous tree you can depict a small white hare and twelve months of brothers in a friendly round dance. In general, you have the right to display everything you like on your poster or postcard prepared for the New Year 2019.
Master class: drawing a Christmas tree quickly and very beautifully
Christmas tree No. 3

If you don’t know how to draw a Christmas tree for the New Year 2019 - with a pencil step by step for beginners in a short time, then we advise you to look at the option we have proposed. It looks quite original and is not at all difficult to do. You only need to use your imagination and attention to ultimately achieve beautiful drawing, which you can freely place somewhere on the wall at home, at school, or as a gift to your friends and family. So, let's begin to realize our secret desires:
- Before you start drawing, it won’t hurt to visually examine the object itself. Pay attention to the shape and size of the pine or spruce, as well as color characteristics. Color distribution plays an important role. Initially, determine the silhouette of the object. It resembles a simple triangle when it comes to simple shapes.
- Carefully analyze the elements - branches. Consider their length, location on the trunk and, in fact, the shape itself. As a rule, the branches begin slightly below the very top. That is why, when decorating it for the New Year 2019, we put a star on top of it, since it is almost completely bald.
- Now we return to the silhouette again. When drawing the branches of a Christmas tree, do not forget that they must completely cover the trunk so that it is not visible between them. It should turn out lush, and the branches should be thick. In this case, it will look beautiful and realistic.
- When it comes to toys, you can completely rely on your taste. Pay attention to how your parents or grandmothers decorate a coniferous tree. Borrow something from them, add something of your own, and get some ideas from the Internet.
If you don’t want to bother with the drawing at all, then use our video tutorial. He will tell you how you can quickly and easily create your own miracle - a creation using a computer.
Master class: drawing a Christmas tree using computer technology
Christmas tree No. 4

In addition to colored pencils and felt-tip pens, paints, of course, can serve as an excellent material for creating a charming drawing of a Christmas tree for the New Year 2019. And it doesn’t matter at all what they should be, whether watercolor or gouache. What matters is what result you are trying to achieve. And by the way, it will be quite realistic. See for yourself.
Work process:
- Let's take it Blank sheet paper or whatman paper, depending on what you want to achieve in the process of your creativity.
- With a brush we apply soft smooth strokes of blue, cyan and white, thus creating a winter background. You can use sparkles to transform the snow cover in this way, which shimmers in the light of the moon or sun.
- Next, looking at the photo presented in our article, you begin to depict the Christmas tree, using all the variety of shades of green. The strokes should be applied taking into account the shape of your tree. If you have a pine tree, then, accordingly, the drawing will turn out different - more lush, airy, and if your choice is still spruce, then completely focus on our visual creation, depicted in the form of a cone.
- Finally, it is also necessary to simply and simply form the decorations. The color scheme should fully satisfy your tastes. If such a desire arises, you can complement your skills with bright garlands entwined around the spruce tree and snowflakes, alluring with their twinkling. That's basically it! For New Year 2019, you will organize a pleasant festive atmosphere anywhere through several similar irresistible works. To make it easier for you to create, we recommend watching our training video, which will certainly be useful for you.
Master class: gouache Christmas tree against the backdrop of a winter landscape in stages
It's clear that new year posters or postcards are not complete without our loved ones fairy tale characters, such as Father Frost, Snow Maiden, Snowman and much more. But what to do if it’s not entirely possible to portray them effectively and believably? Then our video tutorial will come in handy for you.
Master class: drawing Santa Claus with pencils and felt-tip pens step by step
In the same way, this character can be decorated with paints. It will look pretty good and fun.
Master class: Snow Maiden with pencils and felt-tip pens step by step
This is how exciting and very easy you can create the most beautiful poster on new year holidays with your own hands. At home, such drawings will cheer up all family members, and especially small children.
Trivial mistakes
To know for yourself how to draw a Christmas tree for the New Year 2019 - with a pencil step by step for beginners quickly and accurately, you should take into account some nuances that play an important role in its aesthetic appearance. I would like to note that many people make several mistakes when drawing a coniferous tree, and all of them are typical. These errors are not at all fatal, but they result in a completely unnatural drawing. Below are some basic tips.
- Do not draw branches from the very top. She must be bald. Step back some distance from the beginning of the top and start painting.
- You shouldn't make all the branches the same length. Otherwise, the silhouette will not resemble a triangle, as it should be, but a rectangle. Remember that towards the bottom the length of each branch should gradually increase.
- There is no need to increase the length of the branches too quickly. A silhouette that is too wide will also look unnatural.
- Try to draw the edge of the tree not too smooth, as it will look regular, and even artificial.
And finally, we provide a few more photos of ideas for a forest beauty that you can easily draw at home.


