We recently looked at seven simple watercolor painting techniques, and if you've mastered them, then it's time to move on to something more complex and interesting. Today we will look at six more interesting techniques that will help you create your own masterpiece.
Spray
We wet the bottom of the paper to see what would happen.
This technique is quite simple. Just put paint on the brush and start tapping the bristles of the brush on your finger so that the splashes scatter chaotically
If your brush is too wet, it will be difficult to control the splatter. Therefore, shake a few drops off it, and only then get to work.
If you don't like hitting your fingers with the brush, you can use any improvised means, a pen, for example.

Before we start splashing our paint, we'll place some pieces of paper in the top corner of our canvas.
We also wet the bottom edge of the sheet clean water and painted it light purple.
Find an old toothbrush, rinse it and remove any remaining toothpaste. And get ready for chaos.

There are several ways to get paint onto your toothbrush. You can dip it in paint, which makes it very difficult to fill the bristles with paint. You can try filling your toothbrush using a brush. This way you can control the amount of paint.

Take a toothbrush and swipe thumb along the stubble. You can also use improvised means. Choose a tool that you can use to spray paint off the bristles. Notice how the speed of your movements and the distance of the brush from the paper affect the paint atomization.

When you want to spray paint of a different color, rinse your toothbrush thoroughly and dry it with a towel.
Don't worry if you don't get this technique as well as you'd like. Practice and you will succeed.

As you can see, it turns out to be quite an interesting effect. Use the available tools that you have, use your imagination and be creative in your drawing.

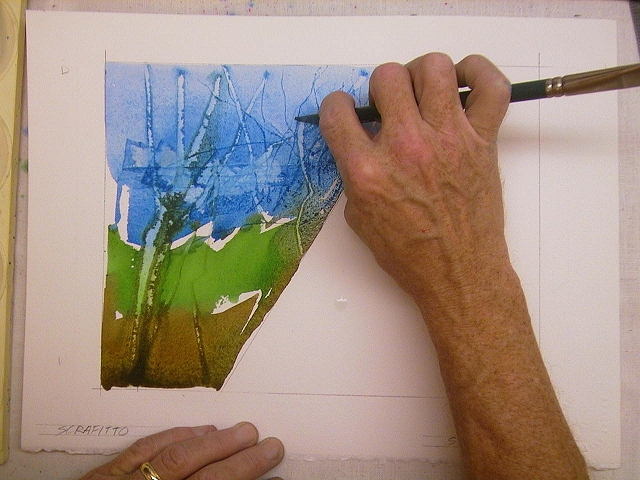
Sgraffito and stamps
Sgraffito is an Italian term that refers to a scraping technique associated with wearing away the top coating of pottery to expose the layers underneath.
In the example, we scraped off the paint using a pocket knife. If you scrape off paint that has not yet dried and has soaked deep into the paper, you will get dark lines.
If you use this technique wisely, you can use it to create interesting landscapes, scraping out the shapes of trees and other flora.

You can use old ones credit cards to scrape off the paint. Use a smooth side card to sweep away any remaining paint.

Many brushes have a pointed edge. You can use these brushes to create fine lines.
It is very important to understand at what interval you need to start scraping. Practice on a separate sheet of the same paper and with the same colors.
A stamp is the application of paint by pressing other objects onto paper. You can choose any material to create stamps. Try everything you can get your hands on.
In this example, we are using facial tissues. Fill them with paint and stamp on the top of the paper.

You can also use a sponge. With its help we will depict grass.
You can play with textures using various materials. Experiment!

Don't be afraid to use body parts for stamps. Everything can be used!

Washing out
Relatively simple technique will help you create unusual and interesting textures.
First, cover the top of the paper with blue paint.

Then quickly paint the rest of the canvas red. This is what our drawing will look like at this stage.

Now rinse your brush thoroughly and refill it with clean water. Light movements brushes, sprinkle drops of water onto the still wet paint.

Continue spraying water until you are satisfied with the result.
How far the paint has dried can be determined by the force of the water on it. Notice that the more water applied to the same area, the lighter the color of the paint became.

Don't be discouraged if you can't control the blur. You most likely will not succeed, since it is quite difficult to influence this process.

Experiment with the amount of water, colors and how dry the paint is. This technique can help you create an interesting and textured background.

We use alcohol
You will need cotton swabs and alcohol.

Paint your sheet thickly with paint.

Create the background color you want and get ready for the fun.

Dip cotton swab into alcohol and start dripping it onto the paint.
Alcohol, when it gets on the paint, repels it, creating a light spot.

Try dripping alcohol onto the paint as it dries to see the effect.
It turns out quite nice, doesn't it?

This interesting technique allows you to create unusual textures.

We use salt
Obviously we will need salt for this technique.

Let's draw the sky and the hill.

Our second hill will be raspberry in color, let's mix it a little with the first hill to get an interesting transition.

Now take salt and sprinkle it on our drawing. After a few minutes, add a little more salt. It pushes the paint away from itself, creating an unusual texture.

Let's wait until it all dries and see what happens next.

Once the design has dried, the effect the salt created becomes more visible.
Shake the salt off the drawing and enjoy the result.

It is better to use a sponge to brush off the salt. This way you don't damage the paint. Clean the drawing with light movements, try not to rub it.

The salt absorbed the paint, creating a huge number of star-like specks.
It is worth noting that coarse salt will leave larger specks, and fine salt will leave smaller ones.

Encyclopedia of blots.
Blob-nature is thin, flexible and varied.
You can create a blot big amount ways.
Classic round.
A drop drips from a brush positioned vertically above the paper. If you shake your hand slightly in a vertical plane, the speed at which the ink falls onto the paper will increase. The impact will make the blot look delicate and welcoming. The larger the brush and the larger the drop, the more expensive the stain.

Widespread.
If you put ink on your brush and quickly wave it over the sheet, moving your hand in a horizontal plane, you will get a very dynamic blot. The stronger the scope and more sheet, the more energetic the spot.

Leak.
We do the drip like this: after applying the drop, we lift the sheet of paper vertically. The drop quite naturally grows legs and tends to flow away from the leaf.

Hairy.
The shaggy blot is made with a semi-dry brush. If you use a flat synthetic brush you can get neat strands.

If it's squirrel, we'll get soft fluffies.

Symmetrical.
It is done like this: fold the sheet in half. We apply a blot on one of the halves. We close it with the other half and press it. We dry the resulting stain on the spread and put it to use.

Picturesque.
If you drop mascara onto glass or another smooth surface, and then press a sheet of smooth paper on top, you will get a stain with a variety of natural landscapes. And they are usually very picturesque.


Ornate.
We lower the thread into the mascara. Place it on one half of a sheet of paper folded in half. Leave one end of the thread outside. Close and move the thread inside, slowly pulling it out. We get an elegant crystal blot.


Spray.
Dip a toothbrush in mascara and move it along any ribbed surface over a sheet of paper. The edge can be a ruler, a comb, or even a mascara cap. A huge number of small droplets fly from the brush onto the paper (including onto everything around us, including our face and hands).

Comet.
If you smear wet spots from the spray with a dry brush
we get a flock of dynamically hurrying blots.

Branched.
If you start blowing vigorously on a classic blot, it will begin to grow branches and eventually transform into either a bush or a sorcerer oak. Depends on the strength of our blow.

Wax.
If you put a wax design on a sheet of paper,
and apply ink on top to get a combination of torn black and white spots.

Openwork.
Apply some ink onto the wet gouache background.
We get an openwork blot with many arms, legs and antennae.


Wet.
On the wet surface of a sheet moistened with water,
Spray the ink and get blots with soft petals - tentacles.

Salt speckled.
If you pour salt on a blot, it will immediately turn into the sky, and there a crystal will fall, and a star will form. Suitable for drawing galaxies.


Round with iridescence.
If you add shampoo to the mascara and blow a soap bubble from this solution onto a sheet of paper, you will get an excellent round blot with a halo of small specks. It is in them that the bubble turns into after it bursts. However, we will get it in all its glory.

Horned.
If you blow on this burst bubble from a tube, we get a blot with horns.

Printed.
A print can be made with anything.
Dip your finger into the ink and press it to the paper. The fly wants to fly!

So we got a dozen or so. I'm sure there are others too.
I will update the encyclopedia as I learn more amazing world wild blots.
I hope my selection inspires someone!
To the old ones good times When quills were used for writing and had to be dipped in ink, making a blot on paper was as easy as shelling pears. It was enough to gape a little, not completely shake off the pen, or simply jerk your hand carelessly, and the letter would be ruined. There was a huge blot on it, indicating that the work would have to be rewritten. Nowadays, only people who are passionate about rarities write with a pen in order to feel the atmosphere of the past.
Fountain pens vs fountain pens
IN Soviet times appeared that needed to be refilled with ink yourself. Confusions with blots occurred less frequently, but were not completely eliminated. Fountain pens, like their predecessors, continued to spoil writing, forcing people to redo, rewrite, and tear out damaged sheets. Now that the fountain pen rules the roost, it is almost impossible to see a blot. Such an event can only happen in emergency situations, for example, if the rod leaks in hot weather. Children began to forget what a blot is, because a fountain pen is convenience and practicality.

Blot in cartoons about schoolchildren-idlers
In many loved ones by all of us Soviet cartoons There are episodes about would-be students when a schoolboy writes an ink in his notebook. Doing homework, which already seems difficult to him, the character begins to get terribly angry because of the incident that happened. Modern children, watching old cartoons, wonder what a blot is and where it comes from. It is difficult for them to understand the whole mechanism and history of the formation of a blot, because the fountain pens they use do not flow. Here, as always, parents come to the rescue, who can not only explain everything clearly, but also clearly show the child, using paints, gouache or watercolor as an example, how to draw a blot. Learning new things is much more interesting if you do it together.

Collaborative creativity
The shape of a blot resembles a blurry spot of paint or ink. The most accurate way to explain it to a child is in several ways, for which you will need a sketchbook and paints, a brush and a simple pencil:
- The first method is with a brush and paints. Having dipped the brush in water, and then thickly smeared it with paint, you need to lift it above the album sheet and wait until a drop of color falls on the sheet. Under the force of its weight it will take on a unique shape. It’s easy to draw a blot; even a one-year-old baby can handle it.
- The second way is using a simple pencil. How to draw a blot with a pencil? It’s simple, if you’re not afraid and show a little creativity that are inherent in each of us. To do this, you just need to reproduce on paper circles or ovals that are uneven in shape and proportions. This should be done by including imagination in the work, because each blot is unique. Inexperienced artists may think they are the same, but this is completely misleading.
- The third original way of drawing blots would be this: first, you should completely paint a landscape sheet or any canvas intended for work with uniform paint. Then you should dip a clean brush in plain water and, without shaking it off, hold it over a previously decorated sheet of paper. A drop of water will certainly fall on the canvas and leave a mark in the form of a blurry place. This will be the blot. This method answers the question of how to draw a blot with clean water. Using it as a competition at events, you can long time to captivate children, and this, as we know, is very valuable.

How to draw a blot and turn it into a masterpiece?
That's not all. The resulting blurry spots can easily be turned into funny monsters or wonderful jellyfish. After clearly explaining to your child how to draw a blot, you can begin this more exciting activity. This is easy to do by adding a few original details: eyes, nose, mouth. You can draw whole families of similar monsters or make them all different. Everything is decided by imagination and imagination. Drawing is easy when you do it in good mood and in fun company. Such interesting joint creative events are also good to hold in large children's companies, for example, at some kind of holiday. Children will have great fun laughing at each other's original masterpieces.
Draw with your children and the whole family - it's exciting and funny.
Blotography is a painting technique based on spontaneous spots and splashes.
It can be used for different purposes.
- To create decorative backgrounds (in postcards, for example)
- For exercises to develop imagination
- For art therapy – pulling out images of problems from the subconscious and transforming them
- To create works of art.
More materials on the topic:
I’ll tell you about the last point another time, but for now let’s try what blotography is.
Materials:
In order to do blotography, you need paper. Lots of paper. Because the process is exciting, and you want to “stain” as much space as possible. Therefore, take a pile of simpler paper - gray for writing or white for the printer.
You also need ink or ink. If they are not there, then they will do watercolor paints. Take a larger brush. Even a paint brush will do.
Preparing the workspace:
Before starting the process, cover the table surface with newspapers or film. Perhaps everything around will also have to be covered so that the splashes flying in all directions do not stain the interior. It would be a good idea to protect your clothes with an apron - mascara practically cannot be washed off.
Start painting with watercolors today!
Master the basics of watercolor painting with this popular course
“Taming Watercolor”
Blotography, technique for creating blots:
Now that everything is ready, you can start going crazy. 🙂
- Put some mascara on the brush and shake it onto the paper to make blots. Beauty?
You can impulsively move your hand over the paper, you can simply drip ink, you can tilt the sheet so that the ink flows in different directions. You can also blow on drops of paint, and they will spread in beautiful drips. It is convenient to take a cocktail straw for this.
Here are a couple of spots that I ended up with.


The first one reminds me of a flower. And the second causes some unpleasant associations with internal organs... True, it still looks like a bean with a sprout...
I invite you to play mindlessly with your blots. This is exactly what was forbidden in childhood. And now we are adults and can afford to be a little naughty and fall into madness... :)
Let go of your hand and let it paint whatever it wants. Let the subconscious, through body movements, spill out what it needs.
Spontaneous splashes and “blown” blots, of course, have little to do with the work of the subconscious, but they decorate the graphic sheet well. So try both. IN different options, and on one sheet at the same time.
So, what is next?
- After you've played enough, take a break and look at the works. Choose those that tell you something or represent something interesting compositions from spots.
- Now you can use your imagination and complete the paintings with a few neat strokes.
This is what happened to me.

The second work with the “organ” I first enlivened with a flower sprouting from a seed. The result was still not pleasing, so I shaded the black and white image with color. In graphics this is quite acceptable.
This picture clearly has an art therapeutic focus.
Such works are important not for their artistic side, but for what they mean to us personally. They require us to make adjustments to them until we are satisfied with the changes that have occurred in them. In this way, we seem to give our subconscious a way to solve the problem.

But the picture with a flower was important precisely as a pictorial motif. I finalized it by drawing a flower stem, stamen, and caddis dragonfly. This one can be hung on the wall. 🙂
I hope that you have a similar method of creating graphic images you'll like it. After all, they have something that attracts attention so much - the energy of movement, the play of spontaneity and awareness.
The blotography technique can be successfully used to create completely artwork. Such as we do in the “Watercolor Fantasies” course:

 The watercolor technique includes many different techniques that awaken your imagination and help you unleash your inner Artist.
I want you to try your hand at watercolors and fall in love with this wonderful medium.
Therefore I suggest you
Drawings from blots are a great idea that can diversify your creativity with your child. It was suggested to us by the talented St. Petersburg artist Sergei Rublev. For Galka-Player, Sergey has prepared a small master class that will allow you and your child to create your own unusual (and probably more than one) painting from blots. Try it, it's not at all difficult, and the result can be very impressive.
First, a little background. Last summer I spent a lot of time in the company of my nephew Mark, who was 4 years old at the time. When we were once again looking for something to do, I remembered watercolor blots, and we got down to business. And we got so carried away that in a couple of hours we ended up with about 50 blots. And it’s not so easy to get Mark interested in something, especially for a long time!

Later, while cleaning out my closet, I came across our artwork and decided to complete it with ink. So the blots turned into a series of urban and seascapes, and after several years of working and drawing on the computer, I fell in love with watercolors again.

Do you also want to try to create your own little masterpiece from blots? This will be interesting for children (and adults as well) different ages (Editor's note: with kids we use the “hand to hand” technique; it could also be great idea for mom's creativity). The technology is quite simple, and materials for creativity will probably be found at home.
1. We will need watercolor paints, 6-12 colors are enough. The paper can be any kind, for example, my nephew and I drew on ordinary office paper. It is best to take large brushes; they are easier and faster to paint over the sheet. A jar of water and a rag or paper towels will also come in handy.

2. Before drawing, fold the sheets of paper in half: on one side we will draw, on the other we will make a print.

3. Wet the brush with water and take the paint. There should be enough water so that the color spots can mix on the paper, then you will get a beautiful transition between colors. I recommend using no more than 3-4 colors, then the spots will turn out bright and saturated and do not risk turning into dirty gray.

4. When one side of the sheet is painted, you can fold it in half.

5. Smooth out the folded sheet to make the print clearer and brighter.

6. The blot is ready. Let's put it aside for now to dry, but for now you can do the next one.

7. When the blot has dried, we can finish drawing it with felt-tip pens, pencils and a gel pen.
How can we “revive” our blot? The plot can be thought out in advance or further imagined when the inkblot is ready. In the first case, it could be a flower, a butterfly, the sun or a heart (by the way, interesting idea for Valentine) - something symmetrical. Then you simply apply half of the desired design onto half of the sheet.


