For a child, drawing is nothing more than an expression of knowledge about the world around him. The child acquires most of these skills during play. Drawing in any form is incredibly beneficial for a child’s development and contributes to his comprehensive development, allows you to acquire the ability to persevere, develops patience and attentiveness.
Most children are most interested in images of all kinds of animals. One of the first sounds that a child learns to pronounce is an imitation of how a dog, cow, frog, cat, horse, and other animals “speak.” Later, the baby begins to study images of animals in books. Therefore, it is not surprising that he wants to draw, first of all, animals.
Drawing a rabbit step by step
IN this material I would like to tell you in detail how to draw a rabbit step by step with a pencil. After all, this kind of drawing can be the easiest for a child to understand. The child will definitely enjoy this activity, because he has already seen such an animal many times in books, coloring books, and cartoons.
Preparing the drawing
In order for the image of the rabbit to be proportional, it is necessary to prepare the drawing in the form of preliminary markings. For this purpose, the image of geometric figures is used, which schematically represent individual parts of the animal’s body.
To draw a rabbit correctly with a pencil, first you should draw it in the middle of the sheet vertical line. This will allow you to depict the future contours of the rabbit’s body, legs, and head in the form of intersecting ovals. If you have basic drawing ability, parents can try to draw ovals by hand. However, if a child is directly involved in drawing, then it is better to use round objects for this, which will allow you to depict ideally shaped circles.

When demonstrating to a child how to draw a rabbit step by step with a pencil, you should not draw too thick outlines. After all, if there are light strokes, the drawing can be easily corrected or redrawn by removing unnecessary elements from the sheet.
Contours in the form of ovals may be inclined in a certain direction. The largest oval will act as the outline of the rabbit's future body. Accordingly, the small ovals drawn on the side will become the head and limbs of the animal. It must be borne in mind that an adult rabbit has a very small head compared to its body. Therefore, the main oval for depicting the torso should be at least 3-4 times larger than the size of the head contour.
How to draw a rabbit's paws and ears correctly?

Draw the rabbit's paws and ears carefully and slowly. The ears should be shown straight and somewhat narrowed at the top. If desired, you can draw them hanging, lowered down. Showing how to draw a rabbit to a child on at this stage should be trusted with the most simple work, namely, an image of the paws and tail of an animal. All these details are added to the schematic oval of the future head.
Detailing the rabbit's head
The head should be drawn, highlighting the flat forehead of the animal. To do this, it is enough to sharpen the corresponding auxiliary oval. You can add brow ridges to the design.
Particular attention should be paid to the eyes, which in a rabbit are located on opposite sides of the muzzle. Therefore, you should not depict them planted straight, which will look extremely unaesthetic, not to mention the plausibility of such a design.
When demonstrating to a child how to draw a rabbit step by step, it is necessary to give the animal’s eyes the shape of several elongated ovals, pointed at the corners on opposite sides.

At the intended location of the nostrils, it is enough to draw two lines diverging upward. Next, the outlines of the animal’s muzzle are rounded at the nose, and cheeks are depicted under the eyes. You can also round the bottom of the head, thus highlighting the jaw. Finally, mustaches, eyelashes and eyebrows are drawn in the form of bold lines diverging to the sides.
Having completed the above tasks, you can begin to remove all unnecessary, schematic lines. After this, the rabbit drawing will be almost ready.
Finishing touches

When finishing showing your child how to draw a rabbit, you need to pay attention to the image of the animal’s fur skin. Most simple option her images can become simple shading contour lines. If you don’t plan to paint the animal with colored pencils or paints in the future, you can simply draw shadows soft pencil. The addition of landscape elements, such as trees, flowers or grass, will make the drawing come alive.
Coloring the picture
When starting coloring, do not forget about the variety of colors of rabbits. The best option may be an image of an animal with a multi-colored fur coat. When trying to draw a rabbit with a pencil, you can use gray, brown and white colors. Eyes should be shaded with a combination of brown, black, yellow and red.
Eventually
If a child does not know how to draw a rabbit correctly, and his drawings come out somewhat awkward, with uneven lines and poor proportions, parents should under no circumstances laugh at such creativity. On the contrary, any efforts of the child, regardless of the result, should be encouraged. Only in this case can we hope for the child to develop an interest in drawing.
Even if in the end it is not possible to explain to the child how to draw a rabbit according to successive stages, the lessons will certainly not be in vain, because reflecting ideas about the world around them in the form of drawings is extremely important for the development of children. With the help of pictures, many children express what is difficult to explain in words, demonstrate their desires and report on things that bother them.
At the same time, drawing under duress usually does not bring the expected results, but only discourages children from any desire to develop their own artistic abilities.
A sweet little white fluffy creature - the domestic rabbit. A rabbit is the same as a hare. The only difference is that the hare is a wild animal, and the rabbit is a domesticated breed. Rabbits live in cages in yards or on farms where they are raised. Rabbits have very long ears and soft warm fur. They are very voracious and need a lot of food per day. If you look at a rabbit in a cage, you can always see him chewing. He eats and eats all the time. Rabbits are also extremely fertile. One female rabbit can bring up to twenty rabbits at a time. They grow quickly, gain weight and develop. A rabbit has very developed and sharp teeth, and when caring for it you need to be careful, because a rabbit can bite your hand very painfully. Let's draw this cute animal - a rabbit, step by step with a pencil.
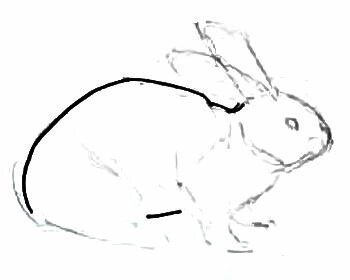
Stage 1. Draw the initial sketch lines of the rabbit's body. This is a thick oval, quite large, this is directly his torso. And in it we draw a small oval - this is the head with two straight lines of ears extending

Stage 2. Let's now begin to outline the line of the rabbit's body. We show with a thick line its back and in front the features of its muzzle and bent legs.

Stage 3. Here, along those straight lines from the first stage, we draw the lines of the ears. These are slightly curved features that create bunny ears that are pointed at the top. Make these lines clear and quite bold. A rabbit's ears are always quite well developed. These are his hearing organs. A rabbit can turn its ears in different directions.


Stage 5. Now let's draw the shape of his ears. On the initial lines of the ears we will draw a few more, which will precisely clarify the shape. Show that the ear has and inner part, looks like a locator. Separate the front part of the muzzle from the body with a line and draw the rabbit's eye on the side of the muzzle.

Stage 6. Mark on the front end of the muzzle long mustache, sticking out in different directions from the spout. There is a small groove under the nose that goes towards the mouth. Under the bottom of the rabbit we will draw its paws looking forward. Let's point our fingers at them.


Stage 8. Remove unnecessary lines and leave only the necessary ones. There is no need to color the rabbit in particular, because it is white. Although they can be black or gray. Let's color the bow blue.

How to draw a rabbit? Let's draw a rabbit realistically.
Having written an article about how to draw a skunk, I lovingly looked at the animals: a squirrel, a chipmunk, a turtle, bunnies... Eh, perhaps I’m wrong here - well-fed, eared animals, probably... rabbits. ABOUT! - This is a clear SIGN - it’s time to learn how to draw a rabbit and, finally, learn to distinguish between hares and bunnies.
The rabbit is a lagomorph and looks very similar to a hare. Well, this can only be noticed if you know what a hare looks like. City residents still mostly have the opportunity to observe rabbits up close - they are tamed, often kept in living areas or simply on the farm. The hare is still not tamed and is wild (respect to the oblique one, that’s right, there is no point in bending to the changing world).
We have already become familiar with drawing a hare, today we are mastering the rabbit. These animals are generally smaller than hares and thicker than them. Rabbit ears are proportionally shorter than hare ears.
These little animals, like hares, move by jumping and, when necessary, very quickly (read Seton-Thompson’s “Jack the Warhorse” - I will never tire of admiring the stubborn love of life of the Jack rabbit).
But for now we will draw sitting rabbits - we have three of them in line.
The second goal of today's lesson is to draw coloring pages of rabbits - this is also a very frequent and popular request, so we will answer it with good, expressive coloring pictures.
Let's draw a rabbit - side view

The first rabbit sits close to the ground, with its side facing the viewer. He rests on all four paws, his back is arched, his head is raised. We start with a pencil drawing.
Although the animal has tucked its paws under itself, and the fur hides its structure, I beg you not to succumb to the temptation to simplify the image to reduce it to several geometric shapes. On the contrary, try to be sure to be aware of and outline the internal structure of the rabbit - honestly mark the folds of the paws.

And draw the details of the head:

The rabbit coloring page is ready, and again, when you color, please remember the direction of the shading - along the fur.

The second rabbit is turned towards us “three quarters” - this position will be more interesting. Let's draw in stages. First, of course, a large, well-fed body.

Then the bent legs - the hind legs, even in a sitting rabbit, are noticeably longer than the front ones.

And now it's time to draw the head. You have to believe the evidence of the photograph - the view is the most cartoonish. The forehead is already round cheeks, big eyes, triangular nose and small mouth. Ears - in two bags (hares, by the way, have much more spoon-shaped ears). This is what we got for the second rabbit coloring page:

Drawing a rabbit - front view

There will be no difficulties with drawing the torso and legs:

We offer you a choice of wonderful drawings of gray rabbits, which you can draw step by step with pencils with your baby.
- black marker;
- black pencil;
- a simple pencil;
- eraser.
3 options for drawing rabbits
Our first rabbit will be shown in the profile.
1. So, take a simple pencil and draw the torso. 
2. Now let’s draw a tail in the form of a small semicircle and an eye. 
3. Let’s add big ears, mustaches, cheeks and thighs to the rabbit. We depict everything in the form of simple lines. 
4. Now we will outline each line with a black marker. Use a black pencil to decorate the rabbit a little. This is how we made this wonderful rabbit with colored pencils! 
Let's move on to the second option: now our rabbit will have its back to us.
1. To do this, we will depict his torso in the form of a large circle. In the middle we will draw a small circle, which will be the tail. 
2. The rabbit's head is almost invisible to us. Therefore, let's draw it in the form of a semicircle. Let's also draw the antennae. 
3. And then – long ears. 
4. Outline the rabbit with a marker. 
5. Draw with a black pencil. This completes the second rabbit! 
It remains to complete the third drawing, where the rabbit will be turned to us with its front side.
1. Draw a circle with an oval in it. 
2. Draw the ears at the top. 
3. Draw the paws in the form of small ovals. 
4. Draw eyes, nose and mustache in an oval. 
5. Circle everything with a marker. 
6. Let's draw with a black pencil. The rabbit drawing is ready step by step! Now you can choose your child's best creation and place it in a frame. 
In today's master class, we will learn step by step how to draw a cute rabbit holding a large carrot in its paws. Such a funny drawing will definitely delight all the children with its bright colors.
When depicting this animal, a large number of colored pencils are used, but you can easily color the drawing with several primary colors.
Required materials for drawing:
- a simple pencil for sketching a drawing;
- colour pencils different shades: red-yellow, pink-beige, green and gray-blue colors;
- paper;
- eraser.

Stages of the rabbit image:
- Draw the silhouette of a carrot. In the middle of the figure, use stripes to create the texture of a root vegetable.

- At the top of the carrot we will draw curly leaves. Just two or three sheets will be enough.

- Now let's outline the silhouette of a rabbit with right side. The head will be at the level of the top point of the carrot. Next we will draw the long ears. On the sides of the body we will draw the legs, where the upper ones will hold the root crop. The tail will be fluffy. We will create this effect using an arc-shaped contour.

- Let's draw all the missing elements on the muzzle - a large nose in the form of an inverted rounded triangle, a mouth and small eyes.

- Let's move on to colored pencils. Let's completely decorate the carrots yellow. This will be its main color.

- Using an orange, red and boron pencil, we will first outline the root vegetable, and then blend it and add volume.

- Use a light green pencil to color the carrot leaves. In some parts, you can apply more pressure on the pencil to enhance the color and give the leaves a rich shade.

- We use two other colored pencils in green tones to work out the outline.

- We outline the silhouette of the rabbit's body with a black pencil. We will also work on the features of the muzzle with this color.

- Using pink and red pencils we will create desired color for the rabbit's nose.

- We will decorate the rabbit with flesh-colored and blue pencils.


