Master class: “Drawing spruce using watercolor technique”
Author: Knis Anna Nikolaevna, senior teacher.
Place of work: MBDOU "Kindergarten No. 3 "Smile", Kalach - on - Don.
Description of work: I bring to your attention a master class: “Drawing spruce using watercolor technique” for children 5-7 years old. The material may be useful to educators, children and their parents, teachers additional education, teachers.
Purpose: The drawing will serve a good gift, can be used for interior decoration.
Target: Drawing spruce using watercolor technique.
Tasks:
- Teach children to draw a spruce, achieving an expressive representation of the needles (drawing with the end of a brush);
- Improve skills and techniques for working with watercolors.
- Cultivate accuracy during work;
Spruce

Spruce is an elegant, slender tree. One cannot help but admire its crown, which has the shape of a regular narrow cone. This cone is especially pronounced when trees grow freely, not cramped. The long lower branches bend somewhat towards the ground, as if they are unable to bear the heavy load of needles. The top of the tree is always sharp, it never becomes dull, even when the tree is old. The crowns of the fir trees look like the tips of giant peaks aimed at the sky.
Spruce is a symbol of courage, boldness (to the point of insolence, recklessness), high spirits, fidelity, immortality, longevity, arrogance, and royal dignity. IN Ancient Greece spruce was considered the tree of hope. The Christmas tree symbolizes the beginning of the annual cycle and life in general. fir cone- a symbol of the fire of life, beginning, restoration of health. Spruce is an amazing plant: it can be used to treat various diseases entirely. Cones, needles, branches and buds have unique beneficial properties. Essential compounds boast bactericidal and antiviral properties. As aromatherapy, spruce essential oil is used for diseases of the upper respiratory tract, as well as to improve immunity and prevent acute respiratory infections. In addition, spruce oil can eliminate stress and nervousness, enhance the protective properties of the skin and increase the overall tone of the human body. While indoors, a short time essential compounds of spruce neutralize harmful microorganisms, filling the house with oxygen and a healing microclimate and weakening electromagnetic radiation from household appliances.
Spruce is widely used in the national economy. Its wood is in large quantities goes, for example, to make paper. In our age of rapid progress of civilization, the need for paper is extremely great and a huge amount is needed. Statisticians have calculated: in one year, all countries of the world produce so much paper that if one whole sheet of normal thickness is made from it, it will have fantastic dimensions - you can “wrap” the entire Earth like a wheel of cheese! Spruce accounts for the majority of world paper production.
Materials and tools:
- watercolor paints;
- brushes No. 12, No. 2, squirrel;
- drawing paper;
- a simple pencil, eraser;
- watercolor paints, sippy cup;
- frame for decoration.

Stages of work:
We take a simple pencil and drawing paper, which we place vertically. Let's start drawing the spruce from the trunk. Its trunk is straight and thin.

We will draw the branches in three tiers. We draw the first tier from below with straight lines emanating from one point on the trunk, as in the figure.

We draw the second and third tier similarly to the first, shortening the lines of each tier.


Add a horizon line.

Using a wide brush, paint the sky with blue watercolor.

We paint the ground with light green watercolor.

Using brown watercolor we draw the trunk of the spruce tree.

We draw the branches with dark green watercolors.

Using the end of a thin brush and dark green watercolor, draw the needles on each branch. The thicker the needles, the more magnificent the spruce we will get.


For splendor, add small twigs to the branches.

Draw the needles.

We draw young needles on the tips of the branches with light green watercolors.

Using black watercolor we add a shadow on the trunk.

Use dark green watercolor to paint the grass in the foreground.

The spruce drawing is ready. We put it in a frame.

Spruce
The common spruce is arrogant from afar,
and nearby is a cozy house...
Here we will wait out the rain.
Yu. Nasimovich.
I have chosen carefully several schemes for drawing a Christmas tree various levels of difficulty. Choose the one you like best.
Some of the schemes are in this video!
Method 1
Although the method is the most difficult, but this Christmas tree quite cute. And considering that all kinds of gifts are conveniently nestled under it, it’s absolutely wonderful. This diagram demonstrates how to draw such a Christmas tree step by step.
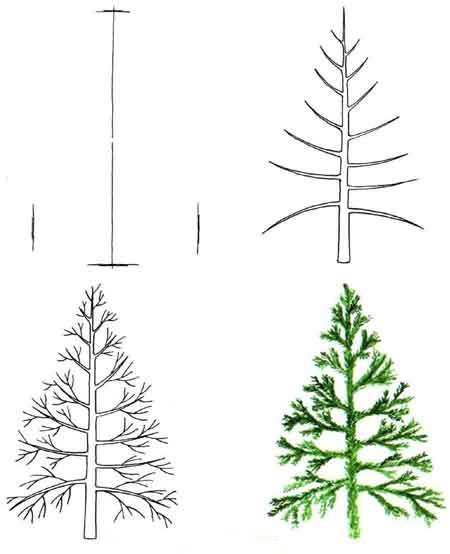
Method 2
And this is the real one forest beauty, lush, luxurious and so beautiful! I hope the diagram won't be too complicated for you.

Method 3
Here is another New Year tree with big asterisk. You shouldn’t forget about her either. This decoration has already become traditional!


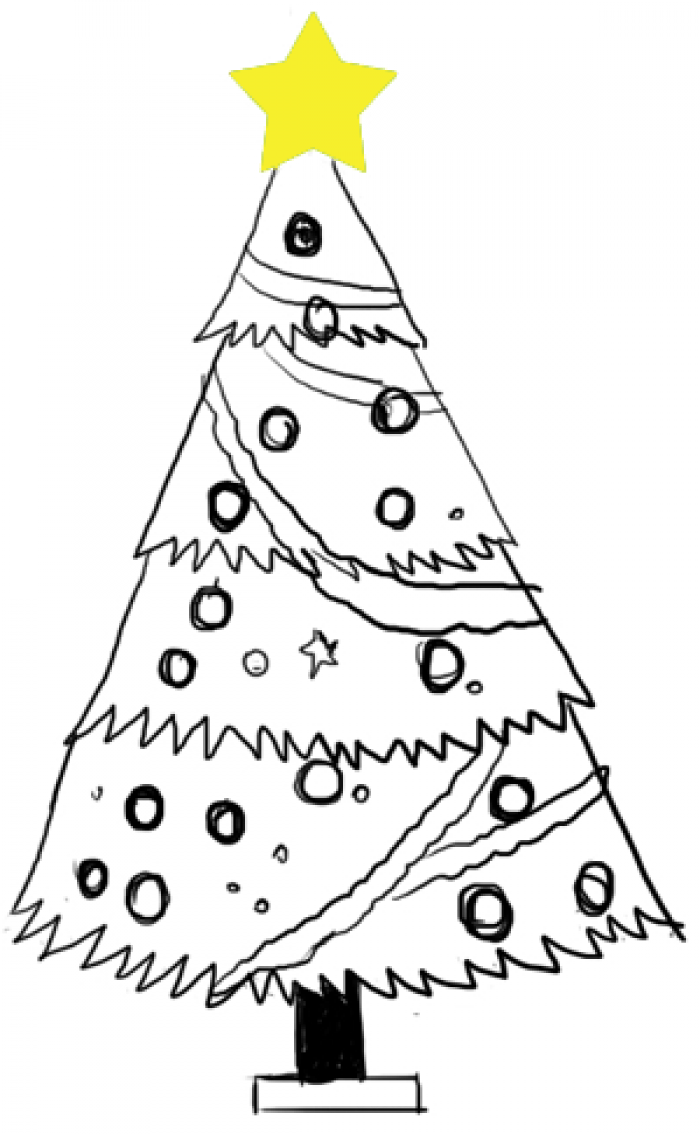
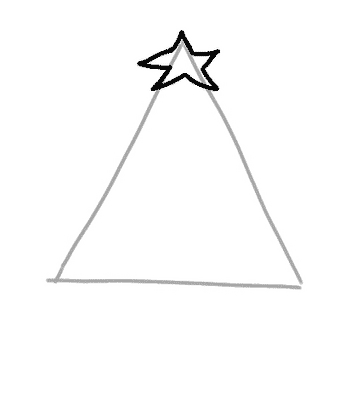
Method 4
This diagram shows in great detail the process of creating a small New Year's masterpiece. First you need to draw a triangle, and on its top a beautiful star.


The Christmas tree needs to hold on somehow. I suggest putting it in a bucket.

All that remains is to add some decorations, toys, bows and, of course, color. Carefully color the Christmas tree. That's all!


Method 5
This tree is based on a large triangle. Attached to it stand, branches, decorations.

Method 6
Another good scheme and again with gifts=)

Method 7
And this one is not bad, slender, curvy, easy to perform. But it's your choice!)

Method 8
The last diagram will help you learn how to draw a Christmas tree in the most naturalistic form.
It seems we have sorted out the Christmas trees. If you don't really love paint, you can make it from paper, cardboard or fabric. Interesting tips regarding how to do this you will find in.
Already drawn +3 I want to draw +3 Thank you + 153
IN new year holidays It is customary to decorate your homes. In addition, you can see New Year's decor in various shops, cafes and restaurants. Thus, every person wants to create a festive mood not only for themselves, but also for those around them. The main decoration on this holiday is the New Year tree. It is decorated with various toys, colored ribbons and bright garlands.
Now we will teach you how to draw christmas tree pencil step by step, our lessons are simple and therefore suitable for both beginning artists and children. Choose a lesson you like and start drawing a Christmas tree.
How to draw a Christmas tree with toys with a pencil step by step
Video: how to draw a Christmas tree
How to simply draw a Christmas tree


How to draw a Christmas tree with gifts
Hello! Now I will tell you how to draw a Christmas tree with gifts for the New Year! We need:
- simple pencil
- eraser
- pencils
- corrector
- pen or marker

How to easily draw a Christmas tree in winter

For this tutorial you will need:
- Plain, green and blue pencils
- Green or black gel pen
- Eraser

Draw a New Year tree with a star and toys
Hello! Now I will tell you how to draw a Christmas tree. For this we need:
- simple pencil
- eraser
- pencils or markers
- pen or marker
- corrector

How to draw a Christmas tree with bells with a pencil step by step

In this lesson we will draw a Christmas tree with bells! For this we need: HB pencil, black gel pen, eraser and colored pencils!
- Step 1
Draw a long line as shown in the figure.

- Step 2
Then we draw lines in different directions, as in the figure.

- Step 3
Draw some of the branches on the Christmas tree.

- Step 4
Let's draw the second part of the branches on the Christmas tree!

- Step 5
Draw the ribbons.

- Step 6
Let's draw bells and bows on the Christmas tree!

- Step 7
Carefully outline the entire drawing with a black gel pen except for the branches of the Christmas tree!

- Step 8
We buy it for coloring. Let's take it green pencil and decorate the branches of the Christmas tree with it!

- Step 9
Take a dark green pencil and decorate the branches of the Christmas tree with it again, making shadows!

- Step 10
Then we take a yellow pencil and decorate the ribbons with it.

- Step 11
Take an orange pencil and decorate the bells with it.

- Step 12
The final step is to take a red pencil and decorate the bows with it! And that's it!!!)))) our New Year tree with bells is ready!!))))) good luck to everyone)))

How to draw a Christmas tree in a fairy-tale cartoon style
Hello! Today we will draw a Christmas tree in a fairy-tale cartoon style. For work we will need:
- Pencil NV
- Lastix
- Pencils
- Corrector

How to draw a Christmas tree in a blanket with a cup of coffee
Hello! Today we will draw a Christmas tree in a blanket with a cup of hot coffee. Why are you surprised?! Christmas trees also have days off! And so we need:
- Pencil NV
- Eraser
- Black gel pen or marker
- Colored pencils or markers
- Corrector

Draw a Christmas tree with arms and legs
Hello! Today I will tell you how to draw a cute Christmas tree with arms and legs. For this we need:
- Pencil NV
- Eraser
- Black gel pen or marker
- Colored pencils or markers
- Corrector

How to draw a Christmas tree with toys for children for the New Year
In that step by step lesson we will draw a Christmas tree with toys for children for the New Year. We will need:
- simple pencil;
- eraser;
- colour pencils;
- orange, pink, blue. green and black pens.
- Step 1
To begin, draw a shape that looks like a triangle.

- Step 2
Now draw another similar figure.

- Step 3
And the last one. Please note that the last figure is different from the others.

- Step 4
Then draw the trunk of our Christmas tree and the pot.

- Step 5
Draw the most important thing on the Christmas trees - a star.

- Step 6

- Step 7
Draw New Year's toys- these can be stars, candies or just balls. In general, whatever you want!

- Step 8
Now circle the Christmas tree with a green pen, New Year's toys with an orange, blue and pink pen, and the pot and trunk with a black pen.

- Step 9
Now take the lightest green pencil you have and color the tree a little with it.

- Step 10
Then take a darker pencil and color the tree a little more...

- Step 11
And so go through the entire tree, starting from light to dark.

- Step 12
Now take a light brown and a dark brown pencil. Color the trunk of the tree light brown, and the pot dark brown. Also color the star on the top of the tree yellow, and the New Year's toys blue.

- Step 13
And color the candies pink, the stars orange, add barely visible shadows and the drawing is ready!

How to draw a Christmas tree with garlands
In this lesson we will understand how to draw a New Year tree with garlands on the eve of the holiday.
Tools and materials:
- Simple pencil;
- Black pen;
- Eraser;
- A sheet of white paper;
- Colored pencils (yellow, green, light green, lilac, brown, red, blue, blue)
- Black marker.

How to simply draw a Christmas tree for kids
This wonderful lesson will prepare us for the holiday and tell us how to draw a Christmas tree simply for children.
Tools and materials:
- Simple pencil;
- Black pen;
- Eraser;
- A sheet of white paper;
- Colored pencils (yellow, light green, green, dark green, brown)
- Black marker.

Drawing a Christmas tree for children
We will need:
- black felt-tip pen,
- wax pencils (green, yellow, brown, others to your taste)

How to draw a Christmas tree with a marker for children video
Christmas tree drawings for sketching
Here you will find 8 different designs Christmas tree for sketching.

You can draw a Christmas tree different ways. Although it is “structured” in the same way as other trees (trunk, branches extending from it), this “skeleton” is disguised by fluffy spruce paws. Therefore, when drawing a Christmas tree with children in general, it is convenient to take a triangle as a basis. By the way, this triangular (or rather, cone-shaped) shape of spruce trees has a deep ecological meaning. Spruce grows in places with harsh climate, with snowy winters. This crown shape prevents snow from accumulating in large quantities on tree branches. He simply rolls off the tree as if from a mountain. And this helps the branches to withstand and not break from excessive snow weight. People have spotted this “trick” of nature and are building houses with a gable roof so that snow does not accumulate there either.
It is very convenient to paint a Christmas tree with children using gouache paints. First, we paint the pine needles with green paint, and when the gouache dries a little, we draw balls and beads. These round decorations are very easy to paint with small children, not with a brush, but with cotton swabs. Dip cotton swab into the paint and press it onto the paper. You will get a fairly regular round print. Then you can add highlights to the dried balls using white paint.
We offer seven options for drawing a Christmas tree with children different ages. They are arranged according to the complexity of the work.
Triangle Christmas tree - step-by-step drawing with children from 4 years old.
This is the simplest Christmas tree. It's not even based on a triangle - it's just a triangle. Add decorations-balls - and you have a wonderful New Year's picture!

Triangle Christmas tree - a step-by-step drawing scheme for children from 4 years old.
Simple with children over 5 years old.
This Christmas tree is a little more complicated. It already has characteristic serrated branches. Such a Christmas tree can be decorated with balls or simply painted with green paint and “planted” in the forest.
 Scheme of drawing a Christmas tree step by step with children from 5 years old.
Christmas tree based on a triangle - step-by-step drawing
with children over 6 years old.
This tree has more branches. You need to draw them like a fence, right away by hand. The bottom of the tree is also openwork. It already looks more like a real tree. It makes sense to draw decorations in advance only if you are going to color the tree with felt-tip pens or colored pencils. If you work with paints, you can paint the balls and garlands later, without preliminary drawing.

Scheme of drawing a Christmas tree step by step with children from 6 years old.
Christmas tree based on a triangle - step-by-step drawing
with children over 7 years old.
In this version, the herringbone pattern is replaced by broken and wavy lines. And the Christmas tree looks less sketchy, even gaining some volume. Although its basis is still the same flat triangle. The feeling of volume is achieved by marking not only the side branches, but also the branches in the middle of the tree. And also not a straightforward, but a capricious and whimsical line of the garland.

Scheme of drawing a Christmas tree step by step with children from 7 years old.
Volumetric Christmas tree - step-by-step drawing with children from 8 years old.
When drawing this Christmas tree, we use a conditional skeleton-trunk. Her main feature The point is that here we draw branches that are facing us. They should be short, distorted by perspective. After the drawing is done in pencil, you can offer different variants design and decoration of the Christmas tree. Figure 4A - summer tree in the forest. Figure 4B – winter tree, covered with snow. Gouache paints are very suitable for this type of work. After finishing the green paint, take whitewash and paint snow waves on the branches. Another idea is to try making the Christmas tree blue instead of green. Figure 4B – New Year tree, decorated with beads and balls.

Scheme of drawing a Christmas tree step by step with children from 8 years old.
Realistic Christmas tree - step-by-step drawing with children from 9 years old.
This is, of course, a very young Christmas tree. This type of work is best done with paints. The Christmas tree will look like a real living tree. Dress her in New Year's outfit It's unlikely to work out.

Realistic Christmas tree - a step-by-step drawing scheme for children aged 9 years and older.
Christmas tree based on a pyramid - step-by-step drawing with children from 12 years old.
It is interesting to do this work with pastel, charcoal or sanguine. In the last two cases, the picture will be monochrome. The work is quite difficult and even children 12 years old without artistic training It’s better to choose another option for drawing a Christmas tree.

A Christmas tree based on a pyramid - a step-by-step drawing scheme for children aged 9 years and older.
In addition to the Christmas tree, there are a lot of other trees that are fun to draw with children. Look at the article about step by step drawing trees with children. You will surely find interesting options for children of any age.
Approaching New Year 2018, and in all homes, kindergartens and schools, they are preparing to welcome it: they decorate Christmas trees, hang toys and garlands on the paws of fluffy beauties, cut out snowflakes, and make drawings. Of course, not all kids know how to draw a Christmas tree quickly, easily and beautifully. Often they end up with sticks and squiggles that bear little resemblance to a spruce. That is why we decided to publish the best pencil and paint drawing master classes for beginners. Having learned to draw a New Year's tree step by step, the children will later draw Christmas trees without the help of diagrams.
How to draw a Christmas tree with a pencil step by step easily and beautifully - The best master class for beginners for the New Year 2018
In order to explain how you can draw a Christmas tree with a pencil step by step easily and very beautifully, we offer everyone best master class for beginners. Artists are not born, but fine arts you can learn, which is what we suggest you do.
We draw an elegant Christmas tree with toys using a pencil and a simple step-by-step master class
If you are ready to learn how to draw a Christmas tree with a pencil step by step easily and beautifully, the best master class for beginners on this page is for you! Follow his instructions and you will end up with a very cute Christmas tree.
- Start your drawing by creating a triangular "skirt" shape with a pointed top, as shown in the picture. Then draw a tree trunk at the base.
- Now draw four curved lines inside the “skirt”.

- Ruffle each of the four lines created earlier.


- “Scatter” circles - toy balls - throughout the Christmas tree.

- It's time to hang garlands on the Christmas tree.

- Now the most pleasant moment has come - coloring your drawing. Use markers, watercolors, pencils or gel pens.

How to paint a New Year tree 2018 step by step - Watercolor and gouache drawings for beginners
Beautiful Christmas trees are the most frequent “guests” of children’s drawing albums. It would seem that everyone already knows how to draw a Christmas tree with paints step by step, and drawings of Christmas trees in watercolors and gouache even for novice artists come out just fine. However, they spend a lot of time on such work. We will tell you in the master class how to quickly paint a beautiful Christmas tree.
How to draw a New Year tree 2018 with paints - Master class with explanations for beginners

Before you draw the Christmas tree with paints step by step - you can find watercolor and gouache drawings for beginners (examples) here - you will have to outline the outline of the Christmas tree with a pencil. There is nothing complicated about this - carefully study the photo below the text.
So let's begin...
- First draw an isosceles triangle. Draw a line inside it that goes down to the base of the future tree.

- Using a pencil stroke, make the spruce “paws” (see photo).

- Paint over pencil drawing first with dark green, then with light green paint. This will give the image volume.

- Continue working with the brush, making strokes using 2-3 shades of green.

- Add shadows to the Christmas tree - gray, green-blue and even black colors.

- The spruce turned out to be alive!

How to draw a New Year tree with toys for kindergarten or elementary school
Before the New Year, educators and elementary school teachers always invite children to draw a Christmas tree. For some children, the green beauty does not turn out as beautiful as they would like. We are sure: when boys and girls learn how to quickly and easily draw a Christmas tree with toys, their work will be recognized as the best in kindergarten or elementary school.

How to draw an elegant Christmas tree with toys - Master class for children

Having learned in detail how to draw a New Year tree with toys in kindergarten or primary school, children can learn to draw a Christmas tree quickly and in no more than 15 minutes. The master class will help them with this.
- First, draw a triangle with a curved base.

- Repeat the previous step - the second triangle, located above the first and overlapping it, should be smaller.

- Draw another triangle on top with a slightly elongated vertex.

- Paint on the trunk of the future Christmas tree.

- Decorate the top of the Christmas tree with a star and its paws with balls.

- Erase all auxiliary pencil lines with an eraser.

- Color the drawing.

- Add even more balls to the tree and draw a shadow from the tree. Now you're all set!25
How to draw a Christmas tree for a child with a pencil step by step and quickly
Learn how your child can draw a Christmas tree with a pencil step by step and quickly using the following simple, illustrated instructions. This Christmas tree is perfect for making a wonderful festive Christmas card for your family and friends.

Quick step-by-step drawing of a Christmas tree with a pencil - Master class with photos

Looking at the image under this text, you will understand how a child can draw a Christmas tree with a simple and then a colored pencil step by step and quickly. Explanations for the master class in the photo are attached.


- Start with an image of a triangle curved at the bottom. It should look like a slice of pizza.
2 - 5. Draw smaller “pizzas” on top of each other as shown in the pictures.
- Draw a "W" at the top of the tree.
- Draw printed letters"L" on the sides of the tree. Also draw an upper "L" on the top of the tree above the "W" sign.
- Draw connected “W” signs—zigzag lines—on the wood.
- Add a star to the top of the tree and tinsel by simply adding curved lines, going diagonally to the drawing.
- Start drawing the base of the spruce tree - the trunk in the pot.
- Finish drawing the pot.
- Color the drawing with pencils.
Now that even beginners have understood how to draw a Christmas tree easily and simply, you can explain to your child step-by-step work above the image Christmas tree with toys. Save our drawing master classes to your computer - you will definitely need them in the future.


