In this lesson we will introduce you to how to draw the sea with gouache step by step in pictures and with a description. Will be introduced step by step steps, with which you will learn to draw the sea with gouache, like this.
You can draw waves on the sea if you understand how the wave moves. First let's draw the background. Draw the horizon line just above the middle. Let's smoothly paint the sky from blue to white near the horizon. You can draw clouds or clouds as you wish.
To make the transition smoother, paint part of the sky with blue paint, part with white, and then use a wide brush to mix the paint at the border using horizontal strokes.
We will also paint the sea itself with blue and white paint. It is not necessary to apply strokes horizontally. There are waves at sea, so it is better to make strokes in different directions.

Now let's mix green paint with yellow and add a little white. Let's draw the base for the wave. In the picture below, the darker areas are wet paint, the gouache just didn’t have time to dry.

On the green stripe, use a hard brush with white paint to distribute the movement of the wave.

Please note that the left part of the wave has already fallen into the sea, next to it is the raised part of the wave. And so on. Under the fallen part of the wave we will make the shadows stronger. To do this, mix blue and purple paint.

Mix blue and white gouache on the palette and draw the next falling part of the wave. At the same time, we will strengthen the shadow under it with blue paint.

Let's outline the front wave with white gouache. 
Let's draw small waves between the big ones. Let's draw shadows under the near wave with blue paint.

Now you can draw the details. Spray foam along the entire length of the wave. To do this, take a hard bristle brush and white gouache. There should not be a lot of white gouache on the brushes and it should not be liquid. It is best to smear your finger with gouache and blot the tips of the brush, and then spray it in the area of the waves. It's better to practice on a separate sheet so that you can direct the splashes to specific place. You can also use a toothbrush for these purposes, but the result may not justify the result, because... the splash area can be large. But if you succeed, then that's good. Don't forget, try the splashes on a separate sheet.

The question “How to draw the sea?” It’s not just artists who ask these questions. Almost everyone who admires marine species, wants to somehow capture this gift of nature, which just begs to be put on canvas. Or, at least, into the camera lens.
A little information. Landscape in art is a genre in which nature is depicted. Individual paintings are also called landscapes of this genre. The landscape can be urban - here nature has already been transformed by man to suit his needs, or, for example, rural. If the sea is depicted, then such a landscape is called a marina. And artists, accordingly, are marine painters.
So let me give you a few useful recommendations. In this article, our main task is to enable observation, as well as consider some laws of composition and color solutions.
1. Horizon
Do you know where the horizon is? Don’t read the answer right away, think, try to answer intuitively. In the distance, where the sky turns to sea? Or where does the earth end? Well, no. The horizon is always at our eye level. You can check it today on the street, especially if you are outside the city, where the horizon is clearly visible. Squat down, stand up - the horizon will move with you.
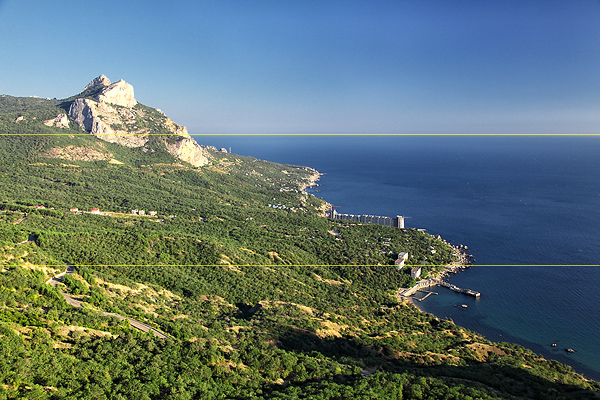
Where should it be placed on the sheet? In the middle? Not worth it. The answer to this question has long been found by artists. You need to decide what is more important (more beautiful, more interesting) - the sky or the sea? If it is the sea, then there is a larger place for it, and if it is the sky, then the sky. It’s better to solve the horizon issue using the so-called “rule of thirds”; try it, you won’t be mistaken. Divide the sheet into 3 parts vertically, draw two lines. If you are more interested in the sea, it will occupy 2 parts, if the sky - it. An excellent example: the third part is given to the sky, the third to the sea, the third to the beach (sand):

And here there is more sea:
Of course, the sky can also prevail, especially this:

2. Which is darker?
Before drawing a seascape, it is important for the artist to decide the question - what is darker, the sea or the sky? And stick to this contrast. Both the sea and the sky have blue shades, so the question is very important. And they solve it, as a rule, towards the dark sea.

3. Drawing the sky
Drawing the sky is quite simple - look carefully at the sky and you will understand everything. It is usually dark blue at the top, and gradually becomes lighter towards the horizon. As in the photo above. Therefore, we simply gradually add lightness to the sky; sometimes it is almost white below.
4. Clouds
They are usually depicted as white. First, luscious strokes are usually made with white paint without water or solvent. Then, downwards, they can be smoothly rubbed into the sky with a very dry brush (another) or the bottom of the clouds can be made light purple-gray. All transitions are smooth.

5. Sea
The sea is also drawn from dark to light. At the horizon it is dark blue, which creates an excellent contrast with the sky and depth of space. You can just take blue paint without mixing it with anything. Then, closer to the third part of the sea, we add a little emerald green and white to the blue, more and more brightening and “greening” the water towards the shore.

6. Sand.
Sometimes they don’t paint it, but if you want... For sand it’s better to mix light ocher with big amount red and white. And make the transition from sea to sand smooth. This can be achieved by placing strokes of “sea” and “sand” colors next to each other, gradually “mixing” one color into the other.

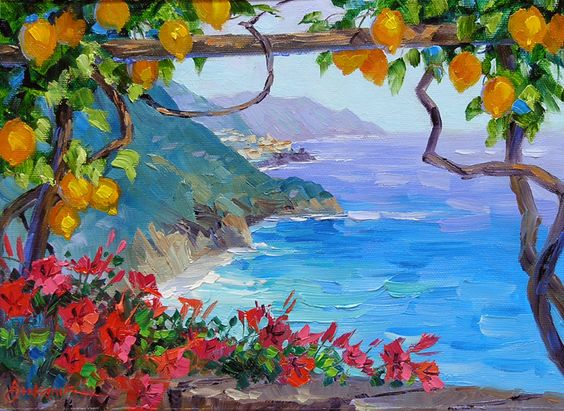
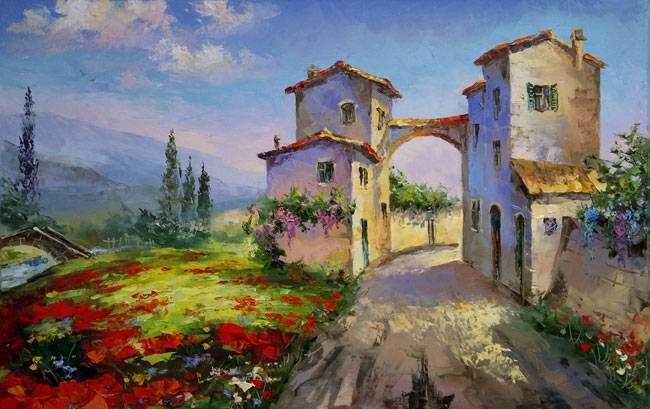
We invite you to write as many as 4 solar sea paintings on course
ITALIAN LANDSCAPE
Meeting frequency: 1 time per week
Level of training of participants: from scratch and above.
Broadcast time: 20:00 Moscow time, recording is provided the next day to all participants
Feedback: given by the teacher on all your work during the course and 2 weeks after its completion


Cost of participation
Four online classes + lesson recordings + Feedback during the course
5500 rubles
>>Checkout
It is expensive?
Let's get a look. The cost of an in-person painting lesson in Moscow is from 1,500 rubles. Add to this the time and money that will be spent on travel. And also the need to go somewhere in the evening after work or negotiate with grandmothers, husband or nanny to look after the children.
Another thing is to pour yourself a cup of tea, occupy your loved ones with something interesting or sit next to them with brushes and paints, and DRAW. Online lessons help you do what you want, when it suits you. It's much nicer that way, isn't it?
You can draw such a seascape with children from 5 to 10-11 years old. The work must be done with gouache paints. In general, it is gouache, and not watercolor at all, that is the most convenient material for children's painting. Schools and kindergartens “respect” watercolor very much, not because it is good for children to work with, but because it is compact and not as “dirty” as gouache. In fact, watercolor is a very difficult material to work with. She doesn't forgive mistakes. Any mistake made is almost impossible to correct. By drawing this seascape with children we can solve quite a lot of problems. For example, introduce the child to the concepts of horizon line and perspective. And, of course, we will learn to apply paint evenly on paper, drawing lines from one edge of the sheet to the other. Toddlers may not be very good at this, but try to teach them this technique.
To draw a seascape with children we will need:
- A sheet of thick Whatman paper A3 or A4 format;
- Gouache in blue, white, green and black colors;
- Large soft brush (eg squirrel #6)
- Brush with stiff bristles;
- Old toothbrush;
- Palette for mixing paints (just a sheet of paper will do);
- A jar of water for rinsing brushes;
- A cloth for wiping brushes.
How to draw the sky in a seascape.
Draw a line with a pencil, dividing the sheet into two unequal parts - 1/3 will be the sky, the rest will be the sea. This line will become the horizon line. Take white and blue gouache, mix them to obtain the blue color of the desired intensity. Paint over the sky, making horizontal movements with the brush from one edge of the sheet to the other. Since the sky at the top of our picture should be darker, to create the effect of “depth”, you can first apply a dark blue stripe, and then paint the sky with blue paint, shading the dark blue stripe.

Draw clouds in the sky.
Apply dotted strokes with white gouache or completely paint over the cucumber clouds. While the paint is still wet, press the crumpled piece of paper onto the drawing. paper napkin. This will give the clouds a “fluffiness” and blur the clear boundaries.

How to draw the sea in a seascape
Take the blue paint and cover the bottom of the sheet with it, moving the brush from one edge of the sheet to the other.  Add streaks of green and white paint over the blue layer. The closer to the horizon line, the darker the sea.
 Splashes of sea foam can be painted using the splash technique. Children of all ages really enjoy working with this technique. For this kind of drawing we need a brush with very stiff bristles or a toothbrush. You can do this kind of work more accurately with a brush, but it’s easier with a brush. Take a brush or brush, dip it in water and then in white paint. Index finger run over the stubble. There will be small white splatters on the paper. The finger movement must be towards you, otherwise the splashes will end up on the artist!
  We paint large “lambs” on the waves with a brush with stiff bristles. The closer to the horizon line, the smaller the “lamb”, and less distance between the waves.

Drawing details of the seascape
Paint a stone island on the horizon line with black or dark blue paint. Its shape can be completely arbitrary. Draw black checkmarks of seagulls in the sky.  To draw a ship, put a black dot - this is the stern of a retreating sailboat. The dots painted with white paint are the sails.
  If the seascape seems unfinished to you, you can add a few stones.
  Our seascape is completely ready. All that remains is to dry it and hang it on the wall.
Art supplies:
- The original picture of a seascape and a lighthouse against some background from which you will copy. You can print the image from the link
- Watercolor album Arches cold pressed, density 252 g/cm2 (140lb), format 405x305 mm (16? x 12?)
- A sheet of scrap paper or sketchbook
- Two paper or cardboard L-shaped corners (as a viewfinder)
- Scotch tape (25 mm wide)
- Simple pencil HB
- Nag
- Palette
- Glass of water
- A towel or rag to place your brushes on
- A piece of cloth or paper towel
Pigment colors (from Holbein Artists' Water Colors set)
- Cadmium Yellow Deep;
- Cadmium Yellow Orange;
- Cadmium Red Deep;
- Permanent Alizarin Crimson;
- Permanent Violet;
- Ultramarine deep;
- Cobalt Blue;
- Cerulean Blue;
- Peacock Blue;
- Herbal greens (Sap Green);
- Hooker's green;
- Yellow Ocher;
- Burnt Sienna;
- Burnt Umber;
- Sepia;
- Payne's Gray.
Brushes:
- "Mop" flat one-inch
- Fibonacci Kolinsky-Sable: core round No. 12
- Escoda Kolinsky-Sable: round core no. 6
- Synthetic round No. 8
- Synthetic round No. 4
- Synthetic round No. 2
- Synthetic round No. 1
- Synthetic round Cotman No. 1
Stage 1
If you don't have a viewfinder, you can make your own using two L-shaped corner strips (Steve called them "corner strips"). Their width and length must be sufficient to accommodate the original image. Place the corners on it so that in the center of the formed rectangle there are only those elements that you will redraw. Attach the corners to the picture with tape. Think over the composition of the finished drawing and how to depict the lighthouse. Now you can take an unnecessary sheet of paper or sketchbook and move on to creating a tone sketch of the composition. To do this, you need to determine the light and shadow characteristics of each element of the picture and apply them accordingly. In our case, the clouds, splashes of water, the spotlight and the illuminated side of the lighthouse will have a light tone. The sky and rocks are dim. Images of falling shadows and deep seas will be dark. Use the original picture as a guide. This should be a quick sketch.
The picture below shows Steve's rough tone sketch.

Stage 2

Having thought through the arrangement of the elements of the picture on the sheet, transfer the composition sketch onto Arches cold-pressed watercolor paper. But this time, do not include the tones in the sketch. Just outline the main contours with light lines. Do not put pressure on the pencil so that you can easily erase it later. The sketch should not occupy the entire sheet; step back approximately 5 cm from the edge. You can draw boundaries under the ruler.
Below you see an example of such a sketch.

Stage 3

Using a #14 sable round brush, create a palette wash of Ultramarine, Cerulean and Peacock Blue with a dash of Alizarin Crimson. Then use a mop brush to apply clean water to the sky area, including the clouds. Treat the areas around the lighthouse and surrounding houses with special care, because they should have a clear outline. While the paper is still wet, apply the wet technique, covering the sky with a watery wash. In this case, start from the top edge of the drawing and move down to the horizon line. At the top of the painting the sky tone is darker, so use more Kraplak red. While painting around the clouds, add more Sky Blue and Iridescent Blue. Remember to smooth out any harsh transitions with a clean, wet brush. You can also use a paper towel to blot off any excess paint in the cloud area to prevent it from running and staining them. But don't overdo it.
Stage 4

Add Cobalt Blue to the finished sky wash and use the resulting shade to create a shadow below the clouds. Next, add a hazy effect to the horizon using deeper blue tones, mixing Ultramarine Blue with Alizarin Crimson. Continue smoothing out the outlines of the clouds using a clean, wet brush and paper towels. You can also add a dark blue tint at the bottom of the clouds by making a mixture of Ultramarine Blue, Cerulean Blue and a drop of Payne's Grey. This will make the clouds larger and more structured. Once done, allow the drawing to dry thoroughly. Then proceed to the next step.
Stage 5

Identify lighted and shaded areas on adjacent buildings and the lighthouse. Prepare a watercolor wash for the shadow by mixing Ultramarine Blue, Alizarin Crimson and a drop of Payne's Grey. The resulting color should match the shade of the dark area of the sky, since shadows tend to reflect adjacent tones. Work with brush #2, switching to brush #0 when painting small areas. Using the same shade, draw a shadow on the lighthouse. This building has a rounded shape, so be sure to add partial shade, smoothing out the sharp edges of the shading as you transition to the illuminated surface. This will give you a gradation from shadow to light. The lighthouse can blend in with the rest of the buildings, so you can add Cadmium Yellow Orange and Yellow Ocher in small quantities to this wash. You can use the same mixture to show light in shadowed areas. The final touch will be to display the falling shadow of the lighthouse.
Stage 6

Let the shadows dry, and in the meantime, begin to draw small elements of the lighthouse and houses. To color the balcony, roof and windows of the lighthouse, add Payne's Gray to the blue-violet watercolor. Before painting windows, check that the shadow is dry. Try the paint by applying it to it back side palms. If it is cool to the touch, then the watercolor is still wet. After making sure the drawing is dry, add details to the surrounding houses, but do not touch the roofs and windows yet.
Stage 7

While the houses and the lighthouse are drying, start drawing the ocean. It will take a lot of blurring since you have to cover a large area. Take Ultramarine, Cerulean and Peacock Blue, add Cobalt Blue, Hooker's green and Sap Green, as well as a grain of Payne's Gray ) Since the sky will be reflected in the ocean, their shades should also match. Using a #14 sable brush, blur the horizon line. clean water, and take a #8 round brush. Add a little more Payne's Gray and Hooker's Green to the prepared watercolor mixture, and begin to work on the surface of the ocean, moving from top to bottom. Try to connect the ocean and sky, smoothing the transition between them.
Stage 8

As you approach the foreground of the painting, you need to use deeper tones, adding more blues and/or greens. This shade can be applied around rocks and sea foam, and other areas of the ocean that need to be darkened. To make the tone less harsh, mix in Burnt Sienna and Alizarin Crimson. Try applying strokes in the direction of the waves, without painting over the surf areas. Where the water foams, blur the outline of the wet watercolor with a #0 brush. Paint over the entire ocean, alternating between blurring and softening the edges with water.
Stage 9

Let the ocean dry out and in the meantime you can start painting the roofs of the buildings. Prepare a wash using Yellow Ocher and Cadmium Yellow Orange. Now use a No. 2 Cotman brush to fill the roof areas with the mixture. Watercolor is quite transparent, so you can layer it on shaded areas if necessary. This way the drawing will come out more harmonious and deeper. To represent shingles and rust, take some Cadmium Red Deep and add Cadmium Yellow Orange and Burnt Sienna. More small parts work with brush No. 1. Passing deep purple shadows falling on the roofs, add Alizarin Crimson and a little Ultramarine Blue to the wash. Use the same shade to paint thin stripes of shadows under the roofs. Paint the remaining elements of the houses, such as the windows and wall texture, using a mixture of Payne's Gray and a blue wash. But don't make them too rich. To do this, blot excess watercolor or water from the brush with paper towels. Continue to refer to the original image and tone sketch if in any doubt.
Stage 10

Wipe the palette with a wet rag or paper towel. Once you have found areas of light and shadow on the rocks, determine their overall hue. Apply a mixture of Yellow Ocher, Cadmium Red Deep and a drop of Permanent Violet. Add water to lighten the watercolor (do not use white for this purpose). Cover the surface of all rocks with the prepared wash, without affecting the foam areas and splash images. Smooth out the edges with a wet brush in areas where water runs up onto the rocks. Feel free to use the resulting shade as a base layer because both the lit and shaded areas of the rocks include this tone. To make the rocks at the bottom of the picture more picturesque and to make the picture deeper, you can add Cadmium Yellow Orange or Cadmium Red dark in slightly larger proportions here and there.
Stage 11

After the base layer has dried, add a drop of Burnt Sienna and blue wash to the orange mixture. Use this shade to paint the penumbra of the rock in the center of the picture. You can draw cracks and other texture elements on it. The main thing is not to overdo it, because it should highlight the main object of the picture, and not draw all the attention to itself. Where the water washes over the rock, its tone will be darker. This area can be filled with a color obtained by mixing with the base shade of Burnt Umber, Ultramarine Blue, Permanent Violet and Payne's Gray. Apply this wash with a #1 brush. Still leave the sea foam and surf line untouched.
Stage 12

To create splashes of water on rocks where waves crash against them, you need to first wet the area with a #2 Cotman brush. Then peel off some of the paint at the base of the rock where the splashes will be. The resulting lightening effect will resemble water dust. If the color is still too dark, blot the paint with a paper towel. Add some more splashes. Be careful, because too many of them will make the picture implausible. Add more Burnt Umber and Sienna to create a light-to-shadow transition. Use the same shade to paint cracks and other uneven surfaces of the rocks. In this case, the rocks in the foreground should be depicted in more detail.
Stage 13

Let's move on to painting the lawn. Using brush #1, mix Sap Green and Cadmium Yellow Deep. This will be a shade of illuminated green. Cover the rocky surface of the island at the foot of the lighthouse and houses with it. Try to convey as accurately as possible the contour, shape and angle of the vegetation on the cliff's elevation. After this, add Burnt Sienna to the wash, and use this tone to paint the shadows and areas of grass at the roots. This will make the clearing larger.
Stage 14

Now let's focus on the area below the lawn where the waves roll in on the coast of the island. Paint shadows on the rocky surface using the same shade as for the shaded parts of the rocks. When depicting coastal plumbs, apply strokes unevenly to better convey the texture. Focus on light and shadow while referring to the original picture. The part of the bank that comes to the foreground can be decorated with crevices. But remember that recording every smallest detail is not as important as reliably conveying the shadows. At the line where the ocean surface meets the foot of the cliff, add more Cerulean Blue to the wash. The parts of the rocks that are always wet will be the darkest. To get this color, combine Burnt Umber and Permanent Violet. Use this tone liberally when working with the foreground. This is the best way to transmit aerial perspective, i.e. when nearby objects are painted a darker shade than distant objects. Under no circumstances should you choose black. It will immediately make the drawing dull and lifeless.
Stage 15

In some places, when working on shadows, you can add Cadmium Red Deep. Don't forget to remove sharp edges near the surf line. To depict the splashes of waves crashing on a rocky shore, use the same paint removal technique as in step 12. When painting over the darkest areas, don't be afraid to apply liberal amounts of Permanent Violet, Burnt Umber and Sepia. . Describe the cracks and irregularities more carefully. The rough surface of rocks can be conveyed using the “dry” technique. To do this, you need to blot almost all the watercolor from the brush before applying strokes. The grainy surface of the paper will only be partially covered with paint, creating the illusion of roughness and rockiness. First, you can practice on a waste sheet of watercolor paper, and only then start depicting the texture of the rocks in the foreground.
Stage 16

As finishing touches, you can add more splashes, foam, and other details. However, try not to overload the picture. Otherwise, the drawing will lose its individuality, and there will be no signs left on it that distinguish your unique art style. However, with proper planning of work on initial stage, at the end you won't have to make any additional modifications or corrections. At the end of the work, when all the paint has dried, go over the drawing with a scratch, erasing all visible traces of the pencil. Please pay attention Special attention white and light areas. If there are not too many layers of paint in the picture, the pencil will be erased very easily. Once finished, you can safely sign the picture, come up with a name, and put it in a frame to the delight of those around you.
In this photo tutorial we will look at a simple technique for drawing a seascape. This lesson is perfect for beginners, because the plot lacks precise drawings and complex constructions. The main task in drawing the sea is to harmoniously blend wet paper paint and make a graduated wash for realistic effect water.
So get ready workplace and take the necessary tools:
- watercolor paints;
- special paper for painting with watercolors;
- container with water;
- round synthetic or kolinsky brushes No. 5,3 and 4;
- pencil with eraser.

Drawing stages
Step 1. Start by creating pencil sketch. Visually divide the sheet into 2/3 parts and draw a horizontal line at the top of the sheet. This way we have created a horizon line. Next, we finish drawing the coastline in the lower left corner. 
Draw a big wave under the horizon line. 
Below we create small waves. 
The sketch is ready. We proceed to drawing with paint, but first we decolorize the rich outline of the drawing with an eraser.
Step 2. Fill the upper part of the sea (behind the big wave) with translucent ultramarine. We blur too clear contours with a wet brush. 
Step 3. High waves transmit well sunlight, distorting the main color of the water, making it warmer, so we paint them with a greenish-turquoise tone. The base of the near wave is shaded with lemon diluted with a large amount of water. We leave the wave crests white for now. 
Step 4. Fill the gaps between the waves with light ultramarine. Next, use yellow ocher to mark a piece of the breg in the lower left corner. 

Step 5. Apply a shade of indigo to the tip of brush No. 3 and use it to mark the dark parts of the waves that form the ridges. 
Step 6. The “wet” technique and graduated blur will help us make a realistic sky. We wet the sky area with water and, using a large brush and cobalt blue, begin to draw the sky and the outlines of the clouds. 
Step 7. On the sand we draw stones and seaweed washed ashore. For a more interesting result, we recommend making a few splashes of brown to best convey the texture of the sandy shore. 
Step 8. Add contrast to the pattern with more saturated shades of turquoise and ultramarine. 


