In this lesson we will tell you how to draw a cat's face watercolor pencils step by step, and we will make the background with watercolors.
Drawing technique - mixed: watercolor pencils, watercolors, thin felt-tip pens for hairs.
1. I make a sketch on watercolor paper.
2. Now you need to carefully wet the part of the paper that will be the background with water.

3. Remove excess water with a wrung out brush.

4. I put a little paint diluted with water on the brush and carefully distribute it over the damp paper.

.
5. Using a brush, you can add watercolors in those places where we want the background to be darker.

6. The background is ready for roughing.

7. Now I put away the watercolors and take watercolor pencils. In principle, I could have taken regular ones, but at that time I only had watercolor ones from the soft ones. I start working on the eyes and nose, always with the lightest color. We will always have time to darken it.


9. To make a cat come to life, I always try to work on the eyes almost immediately.

10. We begin to work on the fur, using thin strokes to follow the growth of the fur.


11. I try to make the stripes according to the shape of the body so that they emphasize the volume.


I draw the fur with thin felt-tip pens.


12. I made the mustache with thin felt-tip pens, leaving no white areas in advance.

13. Under the chin I darkened it a little with a gray pencil to create a shadow.

14. Then I regretted that I had not left my mustache white and decided to try to scratch it out.

I don’t know how well it turned out... But I think I’ve heard about such a technique.

Master class on drawing for children from 8 years old on the theme “Kitten” with step-by-step photos
Unconventional drawing techniques - drawing fur using PVA glue and a toothpick
Place of work: GKKP "Nursery-garden No. 116", Pavlodar
Description: The master class is intended for children from 8 years old and their parents, educators, teachers additional education, creative people.
Purpose: interior decoration, gift, drawing for exhibitions and competitions.
Target: drawing a fluffy kitten.
Tasks. Teach children to convey the features of the depicted object using PVA glue and a toothpick. Strengthen the ability to independently select the desired color. Expand your understanding of the life of a pet. Cultivate an interest in the life of pets, a desire to know as much as possible about them.
Some people like to draw flowers, some butterflies, others devote their creative impulses to portraits. How about a cute fluffy kitten? Imagine how happy your mother or sister will be when on March 8th you give them a postcard with a picture of a pretty kitten with fluffy fur.
Do you think it takes a lot of time to draw fur realistically? Do you want to know about a simple trick for making fur look natural? Now I’ll tell you how to draw a fluffy kitten using PVA glue and a toothpick. This drawing technique is my know-how! Draw with glue and a toothpick, I think you'll like it!
Materials required for work:

- white thick paper A4;
- watercolor;
- 2 brushes - No. 5, No. 3;
-a glass of water;
-PVA glue;
-toothpick;
- felt-tip pens;
- a simple pencil.
Step-by-step process for completing the work:
1. We begin to draw a kitten using geometric shapes.
Draw the head and torso in an oval shape.

2. Always start drawing with what you think is easier to do. It's probably not difficult to draw ears. The ears look like an equilateral triangle, only two lines and ears are drawn. The most difficult thing is to draw the eyes; you need to not make a mistake with the size, make sure that they are on the same line and the same.
On the muzzle we draw cheeks, antennae and a mouth with a visible tongue.

3. In addition, you need to make “highlights” in the eyes so that the cat looks like a real one.

4. We finish drawing the paws and tail.
To prevent the cat from looking lonely in the drawing, you can draw it on a rug.

5. Now comes the fun part. We begin to draw, tracing the contours of the picture with PVA glue using gentle movements. Draw the fur using a toothpick.


6. Add volume to the rug, draw wavy lines with PVA glue and draw with a toothpick.


Let the drawing dry.
7. After it is completely dry, we begin painting.

8. My cat is gray, so I added gray color to the palette.
Cats are some of the cutest and funny creatures on the planet. The animal has perfectly adapted to living next to humans, just like a dog, so almost every person has a cat at home. Many novice artists will be very interested in drawing a cat in watercolor, so we have created a step-by-step photo guide that will help you draw a pet.
The level of difficulty of such work is considered average, because depicting any animal is quite difficult. In a drawing, you need to make a sketch accurately and realistically in order to convey the animal’s pose as best as possible. Beginners especially have difficulty with a plot in which the animal needs to be depicted in motion. But we specifically selected a simple composition for drawing, which will simplify the task. So let's get started.
Let's prepare the necessary tools for work:
- palette of watercolor paints;
- high-density paper for watercolor painting;
- pencil HB or N;
- eraser (it is advisable to use a soft one so as not to damage the structure of the paper);
- soft brushes (kolin, synthetics) No. 3 and 1;
- flat brush for wetting the paper;
- palette;
- a glass of clean water;
- paper or textile napkin.

Drawing stages
Step 1. We start by marking the approximate outline of the drawing with a pencil. We depict the head in a circle, the body as a teardrop-shaped figure, draw a pair of triangular ears, and mark the paws and tail of the cat with several lines. 
Using these auxiliary lines we draw a detailed outline of the animal. Then we finish drawing small parts: nose, eyes. 
The sketch is ready, remove the saturation of the pencil with an eraser and move on to the next step - underpainting.
Step 2. Dilute the gray paint with water so that the paint becomes translucent. And use it to outline the color of the animal, as shown in the photo. Use pale blue watercolor to highlight the shading on the front legs. 
Step 3. Now we register inner part ears and face with translucent pink quinacridone. Let's highlight the eye color with a mixture of turquoise and blue shades. 
Step 4. We return to the color again and give it contrast. We stretch the strokes on the head in lines to milk realistic effect. On the chest we draw the folds of fur in detail. We saturate the shaded front and hind legs with a pale blue tone. 

Step 5. Using brush No. 1 and neutral black, draw the outline of the ears, eyes and pupils. We wash off almost all the paint from the brush and highlight the nose, line of the mouth and dots on the cheeks with the remains of black watercolor. 
Step 6. Next, use umber and neutral black to refine the intensity of the color. Using turquoise we create a light shadow on the cat’s body. 

Using the same shades we create a falling shadow. 
Step 7. To make the plot more interesting, add one bright detail- a ball of thread. We will use pink and burgundy shades, and to indicate the shadow and draw the texture of the threads, we will take a little umber. 
We found and translated for you a wonderful watercolor master class that tells you how to paint beautiful cat.
I am impressed by Liz Shaderton's approach to the choice of composition and the ease of the watercolor solution. Well, the resulting cute portrait of a cat, I think, will inspire you to take up your brushes.
One day I came to the conclusion that working with watercolors requires special forethought. Its success often comes from simplification... What we leave out is just as important as the elements we include in our picture.
I propose to draw a portrait of a cat today. What attracts me to this animal is its marbled look, mustache and patterned color. These are the elements I want to focus on, the rest doesn't matter!
Materials for references
When drawing animals, you will have to use a lot of photographs to obvious reason that animals are usually very mobile. And if they are also wild, they are unlikely to allow you to even get close to them.
Drawing from life in this case is something from the realm of fantasy. Therefore, photographs here can become your “lifeline.”
Please be aware of copyright laws. Not a problem if you're just using photography to draw for fun. But the moment you share it online, display it, or sell it, you may be violating the photographer's rights. In this case, do not use the image without permission from the author.
Luckily, websites such as Paint my Photo(pmp-art.com) and Pixabay(pixabay.com), provide beautiful free images With high resolution. Don't hesitate to ask. Many photographers allow their photos to be used for free.
Work planning
We will carry out the work from light to dark, from long-range to your neighbor. This will allow us to maintain the transparency of the watercolor.
It is important to think through the light areas in advance, because they are the ones that bring the picture to life.
I also like to add shadows to early stages. This way, the area with the greatest contrast (in our case, the eye area) will immediately attract the viewer’s attention.
Do preliminary pencil sketch. It will help you think through the composition and main elements in advance, so that in the future you can fully devote your time to working with color.
A sketch like this helped me figure out that it would be better to reduce the size of the cat's head compared to the original idea.
And also achieve an expressive S-shaped line, conditionally passing between the eyebrows and mustache.
- I don't like it when pencil lines are visible in a drawing, so I prefer to erase them with an eraser. If you want to erase the lines, make the original outline of the image a little larger than necessary or use a watercolor pencil.
- I took half a sheet (not the square format). This allowed me to adjust the composition even after finishing the drawing.
- Drawing with a simple pencil An HB indicating the general dimensions and shape of an object is all you need. Try not to draw details or make the drawing too dark.
- Check the accuracy of the drawing by looking at it in a mirror or turning it upside down.
- Using a small amount of color will help your brain relax. I try to limit my palette to seven colors.
- Decide whether you want to use colors from the original image or your own shades. Make blanks of the desired shades before starting work.
Materials used
Watercolor paper:
- Bockingford NOT (35x35cm)
Watercolor paints:
- French ultramarine
- Quinacridone gold
- Quinacridone sienna
- Emerald phthalo (Phthalo turquoise)
- Permanent mars (Perylene maroon)
- Dioxine purple
How to draw a beautiful cat in watercolor:
progress

click to enlarge the picture
STEP 1
1. Start with the eye. Let's be honest, if you ruin the eye, the whole portrait won't work.
It's better to do it in the first 5 minutes than to leave it until last, wasting several hours of work...
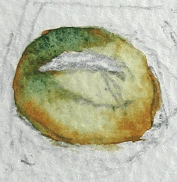
2. Take a closer look, identify places of light, shadows and shades the right colors. The cat's eyes are like marble.
Leave the required area of paper painted over. If you have masking fluid, use it.
Draw the iris around the pupil.

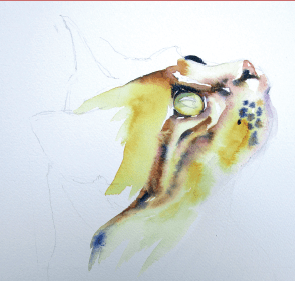
STEP 2
Now move on to the dark areas around the eyes. If some color from the iris flows into the fur area, so much the better. Place your strokes as if you were stroking fur in the direction it grows. This will make your strokes look much more natural.

STEP 3
With a clean, damp brush, brush off part of the dark layer, marking the S-shaped line that I mentioned at the sketching stage.
Add more characteristic strokes, paint wet on wet.
Pre-moisten the paper in places where you want the stroke to lay more softly.
Remember that the edges dry out faster. Be prepared to soften them to avoid hard edges when representing fur.
STEP 4
Mark the bases of the whiskers while the surface is still wet.
Very lightly touch the nose with Perylene maroon and the far eye. Soften the edges of the chin.

STEP 5
Now work with pale shades on three fronts in turn - under the chin, with the far ear, and then with the near one.
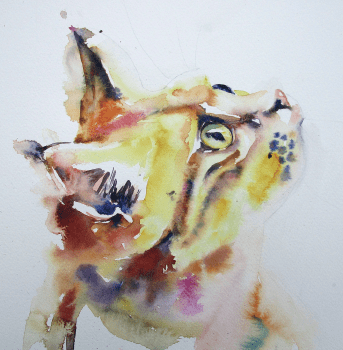
STEP 6
When the basic character of the animal is “captured”, let the work dry.

QUESTION: The image looks somewhat flat.
ANSWER: Is everything okay with the balance of dark and light? If there are errors in tone, then no beautiful colors will “save” the work. Squint and look at the picture carefully. Or take a black and white photo of her on your phone. And then adjust by adding color.
QUESTION: The work looks tortured.
ANSWER: Write with a large brush wherever the size of the paper allows. Hold the brush close to the tip and stop when you think there are 10 percent left to finish. You can always make some changes, but removing the excess will be much more difficult.
QUESTION: The colors are dull and lifeless.
ANSWER: If you make changes to a wet layer, the colors may blend and become lifeless. Check also the quality of the materials used. Perhaps you are using amateur paints or cheap paper?
QUESTION: The eye flare is “lost.”
ANSWER: Add a highlight with white gouache. Or, if you're brave enough, carefully scrape the top layer of paint down to the base of the paper with a scalpel. This should be done after complete drying, at the very end of the work.
Now experiment!
Draw the cat again, but use purple or blue as a base, which is not a natural "cat" color.
If you get the tone right, the portrait will still look alive.


