Hello! I’m in touch with you, Timur Mustaev. I often see images of stars in the sky from professional photographers. They were shot in different ways and from different angles, in different places, but they are certainly beautiful: a landscape against the backdrop of many stellar objects, the Milky Way or a real starfall created by the movement of luminous stars. celestial bodies. Do you want to have such shots in your portfolio? My article is at your service.
Photographer's focus
The main question: how to photograph the starry sky? How to convey exactly the splendor that we see or how we wanted it to look? We can create miracles in Photoshop, but it will not be so valuable, because there will be no documentary or real reality in the photo.
Therefore, I advise you to be fully armed at the time of the photo shoot and try to get an almost perfect shot. To do this, you need to consider the following factors:
- Composition. Contrary to the possible idea that shooting the sky with stars is only about stellar bodies and the firmament, you should also concentrate on your surroundings. As with any type of photography, you need to think about what objects will be included in the picture. For example, trees of unusual shape, mountains, valleys, interesting natural objects, beautiful architectural structures - choose for yourself.
- Time. It is clear that you will have to take photographs at night, but when - when the stars are clearly visible and presented in maximum quantity. The night should be without clouds. It is advisable to monitor the phase of the moon: how bright it is and where exactly in the sky it will be at a particular moment. The time of year doesn't really matter.
- Terrain. Firstly, you should choose a location that is more or less picturesque, since you will probably want to photograph the landscape, at least partially. Secondly, going out into nature is useful not only in search of beauty, but also in order to avoid light from city lights getting into the frame. Artificial lighting illuminates the sky; in principle, it will be superfluous in the picture.
- Technique. And there are two points here: the camera itself + optics. Of course, it’s good to have a high-quality camera that allows you to shoot in high resolution, take clear pictures, and it wouldn’t hurt to have a separate noise reduction function. But don’t be upset if you don’t have a very advanced and modern camera. Even with Nikon d3100 you can take a good photo.
Pay more attention to the selected lens. If you plan to increase the illumination of the photo due to the open one and play with the f indicator, then you can’t go without high-aperture optics. Also, the device should be wide-angle, say 16, 24 mm, etc. With such data, you can cover a very large part of the sky and the rest of the landscape.
- Additional accessories. Any of your illuminator will come in handy, even a basic flashlight or flash, which in the right hands can do a lot. Light will most likely be needed to illuminate nearby objects that could be more easily focused on. At this point you can also remember about colored ones in order to create original lighting.
But something else is more important when photographing the sky at night - a good one. It must be high enough and stable. It is he who will fix the camera when you set the long one. Why did I mention endurance? Find out below where we will talk about the settings.

How the professionals do it
We will, of course, talk about camera settings.
- Manual control. The camera can be almost any one, of any brand (for example, Canon or Nikon). But what it definitely should have is a manual mode, with which you can adapt as much as possible to rather difficult external conditions.
- Low ISO. Perhaps beginners may be surprised: we are shooting in almost absolute darkness, without high sensitivity we will only get a black picture! This is not true: the light sensitivity should be no more than 200 so as not to create noise. When photographing the sky and stars, the emphasis should be on shutter speed. And read about it further.
- Diaphragm. You shouldn’t open it too much, we need the largest one, since we want to capture the entire landscape. A large aperture, by the way, in such circumstances in any case will not give a noticeable increase in illumination.
- Excerpt- is of paramount importance. It is on it that all the lighting depends, and how the stars turn out, that is, either clear (short shutter speed) or blurred in motion (long shutter speed). It is better to select a specific value yourself, already at the filming location. Remember that the earth rotates, so at average time intervals the stars may also be blurry. Remember that in many low- and mid-range cameras, the longest values are 30 seconds. This is enough to show stellar movement, but within a small range. Thus, a long shutter speed will both brighten the photo and turn dotted stars into dashed stars.
- Focus. The most difficult thing with him is: what to focus on in the dark? Turn off auto mode immediately, it simply won’t help you at all. Using sleight of hand and a natural eye, we will have to adjust the focus. There's unlikely to be anything visible in the viewfinder, so it's worth finding at least some lights and focusing on them. There is an option to illuminate the foreground of the scene, for example, with a flashlight, and focus on it.

When photographing with an amateur camera or an expensive professional camera, in any case, the image of the starry sky will have to be retouched to a certain extent. So don't worry if something doesn't turn out right, but don't get carried away with post-processing either! Rely on yourself and actively use the acquired knowledge.
If you want to understand your SLR camera better, better understand him what he is capable of, then the video course will be your assistant - Digital SLR for a beginner 2.0. Why this course? It's simple. It is intended for beginner photographers. It tells and shows everything in such a way that everything will become clear from the first viewing. Many beginners, having watched it, are already talking to their DSLR on a first-name basis!

Bye! Look for new things, set goals, grow, and above all, improve yourself! Don't forget to visit my blog - the blog of your faithful guide in the world of photography!
All the best to you, Timur Mustaev.
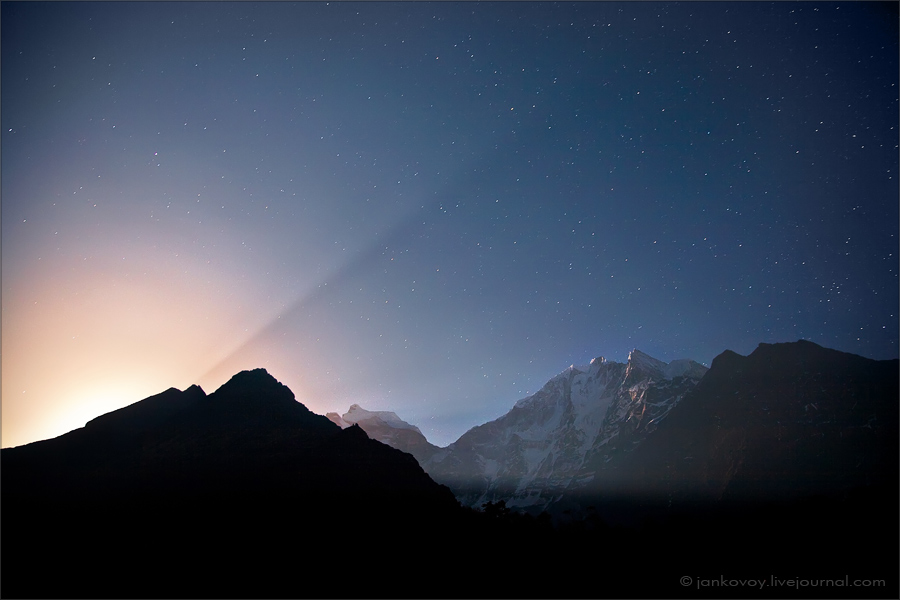
Nepal, national park Annapurna, the dizzying Himalayas, 2010 | 1 h 43 min (199 frames x 30 sec), f/1.8, AF 24 mm (Canon EOS 5D Mark II + Canon EF 24mm f/1.4 II L USM)
Within the framework of night photography, there are 2 main approaches to photographing stars:
1) shooting static stars, when in the final image we see the stars the same as our eyes perceive them (in the form of many dots in the sky :));
2) shooting tracks - photography using very long shutter speeds, in which the photograph captures the trajectory of the stars across the sky around the South/North Pole of the World
So let's take a closer look at each of these types of photography...
Screenshot of the program "Startrails Version 1.1." In action
Screenshot of the program "The Photographer's Ephemeris (TPE)"
There are also a number of programs for modern gadgets based on iOS and Android, which, in addition to simple data on solar and lunar activity, can be a real-time guide to the visible universe, as well as how to show in a time machine, taking into account the relief, what will be visible and in what place at a given time. It works very simply. You turn on the program and a real picture of the surrounding area is displayed on the screen from the built-in camera, on top of which the location and trajectory of the Sun, Moon, planets, constellations, nebulae, etc. are superimposed. All this works thanks to the GPS and gyroscope built into your device. What seemed like some kind of unthinkable fantasy just a couple of years ago is now available to everyone. It is very difficult to overestimate the usefulness of these programs in photography (especially landscape photography). So download them quickly to your devices;) Here are the links to best programs in this segment for iOS: Star Walk , SkyView; and Android: Google Sky Map , Celeste SE .
If you know any other programs that could be useful for a night photographer, send their names with accompanying descriptions in the comments and I will add information about them to this article.
Work examples
For inspiration, in addition to my works, I’ll give 10 more examples best photos stars that I managed to find on the Internet. Links to good stellar photographs and your first experiences after reading this article are also welcome. Experiment and you will succeed! ;)
Over the past year, periodically you could see photographs of stars in my articles. Some asked me questions, like what aperture, what shutter speed, etc. Therefore, I have already published the photos themselves in a separate post with their parameters, but here I want to post them detailed description how to photograph the starry sky. I've been wanting to write for a long time similar article, but there was very little experience. After reading this manual, you will at least be able to take the same photos as mine.
I warn you right away that I am not a pro in this matter, and you will not discover anything radically new for yourself, especially if you yourself are engaged in similar filming. Nevertheless, it will be useful for beginners to know some nuances that I did not know at the time.
I have written a number of articles related to photography and aimed at amateurs like me. Here is a list of them, you can take a look.
What you need to photograph the starry sky
- First of all, a tripod. Shutter speeds are long and you can’t get anywhere without a tripod. It is important that it supports the weight of the camera along with the lens and does not wobble, but at the same time it is not too heavy, otherwise you will not want to take it on a trip, well, unless you are driving a car, of course.
- A camera with manual settings and preferably shooting in Raw, because this format provides great opportunities for photo processing. It would also be nice if the ISO could be set to 800-1600 without much damage to the picture.
- Wide-angle lens for shooting static stars and large coverage of the starry sky.
- A remote control for setting long exposures, or in common parlance a cable.
- Spare battery, as it runs out quite quickly.
My starry sky photography kit
In general, I already wrote about my wife and I’s set of photographic equipment in an article. But there was the whole list, namely the pictures of the night sky that I am currently taking:
- Canon 7d camera
- Wide-angle and fast lens Tokina 11-16 F2.8
- Programmable remote control
- Slik Sprint Pro II 3W CG Tripod
I think you can photograph the starry sky with a point-and-shoot camera, if it allows you to do certain things, such as: set the shutter speed to 30 seconds or connect a remote control to it, screw on a tripod, set the ISO higher without making brutal noise, open the aperture wider. Otherwise, your options will be severely limited, and it’s unlikely that anything will work out.
My typical mistakes
I recently started trying to photograph the starry sky. But my first photographs did not turn out well at all, since I was sure that just a long exposure of 30 seconds would be enough. As a rule, all DSLRs allow you to shoot with a shutter speed of 30 seconds without a remote control.
So, for such shutter speeds you cannot clamp the aperture, although you want to make everything sharp. In this case, there is not enough light from the stars for them to appear normally in the sky. On the contrary, you need to open it to the maximum! In my lens it is F2.8, some people buy even faster lenses. But not only the aperture needs to be opened, it is also advisable to set the ISO to at least 800-1600.
Options for shooting the starry sky
1. Shooting static stars. Exposure 10-40 sec. They look like dots, that is, the way we see them with the ordinary eye.
2. Filming the rotation of the starry sky (stars in the form of stripes) or otherwise, tracks. Exposure length ranges from several minutes to several hours. Completely unrealistic photos, but they look funny.
3. Shooting tracks, but in a different way. A large number of photographs are taken of the same area of the sky using the technology of shooting static stars with an interval of 1 second, and then glued together in a special program into one photograph. Visually it is similar to option 2, but more colorful and with less noise. When shooting tracks using option 3, we get both a stitched final photo and the ability to stitch together a timelapse video.
4. Timelapse. More photographs of static stars are taken and then compiled into a video. The results are very beautiful videos of how the stars move across the sky.
How to photograph the starry sky - static stars

Static stars. ISO1600, 11mm, f2.8, 30sec
Excerpt
Well, let's move on to photographs and actual shooting. As you already understood, due to the fact that stars move, they remain in the form of fixed points only up to a certain shutter speed. And if she has higher value, then they turn into stripes. And in order to calculate that very critical shutter speed value, there is the “600” rule.
We need to divide 600 by the focal length of your lens and we will get the maximum shutter speed at which the stars will still be points. This formula is valid for full-frame cameras, crop factor 1:
15 mm - 40 sec
24 mm - 25 sec
35 mm - 17 sec
50 mm - 12 sec
85 mm - 7 sec
135 mm - 4 sec
200 mm - 3 sec
300 mm - 2 sec
600 mm - 1 sec
Most often, everyone, including me, uses non-full-frame cameras. This means that an amendment is needed - we also divide 600 by your crop factor. For Canon cameras this is 1.6:
10 mm - 38 sec
11 mm - 34 sec
12 mm - 32 sec
15 mm - 25 sec
16 mm - 24 sec
17 mm -22 sec
24 mm - 15 sec
35 mm - 10 sec
50 mm - 8 sec
Obviously, a full-frame sensor and wide-angle lenses have a larger shutter speed margin. That is, when shooting with a 50 mm lens on a cropped matrix, you only have 8 seconds, and this is very, very little, the stars will not be visible. In addition, such a lens may not have enough viewing angle.
According to my observations, the shutter speed can still be increased by one and a half times. Yes, when zooming on a computer, the stars will already be dashes, but in small photographs (for a blog, for 10x15 prints) this may not be particularly visible.

Diaphragm
It is best to open the aperture as wide as possible. If the lens allows you to open it to 1.6-1.8, then it will be possible not to increase the shutter speed above critical and not to set the ISO above 800. Sharpness drops, but what can you do?
Manual focus
At night you can forget about automatic focusing, so you will have to use only manual focus. Usually it is advised to put it in the extreme position at infinity, because we are shooting stars. But I was faced with the fact that my lenses almost never adjust the focus to infinity in auto mode. I checked it by focusing on the moon and distant lights (these, by the way, are options for autofocusing at night). There was just a little bit left to the extreme position, which is what I used later.
Focal length
I repeat once again, the longer the focal length, the shorter the shutter speed should be, because the stars are getting closer, which means that in order to prevent tracks, you need to reduce the shooting time. In addition, you may not have enough viewing angle; you won’t just shoot one sky without anything. And the density of stars decreases as you approach.
How to photograph the starry sky - sky rotation, tracks

Rotation of the sky. ISO400, 11mm, f5, 1793sec
So far I have shot only a little bit of tracks and only using the second option (without using additional programs).
Excerpt
From 10 minutes to several hours. The longer it is, the longer the lines drawn by the stars. You need a remote control to set such values and a good tripod so that it does not get blown around by the wind for such a long time. Just keep in mind that at such shutter speeds it is very difficult to calculate the correct exposure.
Diaphragm
It is difficult to write specific values, since I do not know how to calculate the exposure, most likely only by experience. And there is always a risk that after half an hour of waiting, you will get a blown-out shot. I set it by eye, for example, like this - 11 mm lens, shutter speed 30 minutes, aperture 7.1, ISO 400.
Focal length
In this case, it can no longer be said that it is better when it is minimal, because precious seconds of exposure are no longer so important, there is enough light in any case, the count is not in seconds, but in tens of minutes. Therefore, if the composition of the frame works well with a regular rather than a wide-angle lens (the angle is enough), then this is even better, since you will have to wait much less for the frame to be captured. But you need to understand that the stars will be closer and their tracks will become less round. You are unlikely to need a lens larger than 50 mm.
Determining the center of rotation of stars
Since the stars in the sky rotate, their tracks are circles, which naturally have a center. And, if you build the composition of the frame in a certain way, then where this very center is, it will be useful to know. Therefore, in the northern hemisphere we aim the lens at North Star, and in the south on Sigma Octanta. Rotating, in half an hour the star forms an arc of 7.5 degrees, and this arc is longer, the further the star is from the North Star or from Sigma Octanta.

At the center of rotation is the North Star. ISO400, 11mm, f7.1, 1793sec
Now about how to look for the stars we need. The easiest way to find the North Star is through the Big Dipper. We find a constellation on the horizon, mentally connect the two stars of the bucket, forming one of its walls, located opposite the handle of the bucket, and get a line. Mentally set aside 5 distances along this line from the bucket (from its top and beyond) and rest against the North Star.
It seems to me that Sigma Octanta is almost impossible to find in the southern hemisphere. It is easier to be guided by the Southern Cross constellation. First we find it in the sky, and then we extend the long crossbar of the cross downwards by 4.5 times the distance of this same crossbar. Sigma Octanta will be around this location.
How to photograph the starry sky - tracks in the program
All settings are set exactly the same as in the first point when shooting static stars. I won't repeat it. But in fact, you can use longer shutter speeds when you can see a slight shift in the stars. All the same, the program will glue all this together. But in this case, as individual photos they will not be very beautiful, and you won’t be able to make a timelapse later.
Software for gluing tracks
There are probably different programs, but I know only one - Startrails Version 1.1, it is very simple and not difficult to understand. Upload files and make tracks. If they turn out to be too long, then some of the photographs can be removed from processing.
How to shoot timelapse
I did Timelapse with stars only once, as it was quite a long activity. And then, having taken 99 frames, I left the tent and realized that the sky was overcast and there was nothing more shining for me, it was a shame. Up to this point I had only shot timelapse during the day, like the sun is setting or people are moving, and this was video filming on a point-and-shoot camera (it does this well for me), then sped up in Premier. And to photograph the sky you need a camera; a video camera at night will not be able to shoot with such a long shutter speed.
The video used 99 frames (ISO1600, 11mm, f2.8, 27 sec) with an interval of 1 second. The total shooting time is 46 minutes. This was enough for 4-7 seconds of video. If you do it slower, you will already notice how the image is interrupted.
Here is a small calculation of how many photos you will need to have for a 1-minute video with the rotation of the starry sky. The video contains 25 frames in 1 second, and if it is a minute, then it will already be 25*60=1500 frames. We take each photo, say, with a shutter speed of 30 seconds and an interval between frames of 1 second, which means to shoot 1500 frames we will have to spend 31 * 1500 = 46500 seconds, or 775 minutes, or ~ 13 hours.
Some nuances when shooting the starry sky
1. If the moon is shining brightly in the sky, the stars will be faded in the background blue sky. Therefore, you need to shoot before the moon rises, or at a time and place where the moon is not visible, as well as during the new moon. For example, in August in Crimea, during a 5-day hike, I never saw her once, and the sky was black and black. But in fact, lunar landscapes can be quite beautiful; the night star illuminates everything around very well.

2. Lights big city in the same way, the sky is well illuminated, but inside the city it is generally not realistic to photograph the starry sky; you need to move tens of kilometers away. And only if the city is visible somewhere in the distance, it can create an interesting backlight.

— It must be taken into account that at night there is a possibility of the front lens fogging up. Therefore, if it is humid, then ultra-long exposures and shooting tracks are not always possible.
3. With long exposures of ten minutes or more, the matrix heats up and terrible noise appears in the photo. I can’t say about all DSLRs, but in my Canon 7d it’s very noticeable - there are a lot of multi-colored dots in the photo. But the noise reduction function for long exposures saves the day; they are somehow subtracted from the image. There is only one moment: the noise reduction works as long as the shutter speed lasted, which means the duration of shooting one frame doubles, for example, instead of 30 minutes, it takes a whole hour. The option of shooting tracks by gluing together photographs in specialized software does not have this drawback; the matrix does not have time to heat up.

4. Just photographing the starry sky once is enough. Next you will want to do more interesting photos, and they require objects in the foreground. Therefore, the problem arises of choosing a place for shooting; an ordinary field or forest looks so-so, you need to experiment and use your imagination. Personally, I like the mountains most in this regard, but since I don’t go there often, I don’t have many shots of the starry sky.


© 2018 site
Altair, Vega and Ras Alhage
Many people admiring the starry sky on a clear night have a desire to photograph the spectacle they see. Unfortunately, these attempts are not always crowned with success, especially since a person who is accustomed to photographing exclusively during the day with plenty of light often has no idea how to approach photography in such seemingly unfavorable conditions. However, get a beautiful night shot with rich colors, clearly visible constellations and a whitish stripe Milky Way crossing the sky is simpler than it might seem at first, and in this article I will try to cover the practical side of the issue as clearly as possible. Let me note that we are not talking about high-level astrophotography, but rather about ordinary shooting of the starry sky in the context of landscape photography. Detailed photography of deep space objects (galaxies, nebulae, quasars, etc.) requires very specific skills and tools, while decorating the night landscape general plan Everyone can explore the Milky Way.
There are two types of photographs with the starry sky. In the first case, the stars are represented as individual points, i.e. approximately the same as we see them in real life. To obtain such photographs, relatively short (by night standards) shutter speeds are used - up to 30 s. In the second case, very long exposures are used - up to several hours (or a series of short exposures are stitched together later using a special program) - and due to the rotation of the Earth, the stars manage to trace long luminous trails in the sky, twisting around the celestial pole. Such images look very unusual, but personally I prefer the first type of photographs, as they are more realistic and at the same time more artistic. And since they are also much simpler technically, it is about obtaining such images, i.e. depicting the stars as conditionally motionless, we will talk.
Equipment
Camera
You will need a camera with a large sensor (crop factor no more than 2) and manual exposure settings, i.e. DSLR, mirrorless or, at worst, an advanced compact. A soap dish with a small sensor is useless even if it has manual settings, since any stars will drown in noise, up to complete indistinguishability. A mobile phone can only be useful as a flashlight during a night photo shoot.
I hate to write about this, but shooting the starry sky is one of those rare cases when a full-frame camera has an objective advantage over cropped models. All other things being equal, a full-frame matrix provides a gain in noise by approximately one step compared to an APS-C format matrix, and in conditions of acute light deficiency this is quite a lot. However, as practice shows, moderately cropped devices also allow you to get pretty good pictures of the night sky - the picture will just be a little less clear.
DSLR cameras are preferred over mirrorless cameras due to the presence of an optical viewfinder. The electronic viewfinder of some mirrorless cameras sometimes goes blind in the dark, while a traditional optical viewfinder allows you to somehow compose the frame even in the light of the stars.
Lens
Take the widest and fastest lens you have at your disposal. Wide-angle to fit more of the sky into the frame and reduce the effect of blurring the stars due to the rotation of the Earth, and fast-aperture because there will be really little light, and the ability to open the aperture an extra stop will seem more valuable to you than ever before.
The ideal option is a lens with a fixed focal length of 20-24 mm (35 mm equivalent) and an aperture of f/1.4 or f/1.8. A zoom or prime lens at f/2.8 is acceptable, but not nearly as good. However, even if all you have is a kit zoom 18-55mm with a maximum aperture of f/3.5 at wide-angle, don’t be discouraged: that will do.
I usually don’t favor fisheye lenses, but for shooting starry skies they (if you know how to use them) are quite appropriate.
Tripod
Any tripod that can support the weight of your camera will do.
Remote release
A remote control or cable release is convenient, but not required. We'll be using shutter speeds so long that any vibration caused by the shutter release will only take up a small portion of the total exposure time and will have virtually no effect on the sharpness of the final image.
Flashlight
A flashlight is needed so that in pitch darkness you don’t fall into a ravine or step into a cow pat, and also to make focusing easier. In addition, the flashlight allows you to highlight elements of the landscape if required. artistic design. The more powerful the flashlight, the better.
Place and time for shooting
The further you are from the city, the less exposure there is from street lighting and the better the stars are visible. Light pollution is the main and most difficult obstacle when photographing the night sky. It is because of this that the sky in night photographs often looks brown or even orange instead of black. In a word, the more remote place you choose for shooting, the better. It is desirable that the nearest populated area with minimal street lighting be at least a couple of kilometers away, and the distance to large cities should be measured in tens of kilometers. If you wish, you can use the Blue Marble map to estimate the extent of light pollution in your area.
By the way, moonlight also illuminates the sky quite well, and therefore, if your main goal is the stars, and not the moonlit landscape (which, in general, is also beautiful in its own way), then you should shoot on moonless nights if possible.
Obviously, the sky should be clear, so it's a good idea to check the weather forecast so you don't get caught off guard by overcast skies. On the other hand, the presence of minor translucent clouds in the sky can sometimes even brighten up the photo. In fact, even the glow of light from cities lying at some distance can be used for artistic purposes, if you still can’t escape from it.
As for the shooting time, at least two hours should pass after sunset (true for 54° north latitude, where I live). The closer to midnight, the better (by the way, in Belarus, astronomical midnight occurs at approximately 1:00). The darkest nights with stars as bright as gems usually occur in winter. It’s just a pity that in winter our weather is most often cloudy and you can’t see the stars in the sky, and the rare cloudless winter nights are always accompanied by severe frosts.
Composition
Composition, you say... It’s good if, when looking through the viewfinder, you can distinguish the sky from the ground. However, sometimes you can still see something. In this case, it usually makes sense to place the horizon line as low as possible. The earth is most often too dark to be of serious artistic interest, but the starry sky, for the sake of which, in fact, everything was started, I would like to make the main area of interest. You can, for example, run the Milky Way across the entire frame from corner to corner, you can find familiar constellations, bright stars, planets (for those who want to improve their knowledge of astronomy, I recommend Stellarium), and if there are individual clouds in the sky, use them as structure-forming elements. Frames with vertical orientation work well.
You shouldn’t completely exclude the earth from the frame - the photo will become too abstract. It is better to look for objects that have an expressive silhouette (trees, boulders, old buildings) and place them at the bottom or sides of the frame. The main thing is that they do not take up too much space. If there is a lake nearby - great - you will have the opportunity to show not only the starry sky, but also its reflection in the water.
If you really want, you can highlight foreground objects with a flashlight if you are not afraid that they will distract the viewer’s attention from the starry sky. As a rule, this is justified when the night is not too dark (light or moonlight interferes) and the sky does not look expressive enough to become the main compositional center.
Camera settings
RAW or JPEG?
I refer the reader to the corresponding article. In my opinion, RAW is preferable, since night shots almost always require quite intensive processing, but by shooting in JPEG you can get good (albeit less controllable) results.
Focusing
If you point your camera at the night sky and try to use autofocus, nothing good will most likely come of it. The brightness of the stars is usually not enough for the autofocus sensors to catch on to them (it happens with planets that it does). It is also unlikely to be possible to manually focus in the traditional way, since when using wide-angle optics, individual stars are practically invisible in the viewfinder. Therefore, the lens must be forced to focus at photographic infinity. How to do it?
Old manual lenses allowed you to aim at infinity blindly by simply turning the focusing ring all the way. Modern autofocus lenses not only lack a stop, but also the focusing distance scale, to put it mildly, is not very accurate. In principle, such a scale can be used (if you have a flashlight, of course), but first you will have to carry out some kind of calibration by studying which values on the scale correspond to real photographic infinity. In daylight, let the autofocus focus on some very distant object near the horizon and, looking at the scale, remember or write down the desired value so that you can use it when the autofocus is powerless.
Some budget lenses do not even have a primitive focusing scale. In this case, you will still have to resort to autofocus, even if it does not want to focus on the stars. Look around for any fairly bright object located at the maximum distance from you (most often these will be distant lights of some populated area), and try to focus on it. If everything works, turn off autofocus and try not to touch the focusing ring in the future. If there are no suitable light sources nearby (which is generally not bad, for the reasons described above), use a flashlight. Place the switched-on flashlight on the ground, a stump or a stone, then move away as far as possible and focus. If you don’t suffer from excessive pedantry, then, on average, for wide-angle lenses, everything that is more than ten meters from the camera can be considered infinity.
Exposition
The exposure meter is even less useful in the dark than autofocus, i.e. none at all, which is why the camera should be switched to manual mode and set the exposure by touch. Assessing exposure will be difficult for a number of reasons. First, the camera screen appears very bright in the dark, so underexposed photos may look normal and normal photos may look overexposed. Secondly, exposing based on the highlights (as I usually recommend doing) in this case is not the best idea, since the stars are too bright objects and, trying to prevent clipping in the highlights, you will drown the frame in darkness. Therefore, you will have to accept that both shadows and highlights will be outside the camera's dynamic range. Thirdly, long shutter speeds make the experimental selection of exposure parameters an extremely labor-intensive process.
Below I will try to show how, without further ado, to obtain a more or less correct exposure, without resorting to the help of an exposure meter and without doing tedious selection.
Diaphragm
Open the aperture to the limit, i.e. Set the minimum aperture number available for your lens. Every photon is precious to us now, and this is exactly the situation when, for the sake of a less noisy picture, we can sacrifice a little sharpness.
Excerpt
The longer the shutter is open, the more light will fall on the matrix, which, of course, is good, but the more blurred the stars in the image will be due to the rotation of the Earth, which is not so encouraging.
For such cases, there is a popular “rule of 600”, according to which, by dividing the number 600 by the equivalent focal length of the lens in millimeters, you can get the maximum allowable shutter speed in seconds. For example, for a lens with a focal length of 20 mm, the shutter speed will be 600 ÷ 20, i.e. 30 seconds. For a longer 35mm lens, a shorter shutter speed was needed: 600 ÷ 35 = 17. Since not every shutter takes 17 seconds, the result can be rounded up to 15.
However, my experience is that even using shutter speeds one and a half times slower than dictated by the 600 rule (call it the “900 rule” if you like) produces pretty decent images. Yes, near the celestial equator at 100% magnification the stars will be slightly blurred, but this effect will be so insignificant that it can easily be ignored.
For those who are just starting to master night photography, I would recommend an even simpler and more liberal approach: if you are using a wide-angle lens (or a standard zoom in the wide-angle position), set the shutter speed to 30 seconds and do not fool yourself, especially since for many cameras 30 seconds is the maximum shutter speed available in standard modes, and you don’t need to set a lower shutter speed.
ISO
If you, following my advice, set the shutter speed to 30 s and opened the aperture completely, then, depending on the aperture of your lens, you should set the ISO sensitivity to the following value:
| Diaphragm | ISO |
| f/1.4 | 800 |
| f/1.8 | 1250 |
| f/2 | 1 600 |
| f/2.8 | 3 200 |
| f/3.5 | 5 000 |
| f/4 | 6 400 |
The values indicated in the table should be taken as starting guidelines, from which it is permissible to deviate upward or downward if such a need arises.
Noise reduction
If your camera allows it, turn on Long exposure noise reduction, provided, of course, that you have the patience to wait an extra half minute after each exposure for the camera to take a control shot with the shutter closed. A photo taken at high ISO values will still turn out quite noisy - you need to be prepared for this, but if there is an opportunity to improve the image quality at least a little, this opportunity should not be neglected.
White balance and image style don't make any difference when shooting in RAW, but in case you shoot in JPEG, or just want your photos to look decent on the camera screen, let me give you a couple more recommendations. .
White balance
Automatic white balance when shooting a starry sky is absolutely unacceptable, unless, of course, you deliberately strive to give the sky a dull gray-brown-crimson tint. You can set the white balance for incandescent lamps (Tungsten or Incandescent), i.e. approximately 3000 K, but in my opinion this makes the picture too cold. The best ready-made presets are usually settings for fluorescent lamps, for example, “Lamps white light“(White fluorescent – 3700 K) or “Cool-white fluorescent – 4200 K”. If your camera allows you to set the color temperature manually, then start with 4000 K and shift the Tint slightly towards Magenta. The final values can be determined experimentally.
Picture style
For the starry sky the best way Vivid style or something similar is suitable, i.e. with the most saturated colors and high contrast, and color saturation can be further increased by adjusting the Saturation parameter. Unlike daytime landscapes, there is no need to be afraid of getting unrealistically saturated colors, since the scene will look very unusual in any case, and additional colors will not harm it in any way.
Thank you for your attention!
Vasily A.
Post scriptum
If you found the article useful and informative, you can kindly support the project by making a contribution to its development. If you didn’t like the article, but you have thoughts on how to make it better, your criticism will be accepted with no less gratitude.
Please remember that this article is subject to copyright. Reprinting and quoting are permissible provided there is a valid link to the source, and the text used must not be distorted or modified in any way.
In modern Russian-language magazines and books on photography you can find thousands of articles about landscape, portrait, animalistic, reportage, genre and other types of photography.
It seems like everything has already been written. It's hard to even think of what could be added to all this. But if we take a closer look, we will see that all these countless volumes of advice and instructions mostly relate to shooting only during the daytime and, in rare cases, in the evening.
Almost not a word is said about night photography, but the dark time of the day occupies at least a third of the entire length of the day. Some may argue that at night nothing is visible, there is no light and the art of light painting loses its power and relevance.
With this article I will try to refute this stereotype and show that night photography can be no less interesting and productive than other genres of photography.
The first and main problem that a photographer faces when shooting at night is the insufficient amount of light. And if in painting the artist draws with paints, then in photography the basis for everything is light.
And, unlike regular photography, at night the photographer has to collect light bit by bit, cherishing every photon as if it were a treasure. There is something mysterious, even mystical in some way, in all of this.
It is important that in such conditions you very quickly learn to appreciate and feel light, after which working in daylight no longer seems so difficult and at times not even so interesting and exciting.
Choosing photographic equipment
Before moving directly to questions related to photography, let's decide what equipment we should take with us on a night photo hunt.
Camera
Since at night you have to work almost at the limit of the capabilities of modern digital cameras, it is advisable to use the most modern technology, which will allow you to obtain photographs of the highest possible quality.
When choosing a camera, you should give preference to full-format top models from leading manufacturers of the photo market (Canon EOS 1Ds Mark III, Canon EOS 5D Mark II, Nikon D3x/s, Nikon D700, etc.), which provide a relatively low-noise picture at high sensitivity values (ISO ) and/or long exposures (shutter speeds).
Of course, this doesn't mean that other cameras are unsuitable for night photography. Not at all. Simply more advanced and modern models They provide more flexibility and high-quality shooting, and they are well protected from a variety of adverse weather conditions that are often associated with night photography.
 Canon EOS 1Ds Mark III, Canon EOS 5D Mark II, Nikon D3x, Nikon D700
 Lenses
All of the above about choosing a camera can also be applied to lenses. It is advisable to use top-end lens models that can provide maximum resolution at open apertures.
The faster the optics you choose, the easier it will be for the camera to focus and the easier it will be for you to compose the desired shot, since the brightness of the image you see in the viewfinder of your camera directly depends on the aperture of the lens used. But a fast lens is also not a panacea.
Many budget models with relatively fast lenses have a lot of blur at the edges of the frame. This is another reason why you should give preference to more expensive models that allow you to get a sharp picture even at almost fully open apertures.
In addition, it is important to note that most often and best scenes with a starry sky, circular star tracks and the Milky Way are obtained when using wide-angle lenses.
An excellent means of self-expression in astrophotography is also ultra-wide-angle optics with a field of view close to 180 degrees. These are the so-called fish-eye lenses, which in astronomy are usually called all-sky lenses (all-sky lenses).
With such a field of view, you can easily capture almost the entire starry sky in the frame. Just remember that such lenses have strong distortion (geometric distortion), so always keep an eye on the horizon line and vertical lines at the edges of the frame.
As for my personal experience, I extremely rarely use zoom lenses and lenses with a focal length of more than 50 mm, since as the focal length increases, the density and, accordingly, the number of visible stars in the frame decreases, and star trails become larger at long exposures approach boring straight lines.
Specifically, for the Canon system I would recommend the following lens models: Canon EF 14mm f/2.8 L USM, Canon EF 15mm f/2.8 Fisheye, Canon EF 24mm f/1.4 L II USM, Canon EF 35mm f/1.4 L, Canon EF 50mm f/1.2 L USM. Although, you need to understand that you can use absolutely any optics. The main thing is to have good imagination, stubbornness and a true desire to achieve the expected result.
 Canon EF 14mm f/2.8 L USM, Canon EF 15mm f/2.8 Fisheye, Canon EF 24mm f/1.4L II USM, Canon EF 50mm f/1.2 L USM
 Tripod
A tripod, it’s a tripod in Africa too, so there are no special requirements for it. It just needs to be stable and able to support the weight of your camera equipment.
It is highly recommended to use tripods made of composite materials, which, among other things, very well dampen vibrations that come from the ground and are relatively light in weight, which is very critical during long trips, especially in mountainous regions.
It would also be useful to have a hook on the central rod, on which you can hook up a photo backpack or some other load for greater stability of the tripod.
Remember that vibrations that can ruin your shot can be caused by passing cars, people walking, or wind. Therefore, try to choose a location for shooting in a quiet, windless place, away from roads and trails. Well, if you want to warm up or jump/squat to warm up, it’s better to move to the side, away from the tripod.
It’s good if there is a level on your tripod head with which you can level your camera horizontally, since at night it is often not possible to determine the position of the horizon “by eye” the first time. If your tripod head does not have a level, then you can buy a level that is placed in the flash shoe. You will need such a device in the future, especially when shooting panoramas 😉
 PHOTO TRAVEL team after night shooting (Nepal, Himalayas, Everest region)
 Flash
Some photographers use off-camera flash/flash units to highlight the foreground. Sometimes this gives very interesting results. So you can experiment if you wish.
I don’t practice this, because I really appreciate natural night lighting, which seems to me more alive, plastic and somewhat mystical.
Power supply elements
Photographing night scenes always involves long exposures, multiple takes, and an insane number of shots when shooting in time lapse mode.
Often one night photo session, smoothly turning into dawn photography, can reach 7-9 hours. Moreover, in the vast majority of cases, in conditions that are not at all favorable for the camera (cold, snow, wind, etc.).
Therefore, I strongly advise you to stock up on a fair amount of fully charged batteries before going out on a night photo hunt. Sometimes it happens that during an extremely long exposure or time lapse shooting, at the most inopportune moment, the battery is discharged, and even an ultra-quick replacement will not save your shot.
To avoid such cases, you can resort to using a battery grip, which will at least double the operating time of your camera on one set of batteries.
Spare batteries should always be kept in a warm, dry place, somewhere in the bosom, closer to the body. For example, on mountain treks I always sleep in a sleeping bag along with all the batteries from 2 cameras, not to mention the fact that I always carry them in the breast pocket of my down vest. As they say, I keep everything that is most precious to my heart.
 Self-portrait against the backdrop of Machapuchre (6997 m), full moon (Nepal, Himalayas, Annapurna Base Camp)
 Programmable cable release (PST)
If not mandatory, then highly recommended when shooting at night is the presence of such a specific photographic accessory as a programmable cable release. It is very difficult to overestimate its importance in this genre of photography. So, let's figure out how it can be useful to us...
- Allows you to take photographs without direct contact with the camera, which reduces the likelihood of movement in the frame (but this can also be avoided by using an in-camera function of the camera such as a shutter timer or a simple cable/remote control);
- Allows you to shoot in bulb mode. You simply hold down the button on the cable at the beginning of the exposure and release it when you want to finish exposing the frame. This way you can set an almost infinite shutter speed, which is limited only by the charge of your battery. The only downside of this method is that you will have to constantly monitor the exposure time so as not to miss the moment when you need to close the shutter curtain. Of course, you can simply press the shutter button of your camera with your finger, but then you will probably be guaranteed to move in the frame;
- Allows you to set a programmable shutter speed, in which you set the desired exposure period of the frame in advance (up to 100 hours in 1 second increments);
- Allows you to take time-lapse photography with a specified number of pictures in a series, at any interval from 1 sec and with any exposure pair you have programmed (both in fully manual and semi-automatic mode). This is probably the most important function of this device, which allows you to take pictures of starry stars tracks with absolutely any exposure duration, without losing anything in quality. In addition, using this PST function, you will be able to shoot a series of time lapse images, from which you can then edit a video with the rapid movement of the starry sky, the Milky Way, the blooming of flowers, the growth of mushrooms, the movement of clouds, people, the construction of some objects, or anything at all;
- Allows you to set the shutter timer from 1 sec to 100 hours (in-camera capabilities are limited to 10-12 sec). How can this be useful and how can you use this function when shooting at night? It’s very simple. For example, you want to take a photo of the Milky Way over the surrounding landscape, but you are very tired and do not want to get up in the middle of the night to shoot this scene.
Then you put the camera on a tripod, adjust to the landscape you want, focus, set the necessary parameters for the exposure pair (again in manual or semi-automatic mode) and set the timer for the time at which, according to your preliminary calculations, the Milky Way will pass in the place you want , start the timer and go to bed. And in the morning you wake up, voila, and discover that the camera has already left a trace of a beautiful night shot on your card.
You cannot replace the last 3 functions of the PST with anything, except perhaps a hired slave who will sit all night long with a stopwatch in his hands and work out hundreds of exposures with an interval of 1 second)) and will get up at midnight to take the picture you have in mind :)
 Programmable cable releases Canon TC-80N3 and Nikon MC-36
 Useful little things
- Flashlight— helps to get to the intended shooting location in the dark; sometimes they can be used to highlight a close-up object to help the camera focus on it;
- Compass- helps literally in a matter of seconds determine the cardinal directions, find the poles of the world and, coming out of this, even before dark, plan the future composition of the frame;
- Mobile phone/PDA/iPad/laptop- useful as an entertainment device that will help while away long nights with a camera programmed to shoot for many hours (player, all kinds of games, e-books, films, etc.). In addition, you may need a calculator function to calculate the duration of exposures, number of frames, etc.;
- Backlit clock— help not to get lost in time and calculate the shooting period;
- Food- be sure to bring some food with you, some nuts, dried fruits, seeds, perhaps chocolate bars, cookies. This will at least slightly diversify your nights, help keep your body in an active state of wakefulness and keep you warm on cold nights, otherwise without food it becomes somehow even colder;
- Beverages- Bring water/juice with you. It would also be a good idea to take a thermos with hot tea/coffee. Hot drinks are especially helpful when shooting in winter and in the mountains, where it’s simply unthinkable to sit up all night without them;
- Warm clothes- even in the lower reaches, in the warm season the nights are always cooler than the day, so take some spare jacket or windbreaker with you. If you are going to shoot in the high mountains and/or in the cold season, then you need to take your choice of clothing more seriously. In such cases, you don’t need to take it off, but put it on! More warm clothes. Don't forget about warm woolen socks and two pairs of gloves - one thin, in which you can work with the camera, others thick, worn over thin ones. Fingers freeze instantly;
 Me with Slava Dusaleev the morning after a night shoot.
 - Optical cleaning kit. It is clear that before shooting, all optics must be thoroughly cleaned and “rubbed” to a crystal shine. But in addition, at night, abundant moisture (condensation, dew) may settle on the camera due to temperature changes. In this case, the front lens of the lens first becomes covered with barely noticeable droplets, and then completely loses its transparency. It’s good, if you manage to notice this phenomenon in time, wipe the camera and lens. As a rule, shutter speeds are so long that you cannot be sure that there will be no condensation on the front lens until the end of the exposure, when it becomes possible to examine it in the light of a flashlight. In this case, you can regularly check for moisture on the camera and, if necessary, gently wipe the surface of the lens (or filter);
- Protective (insulated) all-weather camera case— used to protect the camera from all sorts of vagaries of nature, such as rain, snow, frost, condensation;
- Gradient filters- sometimes (especially on moonless nights) they help to even out the difference in brightness between the bright starry sky and the dark surrounding landscape;
- Atlas of the starry sky- a wonderful companion and guide in our visible Universe. With his help, I discovered a new incredibly interesting and fascinating world of astronomy;
- Schedule times and places of moon and sun rises/sets for the entire period of your trip
Shooting conditions
When photographing stars, the most important criterion is the transparency of the sky, which depends on several factors:
- Height above sea level- the higher you climb into the mountains, the thinner and more transparent the layer of atmosphere above you will be and the clearer the starry sky will be;
- Filming location relative to the earth's equator - the closer to the equator, the more transparent the sky;
- Presence of haze in the air— it is best to shoot immediately after heavy rainfall, when all the dust and haze that was previously in the air settles for a while;
- Presence of sources of air illumination- choose places away from settlements, roads and any other places where light sources may appear. Otherwise, instead of the stars, you will photograph the air illuminated by the city. Moreover, you should not assume that if there are no light sources in the frame, then you are saved. The light from the air from the same city is visible tens of kilometers away, from places where, it would seem, there is no longer any hint of cars or street lights;
- Presence of clouds- even thin clouds, barely visible to the eye, in the picture turn into large opaque monsters, covering the stars. Therefore, try to choose clear nights for filming;
- Another factor The presence/absence and intensity of the light of the Moon, depending on its position in the 29.5 day cycle of waxing and waning, greatly influences the visibility of stars. The Moon is a powerful source of light that illuminates the air (even when it is not in the frame!). Therefore, if you want to capture all the beauty of the starry sky, it is advisable to shoot on a new moon or when the Moon is not in the sky at all. But don’t be afraid and avoid the Moon; it itself is also a very picturesque subject for photography, but this will be written about a little later.
Focusing
In order to “win” more light when shooting at night, relatively open apertures are most often used, at which the depth of field (depth of field) decreases significantly.
Therefore, it is best to choose scenes in which all plans are at a sufficiently distant distance from the camera and correspond to infinity on the focus scale of your lens.
 Nepal, Annapurna National Park, view of the Kali Gandaki river valley with the South Nilgiri (6839 m) in the background, 2011 | 20 sec, f/1.6, ISO 2000, AF 50 mm, rising moon (Canon EOS 5D Mark II + Canon EF 50mm f/1.2 L USM)
 A bright object that can be seen in the distance can help you autofocus “on the stars.”
It could be the Moon, the light in the window of some distant house, bright Star, snowy peaks illuminated by moonlight, a street lamp, etc.. As a last resort, you can ask a friend to run a few tens of meters with the phone turned on and focus on it.
If you need to focus on the close-up, then a flash or flashlight can help you out. But, unfortunately, not all lenses are perfectly adjusted and can produce a perfectly sharp picture at open apertures in atom focus mode. Therefore, I strongly advise you to immediately get used to manual focusing.
It is advisable to have a focus scale on the lens and focus on it manually. But since at night it is very difficult to hit the target “by eye”, it is better to take several test shots until you achieve the ideal result. Also, manual focusing on the screen in LiveView mode turned out to be very effective and accurate, where the desired area of the image can be magnified 10 times! So I recommend it 😉
Composition
It’s worth getting into the habit of finding suitable subjects and shooting points for night photography in advance, during the day. This will be much more difficult to do at night. Next, you wait for a night with a clear moonless sky, and go to the previously found place.
The stars should not be the main subject, they should just harmoniously complement the composition.
To make the photo less abstract, you can include some easily recognizable silhouette in the frame - a separate tree, building, nearby mountain peaks, etc.
 India, Goa | 30 sec, f/2.8, ISO 640, FR 15 mm (Canon EOS 5D Mark II + Canon EF 15mm f/2.8 Fisheye)
 The Milky Way is the largest and most colorful object in the night sky.
It perfectly conveys all the Greatness and Infinity of our Universe. In order to further emphasize this, you can, for comparison, include in the composition a person or something related to him and his activities (a house, a tent, a fire with people sitting around, etc. Show all your imagination here). Dark, moonless nights are best for photographing the Milky Way.
"One fifth of humanity no longer sees the Milky Way" — phrase from National Geographic
 Nepal, Annapurna National Park, Mardi River Gorge, 2011 | 30 sec, f/1.6, ISO 2500, FR 24 mm, moonless night (Canon EOS 5D Mark II + Canon EF 24mm f/1.4 II L USM)
 At night there is also its own “Sun” - this is the Moon. It may sound strange, but lunar sunrises and sunsets can be no less spectacular and colorful than those of its daytime counterpart.
 Nepal, Sagarmatha (Everest) National Park, sunrise full moon over the Himalayas | 30 sec, f/4, ISO 400, FR 24 mm, full moon (Canon EOS 5D + Canon EF 24-105mm f/4 L IS USM)
 If we talk about moonlight, then all the same laws and rules apply here as during daylight hours.
Post-sunrise and pre-sunset moonlight are ideal for photography. The light at this time is very soft, voluminous, and colors the surrounding landscapes in warm (sometimes even reddish) tones.
 Nepal, Annapurna National Park, Dhaulagiri (8167 m) in the golden light of the rising full moon, 2010 | 30 sec, f/2.8, ISO 400, FR 145 mm, full moon (Canon EOS 5D Mark II + Canon EF 70-200mm f/2.8 L USM)
 The time when the Moon (especially the full one) is high above the horizon at its so-called zenith is of little use for photography, since the light under such conditions is very hard, flat, without color (like from fluorescent lamps, brr) + flare The air at this time is at its maximum due to which the stars are practically invisible.
It is also worth noting that scenes with the reflection of the starry sky (star tracks) on the surface of some body of water turn out to be very interesting. In such cases, it is often better to choose a very low shooting point and photograph almost from water level. Thus, even a small puddle or a small pond can be “transformed” into a boundless ocean.
Nepal, Annapurna Base Camp (4150 m) and Machapuchre (6997 m), 2011 | 44 min (86 frames x 30 sec), f/4, ISO 1250, AF 15 mm, full moon (Canon EOS 5D Mark II + Canon EF 15mm f/2.8 Fisheye)
Also very interesting are the night shots with raging rivers/waterfalls, which when long exposure turn into milky streams and in this form go very well with the starry sky.
 Nepal, Langtang National Park, Gosaikunda Lake (4380 m), 2011 | 27 min (32 frames x 30 sec), f/2.8, ISO 2000, FR 15 mm, moonless night (Canon EOS 5D Mark II + Canon EF 15mm f/2.8 Fisheye)
 In some cases, the images reveal strange traces and stripes, the trajectory of which differs from the trajectory of the stars. Some photographers tend to give such phenomena a mystical character. However, such phenomena are explained by aircraft, satellites and/or bright meteors entering the frame, which burn up in the earth's atmosphere. Meteor trails like these can beautifully decorate your shot.
If you want to capture such a phenomenon, then first of all find out when meteor showers occur. Having determined the maximum period, choose a place where there is no light from street lamps, windows and other light sources (preferably away from populated areas).
The Perseids shower, which peaks on August 11-12, is an ideal place to start. Firstly, it is rich in bright meteors - fireballs, and secondly, in August there are dark and warm nights that are convenient for work. Pay attention to what phase and where the Moon is located. It is important that its light does not interfere with photography.
In addition to all of the above, you can build your photo based on the constellations as the center of your composition. A star atlas will help you find and identify constellations 😉
 Nepal, Sagarmatha (Everest) National Park, Orion constellation above Namche Bazaar (3500 m) | 30 sec, f/4, ISO 400, FR 24 mm, full moon (Canon EOS 5D + Canon EF 24-105mm f/4 L IS USM
 Before you start composing your shot through your camera's viewfinder, give your eyes a few minutes of rest in complete darkness to allow them to adjust to the ambient light.
If even after such a “ritual” you cannot see anything in the viewfinder, then try pointing the camera “by eye”. Then take a test shot at extreme settings (aperture open, ISO at maximum) and based on it, adjust the camera position. Repeat the last step until you achieve what you think is the ideal composition.
That's it, now you are ready to start photographing the stars! 😉


