Olga Nagornyuk
How to draw a person step by step - for beginners
The image of a person is considered the most difficult type of drawing. Artists have been learning for years to convey people's feelings and moods using facial expressions and eye expressions. But we do not set such goals for ourselves. We just need to learn how to draw a person without disturbing the proportions of the body and making it as similar as possible to the original.
How to draw a person: full-length man
When drawing a human figure, it is important to maintain correct proportions.
1. We start drawing with a rectangle: draw a quadrilateral with sides whose ratio is 3:4. We draw a straight line through its center vertical line, the length of which is slightly greater than the height of the quadrilateral multiplied by two. The arc at the top is the outline of the shoulders, the bottom curve will become the outline of the clothing.
2. Mark the body parts. Draw an oval at the top - it will serve as the outline of the head. The two ovals in the upper corners of the rectangle will indicate the position of the shoulders, and the lower ones will indicate the position of the knees. The correct oval shape should be observed only in relation to the head. The rest are shown schematically.

3. The next stage is drawing the outlines of the body. First, at the level of the middle of the body, draw two circles of a not very regular shape, indicating the place of the elbow bends, and then, using the same circles, draw the location of the feet. Then, using smooth lines, connect the top of the body with the line of the pelvis and extend it to the circles located in the area of the knees.

4. Let's start drawing the limbs. Using smooth lines, draw the arms and legs, guided by the image in the picture. Please note: the feet are turned in different directions.

5. Draw the sleeves of the T-shirt, the bottom line of the trousers and the neckline. Then we carefully erase the extra strokes with an eraser and draw the main lines of the drawing.
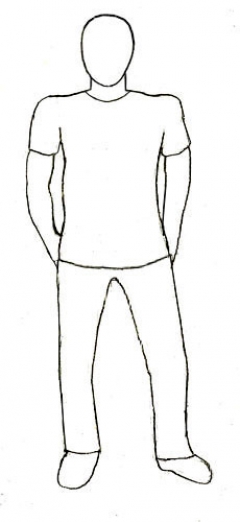
It is done!
How to draw a person: ballerina
Drawing a slender and graceful ballerina requires some skill, but we will try to describe this process in detail, simplifying your task.
1. Start drawing the dancer with a tutu. The oval, slightly pointed on the left and raised on the right, will later become part of the concert dress. Add two adjacent straight lines from below, indicating the legs, and at the top - a curved line - the girl's body, an oval - the head and a smooth line at an angle - the arms.

2. Draw the contours of the body. We start with the neck and shoulders, then draw the outlines of the back and waist, then with light strokes we designate the shape of the legs. The ballerina should be slender, so don't overdo it when drawing her body.

3. Holding an image of a ballerina before your eyes, draw the contours of the legs and arms. Use smooth lines and pay close attention to the dimensions: the dancer should be thin. Drawing feet will not cause any difficulties: the girl stands on pointe shoes, which are quite easy to depict.

4. Draw the hands, use short strokes to indicate the locations of the eyes, nose and mouth, and give the skirt a more realistic shape. After this, erase the unnecessary lines, leaving the outline of the figure.

5. The most difficult stage is drawing facial features. The picture shows one of the most simple ways, allowing you to depict the eyes, nose and lips of a girl. Drawing the dress and hair will be easy. Using just two arched lines, you can outline the line of smoothly combed hair and bun.

6. Color the drawing and apply light and shade. We used a blue pencil, you can use a simple one. The main thing is to scrupulously repeat the strokes applied in our photo.

We hope everything worked out for you.
How to draw a person: girl
1. Let's start drawing the image of the girl with a circle indicating the head and a smaller oval located vertically. It will later turn into the torso of a little lady.

2. Using slightly rounded lines, draw the location of the chin and eyes. Use stick lines to mark the girl’s arms and legs.

3. At this stage, we draw the contours of the eyes: the upper part of the ovals denoting them should touch the first horizontal line, the lower part should lie on the bottom.

4. Next up is hair. We depict the bangs using arched lines, and draw the hair at the back with teeth, choosing a shoulder-length length.

5. We dress the baby in a dress, the role of which is played by a trapezoid, we complete the mouth using a small arc, and hands with feet, the role of which in our case will be played by small ovals.


7. It's time to draw the details. Pupils, eyelashes, eyebrows, ears - draw them following our drawing. Little fingers and little shoes on your feet will complete the picture.

8. Erase unnecessary strokes, and draw the necessary ones well, and at the same time draw additional details: buttons on the dress, shadow on the cheeks and a small neat nose.

9. Now all that remains is to paint the figure.

Take it for yourself and tell your friends!
Read also on our website:
show more

On this page of the site I suggest you learn how to draw a person in full height with a simple pencil step by step. The most difficult thing to draw is a person’s face, so only real artists who have studied drawing for several years can draw a portrait correctly and accurately. Our drawing lessons are intended mainly for children, so the eyes and other facial features in the drawing of a person are drawn schematically, without carefully drawing the details. There are additional lessons on the site about how to learn to draw a portrait of a person with a pencil, draw eyes and even how to draw a person’s lips.
First of all, some tips how to draw a person correctly in pencil. Some people have a habit of drawing with broken lines and then tracing them. Try to learn how to draw lines in one motion, don't be afraid to make mistakes. When drawing a person, especially in motion, you should see the whole future image, the contours of the proposed lines and all you have to do is draw them on paper.
And yet, in fine art, the most important thing is not the accuracy of the proportions and lines of a person’s drawing, but the image of the main, most important thing in the image of a person. A person’s mood, his character, the expression of his eyes, some other features that characterize him.
There are different ways to draw a person

Now let's find out a few basic steps on how to draw a full-length human figure. Often, when drawing a person, the proportions of his figure are distorted. The arms and legs are drawn short or too long, the head is too big, etc. In order to avoid this, it is convenient to divide the entire full-length drawing of a person into separate areas. The human figure, together with the head, can be divided into seven parts, equal to the seven circumferences of the head and neck. We will not use this diagram in this lesson, we will draw a person in a different way, but you can additionally use this marking so that the drawing of the person turns out to be proportional.
1. How to draw a person, initial outlines

So, let's start drawing a person by drawing a quadrilateral with aspect ratios of 3:4. In the center of this figure, draw a long straight line, slightly longer than the longitudinal side of the drawn quadrilateral. Draw an oval shoulder line on top. And since our person will be in summer clothes, then at the bottom of the rectangle draw the outline of future clothes, a T-shirt.
2. Marking parts of the human body in full height

let's continue drawing of a man and make markings using circles for the head, neck, shoulders and collarbone, and knees. First you need to draw an oval for the head, then an oval for the shoulders and circles for the knees. This is not at all difficult to do even for a child, and it is not at all necessary to draw geometrically accurate shapes of circles, except for the outline of the head. Draw the head and neck as accurately as possible.
You probably noticed that many of the lines in the picture are drawn rather carelessly. I deliberately do not try to draw them beautifully, since these contours will have to be removed from the drawing in the future, and they serve only as temporary guidelines for further steps.
3. We begin to draw the general outline of the figure

Moving on to the next step, at first it will seem to you that it is not clear what now needs to be drawn for our person. But take a closer look, you only need to draw two circles for the elbows and feet and two more winding lines on the sides of the person’s torso and connect them with the contours of the knees.
4. Draw arms and legs

Using the circles for the shoulders and elbows in the picture, draw the arms. The hands in my drawing are not drawn entirely, but if you want, you can also draw palms. Maybe a person will have some object in his hands. It is also not difficult to draw legs, the only thing you should pay attention to is how the feet are drawn. The toes of the shoes are turned in different directions. At this step, be sure to check the proportions of the person's arms, legs, and torso. In the next step it will be more difficult to correct errors.
5. Remove unnecessary contours and the person will “come to life”

First, carefully remove all previous contour lines, if you touch any line with an eraser, then restore it. This step is the most interesting and simple, because you don’t need to draw anything, and the person will “appear” like a photograph in a developer. Only three simple details still need to be drawn. This is the line of the neck and sleeves of the T-shirt, and the bottom line of the trousers.
6. Draw the face and clothes

Now, based on the contours, you need to draw clothes, and the main thing is to draw in detail the person’s face and head. You can find a lesson on how to draw a portrait of a person on the website. When drawing clothes, do not forget, for greater realism of the drawing, to draw folds on it. Be sure to make shadows on clothing in the direction of the light source. If the light comes from the left, then you need to draw a shadow on the right.
7. Finish drawing a person

This full-length drawing of a man is very approximate and is more designed to study the location of the proportions of the figure of a man standing at full height. To learn more about how to draw a person, you can watch other lessons. For example, how to draw a person’s eyes and others.
Draw a person or it will always be easier for an animal to learn on its own or teach a child if you carry out the drawing step by step. The main thing is to correctly make preliminary markings of the position of the head, shoulders, arms, and legs. And then, step by step, add more and more image details to the picture.
Drawings of a person’s face, portraits are the most complex look visual arts. Learning to accurately draw a person, even with a simple pencil, requires not only time to learn, but also talent. The difficulty of drawing a person lies in the ability to convey emotional condition a person, his facial expressions, depth of gaze, etc. But it is quite possible to learn a simple technique for drawing a person on your own, especially if you draw a person step by step.
The lesson “How to draw a ballerina” is designed for those who already know how to draw a person well. Drawing a picture of a ballerina is especially difficult, since the drawing needs to convey the grace and elegance of the dance, the beauty of the body and human movements.
Let's try to draw a hockey player in motion, with a stick and a puck, step by step. You might even be able to draw your favorite hockey player or goalie.
Eyes are the basis of anime drawings. All pictures of girls drawn in anime style are distinguished by their huge eyes - black, blue, green, but always huge and expressive. Eyes are the most important and complex element of any human drawing.
Eyes are the most attractive part of a person's face. And since this element takes on more attention, it must be drawn correctly. In this lesson we will learn how to draw a person's eyes with a pencil step by step.
In order to draw Spider-Man, you must first learn how to draw the human figure. Drawing Spider-Man in motion is very difficult, since you need to convey the dynamics of human movements in the drawing and be sure to accurately draw all the proportions of the human body.
Just like Spider-Man, drawing Iron Man is difficult. But, if you accurately make preliminary outlines, then drawing Iron Man will be easier and simpler. To make the drawing look bright and effective, you must color it with colored pencils.
Women and men have fundamental differences in body structure. But, in modern world Some women look like men because of their clothes and hairstyle. However, no matter how hard a woman tries to resemble a man, we can still recognize her. home distinctive feature consists in the structure of a woman’s body - wide hips and narrower shoulders (men have exactly the opposite indicators). At drawing a woman in full growth it is worth starting from this basic rule, and the rest of the secrets of construction can be learned from this step-by-step lesson.
Materials and tools:
- White sheet of paper.
- A simple pencil.
- Eraser.
Stages of work:
Photo 1. First you need to draw a vertical center line with a simple pencil. We leave serifs at the edges of the segment. They will determine the full height of the body beyond which you cannot go:

Photo 2. Divide the segment in half. Thus, the line is divided into two parts, along which we will later build the body. Next, we divide the upper segment in half again, and measure another half from the resulting upper segment. The topmost segment is the height of the woman’s head:

Photo 3. Now you need to outline the location of the shoulders. The line of the shoulders will be located under the head, namely under the second (top) serif. Let's step back a little from the head, leaving a little space for the neck. Let's draw the line of the shoulders at an angle, because the woman will stand slightly bent over:

Photo 4. Next we need to find out the location of the waist and knees. To do this, you need to divide the center line into three parts. To do this easily, we divide the lower half of the center line in half, but the line of the knees will be slightly higher. We measure its height and transfer it to the center line three times, leaving notches. The result should be three equal parts:

Photo 5. Now we outline the waist line. It will be located on the notch between the first and second half of the divided center line (there are 3 parts in total), and the hips will be slightly lower and twice as wide as the waist. We draw the hips and waist at an angle, opposite to the shoulders:

Photo 6. We unite the shoulders and waist along the edges, and from the waist we draw a line to the hips. You need to outline the length of the skirt - it will be equal to two distances from the waist to the hips:

Photo 7. From the shoulders we outline the location of the arms. The left arm will be bent at the elbow and located at waist level, and the right arm will be raised and moved to the side:

Photo 8. Now let's draw the legs. Do not forget that the knees should be located at the level of the notch. Right leg will go a little beyond the left:

Photo 9. Let's draw the head in the shape of an oval, and “outline” the hair on it. Most of them will fall to the left side:

Photo 10. Let's draw the hands and give them shape. Left hand the girl will hold it at the waist, and the right one will be set aside:


Photo 12. Using an eraser, we remove the extra lines that were previously needed for construction. Let's enhance the contour of a woman's body:

Photo 13. Let's draw the woman's facial features. We don’t put much emphasis on drawing the face, because our main task is to learn how to draw a woman in full height, namely the body. You can study my separate lesson “how to draw a female portrait”, where I work out in detail the details of the girl’s face:

Photo 14. Let's set the tone for the hair. Near the bends we make the pencil strokes denser:

Head:
We draw a figure that resembles an egg turned upside down. This figure is called OVOID.
Divide it vertically and horizontally exactly in half with thin lines.

Vertical
line is the axis of symmetry (it is needed so that the right and left parts
turned out to be equal in size and the image elements were not on
at different levels).
Horizontal - the line where the eyes are located. We divide it into five equal parts.
The second and fourth parts contain the eyes. The distance between the eyes is also equal to one eye.
The figure below shows how to draw an eye (the iris and pupil will be
are not completely visible - they are partially covered by the upper eyelid), but we are in no hurry
to do this, first let's finish our sketch. 
Divide the part from the eye line to the chin into two - this is the line on which the nose will be located.
We divide the part from the eye line to the crown into three equal parts. The top mark is the line where the hair grows) 
We also divide the part from the nose to the chin into three parts. The top mark is the lip line.
Distance from upper eyelid to the tip of the nose is equal to the distance from the top edge of the ear to the bottom. 
Now we make our standard preparation cry in three streams.
Lines,
drawn from the outer edges of the eyes will indicate to us the place where to draw the neck.
The lines from the inner edges of the eyes are the width of the nose. Lines drawn in an arc from
the center of the pupils is the width of the mouth.

When you color the image, notice that the convex parts of it
parts (forehead, cheeks, nose and chin) will be lighter, and the eye sockets, cheekbones,
the contour of the face and the area under the lower lip are darker.

The shape of the face, eyes, eyebrows, lips, nose, ears and
etc. Every person is different. Therefore, when drawing someone's portrait, try
see these features and apply them to a standard workpiece.
Another example of how everyone's facial features are different.

Well, here we see how to draw a face in profile and half a turn - the so-called “three quarters”
At
When drawing a face in half a turn, you need to take into account the rules
perspective - the far eye and the far side of the lip will appear smaller.
Let's go to the image human figures.
In order to depict the body as correctly as possible, you need, as when drawing portraits, to know a few secrets:

The unit of measurement for the human body is “head length”.
- The average height of a person is 7.5 times the length of his head.
- Men, naturally, are usually a little taller than women.
-
We, of course, begin to draw the body from the very head that we will be
measure everything. Did you draw it? Now we put its length down another seven times.
This will be the growth of the person depicted.
- The width of the shoulders is equal to two head lengths for men and one and a half lengths for women.
- At the place where the third head ends :), there will be a navel and the arm will bend at the elbow.
- The fourth is the place where the legs grow.
- Fifth - mid-thigh. This is where the arm length ends.
- Sixth - bottom of the knee.
-
You may not believe me, but the length of the arms is equal to the length of the legs, the length of the arm is from the shoulder
to the elbow will be slightly less than the length from the elbow to the fingertips.
- The length of the hand is equal to the height of the face (note, not the head - the distance from the chin to the top of the forehead), the length of the foot is equal to the length of the head.
Knowing all this, you can quite plausibly depict a human figure.
Taken from a group dedicated to graffiti on VKontakte.

Lip shapes 

nose shape 


Eye shapes 
Women's brochure shapes

(c) Book "How to Draw the Head and Human Figure" by Jack Hamm


The proportions of a child's figure differ from
adult proportions. The fewer times the length of the head interferes with growth
child, the younger he is.

IN children's portrait everything is a little different.
The child's face is more rounded, the forehead is larger. If we draw a horizontal
line through the middle baby face, then it won't be an eye line like
was in the portrait of an adult.

To learn how to draw a person not only
standing like a pillar, we will temporarily simplify our image. Let's leave
just the head, chest, spine, pelvis and we’ll screw it all together
arms and legs. The main thing is to maintain all proportions.

Having such a simplified version of the human figure, we can easily give him any pose.


When we have decided on the pose, we can
add meat to our simplified skeleton. Do not forget that the body, it is not
angular and does not consist of rectangles - we try to draw smooth ones
lines. The body gradually tapers at the waist, as well as at the knees and elbows.


To make the image more alive, character and expression must be given not only to the face, but also to the pose.
Hands:

The fingers, with their board-like joints, are the widest parts of the bones in the entire skeleton.


(c) book "Anatomy for Artists: It's Simple" Christopher Hart
In this article, UchiEto offers to learn how to draw a full-length person with a pencil step by step. The most difficult thing in depicting a person is his face. A real portrait can only be made by real artists who have studied this art for many years. This drawing lesson is intended for beginners, which is why the human facial features are drawn schematically, without drawing details.
First, we'll give you a couple of tips. Some people have the habit of drawing with broken lines and then tracing them. Such people need to try to draw lines in one motion and do not need to be afraid that you will make a mistake. When you depict a person on paper, especially if he is in motion, then you should fully see the future image, the contours of all the lines. And yet, the most important thing is not the accuracy of the lines and proportions of the drawing, but the image of the most important, main thing in the image. It is necessary to convey the character of a person, his mood, the expression of his eyes and other features that characterize him.
You can draw a person step by step with a pencil in different ways.
 Now let's find out a couple of main stages. Often, when you draw a person, you can see the distortion of his figure. Legs and arms are drawn long or too short, the body is too large, etc. To avoid this, it is necessary to break the entire drawing into sections.
The whole person can be divided into 7 parts. But we do not describe this technique in this article, we will use a different method, but you can try to make such markings so that the person appears proportional.
Initial outlines

So, let's start by drawing a quadrilateral with side proportions of three to four.
Draw a straight line in the center, slightly longer than the longitudinal side of the rectangle. At the top, draw an oval line for the shoulders. And at the bottom of the quadrangle is the outline of the clothing.

We continue to depict a person. We make markings using the circumferences of the knees, collarbone, shoulders, neck and head. First, draw an oval for the head, then an oval for the shoulders and then circles for the knees.
Even a child can do this; do not forget that it is not necessary to observe the exact geometric shapes of the circles, except for the head. The neck and head need to be drawn as accurately as possible.
You can see that most of the lines are drawn rather carelessly. We deliberately did not try to draw them carefully, because we will remove these outlines in the future, and they only serve as temporary guidelines.
We begin to draw the outline of a human figure

At first you will not understand what is required of you. But you need to take a closer look, you only need to draw two circles for the feet and elbows and 2 more lines on the sides of the torso, and then connect them with the outlines of the knees.
We depict arms and legs

Using the circles for the elbows and shoulders that we already have, draw the arms. The hands in this photo are not fully depicted, but you can also add palms. Or you want to have some object in your hands, this is your personal choice. Now let's move on to the legs, the only thing worth paying attention to is the feet. Socks are turned in different directions. At this stage, it is necessary to check the proportions of the torso, legs and arms. If you don't do this, it will be difficult to correct errors in the next steps.
We remove unnecessary contours and the person “comes to life”

To begin with, use an eraser to carefully remove all unnecessary lines; if you hit any necessary line, restore it immediately. This step is the simplest and most interesting, since you don’t need to draw anything, and the person seems to “come to life.” It remains to draw 3 simple details. This is the bottom line of the trousers, the line of the sleeves of the T-shirt and the neckline.
We complete the drawing of a person. Face and clothes
Now draw the clothes along the contours and it is important to depict the head and face in as much detail as possible. When drawing clothes, do not forget that for greater realism the folds on it should be visible. Be sure to create shadows on the clothes in the direction of the light; if the light falls from the right, then you need to draw a shadow on the left.
This drawing of a person is approximate and is intended more for studying his proportions. In this process, it is important to make preliminary markings of the position of the legs, arms, shoulders and head. And then add the remaining details step by step. TeachIt hopes this article helped you.
Video lessons