Hidden and system files of Windows
Today we will talk about hidden and system files in Windows, as well as ways to work with them. For example, let's take the pagefile.sys page file. We know for sure that it should be located in the root of the system drive C, but if we open Windows Explorer, we will not see this file there.
The fact is that the operating system hides some important system files, protecting them from overly curious users. For comparison, this is what Explorer looks like with the display of hidden\system objects turned on.

Attributes
Special metadata is responsible for displaying files and folders in Windows Explorer - attributes. Here is a description of some of them:
H- hidden. Hides the file, making it invisible in Windows Explorer;
S- system. Tells the OS to treat the file as a system file;
R- read-only. Protects the file from modification, making it read-only;
A— archive (archive). Indicates that the file has been modified since the last backup, used by backup systems;
I— indexed. Indicates that the contents of the file should not be indexed;
D- directory. Indicates that the object is a directory;
L- link. Indicates that the object is a reference.
Explorer can show file attributes just like any other properties (type, size, etc.). To do this, right-click on the column name and select the “Attributes” item in the context menu.

As you can see, all hidden files have H or HS attributes. It is these attributes that affect whether the file will be displayed in Explorer or not. Accordingly, you can see hidden files in two ways - by turning on their display in Explorer (or another file manager) or by removing these attributes.
Enabling showing hidden files
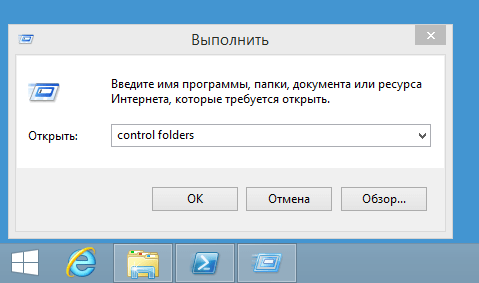
Settings for displaying hidden files and folders in Windows Explorer are located in the Folder options control panel snap-in. You can quickly open the snap-in by clicking Win+R and entering the command control folders.
To show hidden files/folders (H attribute), on the “View” tab, in the “Hidden files and folders” field, set the switch to the “Show hidden files, folders and drives” position. To display hidden system files (having HS attributes), you must additionally uncheck the “Hide protected system files” checkbox.

You can also open the Folder Options snap-in directly from File Explorer. In Windows XP and Windows 7 (as well as Windows Server 2003\2008\2008R2), to do this, select “Folder Options” from the “Tools” menu.
Note. In Windows 7, the menu is hidden, you have to press the key to make it appear. Alt.

In Windows 8\Server 2012, a ribbon (Ribbon) appeared in Explorer, which contains the most necessary options. You can quickly enable the display of hidden files by going to the “View” tab and checking the “Hidden Items” item, and you can open the main snap-in with the “Options” button.

For those who are not looking for easy ways :) it is possible to control the display of hidden\system files in Explorer by directly editing the registry. To do this, in the HKCU\Software\Microsoft\Windows\CurrentVersion\Explorer\Adwanced section there are two Dword type parameters:
Hidden— responsible for displaying hidden files (0 — do not display, 1 — display);
ShowSuperHidden— responsible for displaying protected system files (0—do not display, 1—display).

If you use alternative file managers, such as FAR or Total Commander, then they also have the ability to enable the display of hidden files in folders.
In FAR, in order to see hidden content, press F9, go to the menu section “Options” - “Panel Settings” and check the item “Show hidden and system files” (in the English version Options - Panel settings - Show hidden and system files ). However, most likely you won’t need to do any of this, since the display of hidden files is enabled by default in FAR.

In Total Commander, open the menu “Configuration - “Settings” - “Contents of panels” and check the item “Show hidden/system files” (in English: Configuration - Options - Display - Show hidden/system files). Interestingly, Total Commander (unlike FAR) does not enable the display of hidden files by default, and in addition there is a warning in the settings (only for experienced ones!).

Changing Attributes
Since the visibility of an object is determined by its attributes, we move on to ways to change them. Some file/folder attributes can be changed using Explorer. For example, to make a file hidden, just open its properties and in the “Attributes” field, check the box next to the corresponding attribute.

There is also a command line utility for managing attributes in Windows attrib.exe, which can show and change any object attributes. The utility syntax looks something like this:
attrib [(+R|-R)] [(+A|-A)] [(+S|-S)] [(+H|-H)] [ FileName] ]
+
— setting the attribute;
—
— removing an attribute;
/S— apply the command to all files in the current directory and subdirectories;
/D— apply the command to directories;
/?
— output of a certificate.
For example, the following command will print the file attributes:
attrib ″C:\Temp\file.html″
So we will remove the hidden attribute (-H) from the file:
attrib -H ″C:\Temp\file.html″
And so we’ll make it hidden (+H) and systemic (+S):
attrib +H +S ″C:\Temp\file.html″
Note. Pay attention to the order of operations. The point is that attributes h and s can only be added together. For example, if you try to add a system attribute to a hidden file, an error will be thrown. Therefore, you must first remove the attribute (-H), and then add both attributes (+H +S).

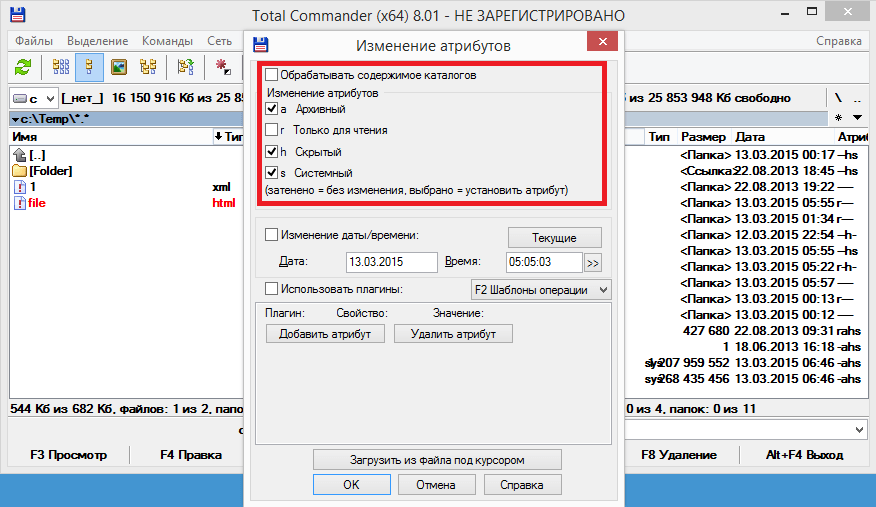
In Total Commander, to change attributes, select a file/folder, then go to the “Files” menu - “Change attributes” and in the “Change attributes” field put a checkmark next to the desired attributes.
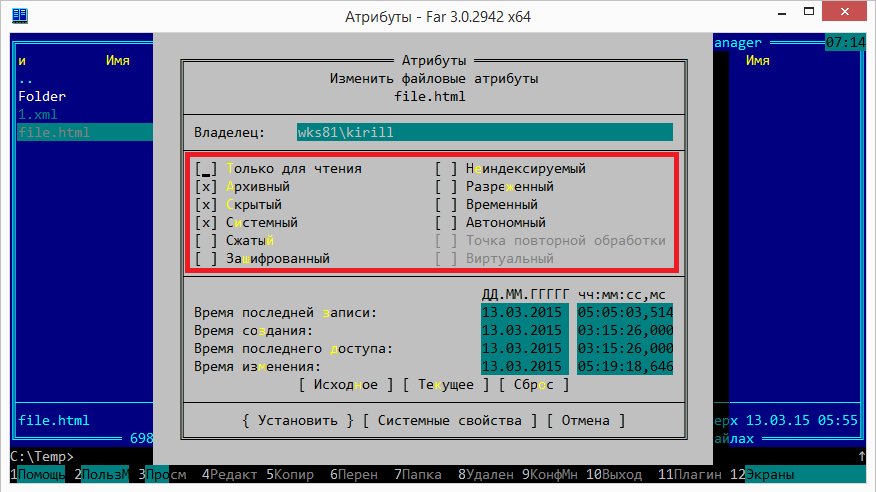
In FAR it’s about the same, only the window for changing attributes is opened with a key combination Ctrl+A(or through the menu F9 - Files - File Attributes).
Prohibition on modification
Let's talk a little about prohibitions. For example, you want to prevent users from changing settings for displaying hidden files. You can do this using the registry setting CheckedValue, located in the HKLM\Software\Microsoft\Windows\CurrentVersion\Explorer\Advanced\Folder\Hidden\Showall section. By default, its value is 1, and if you set it to 0, then enabling the display of hidden files in the folder properties stops working.

Well, a more drastic way is to prohibit opening the “Folder Options” snap-in. To do this, you need to create a Dword type parameter named NoFolderOptions and assign it the value 1. You can disable the ban by setting the parameter NoFolderOptions value 0 or by deleting it from the registry.

Note. Both of the above methods work fine, however, starting with Windows 8\Server 2012, you can change the visibility of hidden files in Explorer using the “Hidden Items” checkbox, which is not affected by these settings. Also, prohibitions do not in any way affect the ability of FAR and Total Commander to show hidden objects.
Conclusion
As a conclusion, let me remind you once again that the hidden and system attributes do not in any way protect files and folders from being changed or deleted, but only affect the visibility of objects in Windows Explorer. It is impossible to fully protect a file using attributes, so to protect important files along with attributes (or instead of them), you need to use other protection mechanisms, such as NTFS rights, encryption, RMS service and other similar things.
On the computer. They are there, but they are not visible.
1 . Right-click on the file or folder and select Properties.
2. A window will open. Check the “Hidden” box and click “OK.”

The file (folder) will disappear. In fact, it will remain on the computer, we’ll just hide it this way.
By the way, many users know how to open hidden files and folders. So think about whether it's worth hiding something this way.
How to open (show) hidden files and folders
If there is no such item, then click on the Start button and open Control Panel. Among the icons, find and open “Folder Options” (Appearance and Personalization → Folder Options).

In Windows 10, to do this, click on “View” at the top of the window and select “Options”.


Place a dot on the “Show hidden files, folders and drives” item (at the bottom) and click “OK”.

Files and folders that are hidden will be lighter than normal files and folders.
Regular folder:
How to make a hidden folder normal
- Right-click on the file or folder you want to make normal and select Properties.
- Uncheck “Hidden” and click “OK”.
How to disable showing hidden files and folders
Open any folder on your computer. Click on “Organize” (at the top of the window) and select “Folder and Search Options”.
If there is no such item at the top of the window, click the Start button and open Control Panel. Among the icons, find and open “Folder Options” (Appearance and Personalization → Folder Options).
In Windows 10, to do this, click on “View” and select “Options”.
A window will open. Click on the “View” tab (top).
Check the box “Do not show hidden files, folders and drives” (at the bottom) and click “OK”.
On a note . In Windows 10, you can do it easier: View → Show or Hide → Hidden Items.

The computer has many hidden files and folders in the Local Disk where the operating system is located (usually Local Disk C). This is necessary so that you don't accidentally spoil anything.
If you delete any of these files or folders, even if you simply change the name, your computer may stop working or begin to freeze seriously. So be careful with system hidden files and folders!
By default, the ability to see hidden files is disabled in any version of Windows. This is necessary so that inexperienced “dummies” do not accidentally delete anything and disrupt the operation of the OS. The solution is quite logical, since these folders are rarely needed. And even then - only to a few users. But sometimes there is a need to look at hidden files.
For example, during Windows optimization and garbage cleaning. Many programs (Microsoft Word, Skype) create hidden files during operation. Over time, they become unnecessary, but are stored on disk and take up extra space.
Very often gamers need to enable hidden folders and files. After all, they are where saves from many games are stored.
Also, displaying hidden files is required by users who want to hide documents on a flash drive, but do not yet know how to find them later. In general, there are a lot of reasons.
I should immediately note that this setting is carried out differently in different versions of Windows. Although some methods may be the same. Therefore, below are several instructions on how to enable hidden files in all Windows - “seven”, “eight”, “ten” and XP. Plus, there is a universal method that works on all operating systems.
The fastest way to see hidden files in Windows 7:

Ready. You will now be able to open hidden files on Windows 7 because they have become visible.
If you need to disable their display, then in the same window, check the box “Do not show...”.
Second way:

And the third way to enable the display of hidden files in Windows 7:

As you can see, there is nothing complicated here. Choose any method that suits you best and use it at the right time.
How to view hidden files on a flash drive? Similar. When you enable viewing of hidden files in Windows 7 using any of the methods described above, they will be visible everywhere. Including on a flash drive. You just need to connect it to your PC or laptop - and you will see the hidden folders (provided that they are there). The same applies to an external HDD.
We've sorted out the "seven", now let's move on to the "eight".
How to enable hidden files in Windows 8?
How do you configure the display of hidden files in Windows 8? There are also 3 options to choose from. The first two are described above in the instructions for Windows 7. That is, you can enable hidden files in Windows 8 by entering the control folders command. Or by selecting the “Folder Options” shortcut in the Control Panel.

But there is another way to show hidden files in Windows 8:
- Open any folder you like.
- Select the "View" section.
- Click on “Show or hide”, and then check the “Hidden elements” checkbox.

Ready. Now you can see hidden files on Windows 8. And not only in the current folder, but also in others. The same methods will help you display hidden files on a flash drive or external HDD – you just need to connect them to your computer or laptop.
Show hidden files in Windows 10
The last method, which works on Windows 8, is also suitable for the “ten”. To enable hidden files in Windows 10:
- Open any folder.
- Select the "View" section.
- Check the "Hidden Elements" box.

After this, you will be able to see hidden folders and documents in any partition of your hard drive or on a flash drive (it must be connected to the PC).
If you want to hide the folders again, uncheck this box.
There is also another way to enable the display of hidden files in Windows 10:


Ready. Now you can open any hidden files on Windows 10. As you can see, the methods on different versions of the OS are quite similar, but differ in minor nuances.
How to show hidden files and folders in Windows XP?
Not many users use Piggy today, but we’ll still consider it. You can view hidden files in XP like this:


That's it - now you can open or delete hidden folders and documents.
Show hidden files in Total Commander
If you don’t want to understand the differences between different versions of Windows, you can use the universal method. In this case, you just need to install the Total Commander file manager (download link). The program sees hidden documents and works on all Windows.
How to see hidden files in Total Commander? To do this you need to do the following:


Now all folders and documents in Total Commander will be visible. And to do this, you don’t even have to go into Windows settings and change folder display settings.
Need to see hidden documents? Launch Total Commander and go to the desired hard drive partition. Or connect the USB flash drive and then open it through this file manager.
As you can see, all ingenious is simple. Now you know how to show hidden files and make them visible. And if necessary, you can easily find them. My only advice: if you find any unfamiliar folders, do not delete them. After all, they may contain important system files, the removal of which will disrupt the operation of Windows.
In the Windows operating system, the display of system files is disabled by default, since an inexperienced user can accidentally delete them. In addition, they will distract you from searching for the desired folder and clutter up your “Desktop”. In general, it’s better and more convenient when you don’t see them.
However, in some cases it becomes necessary to show hidden files in Windows 7 so that you can, for example, clean out the “Temp” and “Prefetch” system folders, thereby slightly increasing the performance of the operating system.
You can enable the display of such files very easily by using one of the methods that will be discussed below. In fact, in each method, only the sequence of actions required to access the “Folder Options” will change.
Via the "Service" menu
So, you have Windows 7 installed. You can show hidden files and folders in this operating system as follows:
- Log into “My Computer” and press “Alt” on your keyboard. A panel will appear where you need to select “Service”. By clicking on this button, a drop-down menu will open in which you need to go to “Folder Options”.
- Now select the View tab and scroll down to the bottom of the list. Here you will need to uncheck the checkbox next to the “Hide system files” option and check the function responsible for showing hidden folders.
- By clicking “Apply”, a warning will appear that deleting such files may negatively affect the operation of the operating system. If you are confident in your actions, then click the “Yes” button.

That's all! Now you know how to show hidden files in Windows 7, so you can use this knowledge if necessary.
Via "Control Panel"
The second method differs in the algorithm of actions, since to open “Folder Options” you will need to enter the “Control Panel”.
So, open the Start menu and go to PU. If you have set the display by category, then select the “Design and Personalization” section. In the “Folder Options” subsection, click on “Show hidden files.”

Now, at the bottom, check the box that will allow you to see non-displayed folders, and uncheck the box next to the “Hide protected files” option. The last step is the “Apply” button, and then click “Yes” in the window that opens.
If, after opening the PU, you see that you have large or small icons displayed, then simply find the “Folder Options” element and go to it. The further algorithm of actions is absolutely identical to those discussed above.
Now you can show hidden and system files of Windows 7 using the Control Panel.
Using the Run command
The third way to enable the display of such files is to use the Run command. To launch this tool, press the "Win" and "R" buttons.
Now in the window that opens you will need to insert the “control folders” command and click “OK”. This will open Folder Options, where by going to the View tab and following the steps above, you can show Windows 7 hidden files.
Some people like this method the most, since all you have to do is remember one command or write it down. Although there is nothing complicated in the first two methods.
Conclusion
So, now you can show hidden files in Windows 7. If the need arises, you can turn on the display of system folders at any time and adjust their contents at your discretion.

With all this, it is worth remembering that it is not recommended to make any changes to these files unless necessary, and especially without certain knowledge.
Compared to Windows XP, the interface of the seventh version of the OS has undergone dramatic changes. The way hidden files are displayed in this operating system also differs from its predecessor. And without showing hidden directories, you cannot fine-tune Windows. This article will tell you how to display folders hidden from the user.
How to show hidden folders in Windows 7
There are several ways to display hidden directories in a standard file manager, but they all boil down to opening the folder properties window. So, the standard course of action is:
- open "Explorer";
- click on the “ALT” button;
- in the top menu, click on the “Service” line;
- in the drop-down list, click on “Folder Options”;
- Expand the “View” tab;
- in the window, scroll through the list of parameters to the very end;
- move the bottom switch to “Show”;
- also, if you need to show hidden Windows 7 files and folders, which are also system folders, uncheck the box next to the text “Hide protected files”;
- Click OK or press ENTER on your keyboard.
To check, open Explorer and go to the partition with Windows installed. The Program Data directory should appear in its root. Note that files and folders that have been hidden by a developer or administrator are shown as semi-transparent icons - their colors blend into the background.
Additional methods
There are several easier ways to open directory display options. For example, you can expand the Start menu and type the word “Settings” into the search bar. Then you just have to click on the item of the same name.

You can also show Windows 7 using the “Control Panel” configuration utility:
- So, go to Control Panel.
- Click the Personalization category.
- In the window that opens, select “Folder Options.”
- Go to the second tab from the left.
- Set the switches to the positions indicated in the instructions above.

To hide files again, simply return the switches to their original positions.
Command line
If working with directories is not necessary, but you just need to check their availability, command line tools are sufficient. How to view hidden folders on Windows 7 using console commands? Follow these instructions:
- Create a shortcut by opening the desktop context menu and following the path in the menu, “Create” - “Shortcut”.
- Enter “cmd” in the file location line.
- Set a custom name.
- Run the shortcut as administrator.
- Enter the drive letter you will be working with.
- Go to the root of the directory in which you want to show hidden Windows 7 folders using the “cd” command immediately followed by entering the path to the desired folder, for example “cd C:\Windows”.
- Type "dir /ah", after which the full list of files and directories will be displayed on the screen.
This method is the fastest, but it has one significant drawback - it will be difficult for a simple user to remember the commands and the order in which they are entered. For those who type slowly, this method is not suitable at all, since entering a long path will take too much time.
Using third party software
Not only Windows Explorer can show hidden folders in Windows 7, but also third-party file managers, for example, Total Commander. This approach is convenient if you need to frequently fine-tune the operating system, but not only experienced users work on the computer and displaying hidden directories in Explorer is not desirable.

How to view hidden folders on Windows 7 using Total Commander? Follow these steps:
- First, install a file manager. It is distributed using a shareware model, but does not require purchasing a license.
- After installing and launching Total Commander, click on “Configuration”. It is located in the top menu of the utility.
- In the drop-down list, click on the “Settings” line.
- On the left side of the settings window, select Panel Contents.
- In the main part of the parameters window, check both boxes in the top line.
If inexperienced users are working on the computer and can accidentally erase important system information, then before showing hidden folders in Windows 7 using Total Commander, you should first remove its shortcuts from the desktop. After this, you can start the program by typing “total” in the search bar. Total Commander is not the only file manager that can show hidden files. For example, Far Manager, FreeCommander, File Navigator are also equipped with similar functionality. Moreover, in Far Manager the setting in question is made by default.
As you can see from the article, showing hidden folders in Windows 7 is not at all difficult, but always remember that they were hidden from the user for a reason and the correct functioning of the entire software often depends on them. After deleting a hidden directory, the operating system may not boot at all. Perform any actions with hidden folders only after first creating a system restore point or even a full backup of the partition.


