We talked about drawing in Photoshop using a pencil and brush. Freehand lines are great, but it often happens that you need to depict an even geometric figure. Rulers and compasses are a thing of the past, and now you can do this using simple tools editor
To select one of them, click the Shapes icon on the tool palette.
Regardless of which group tool you select, the following items, common to all shapes, will appear in the Options Bar.
- Select tool mode. Here you can choose one of three.
- Figure. The value is set to the default, and it creates a vector geometric figure on a separate layer, that is, what you expect from the tool happens.
- Circuit. The outline of the figure is drawn without filling.
- Pixels. It creates not a vector, but a raster figure.
- Filling. Allows you to customize the color and type (gradient, shading) of the drawn figure.
- Stroke. Shape outline settings: thickness, type, color.
- Width and height. They allow you to clarify the size of the figure when it is impermissible to do this “by eye”.
As always, create a new document with a white background. The remaining parameters can be left as default or selected at your discretion.
Rectangle
Select the Rectangle shape and, to draw it, click on the canvas and then drag the pointer while holding down the mouse button. The point where you clicked will be the corner of the shape.
On the options bar, click the icon. The geometric settings window will open.

By default, the switch is set to Rectangle. If you set it to Square, then when drawing you will always get a shape with the same length of sides. A similar effect can be achieved without pressing the checkbox: to obtain a square while drawing a rectangle, just hold down the Shift key.

If the parameters of your rectangle are known in advance, set the switch to the Specified size position and specify the required values in the fields. The figure will be completely drawn as soon as you click on the canvas with the mouse button.
After setting the switch to the Set proportions position, in the input fields that become available, you can specify the aspect ratio of the created figure.
The From Center checkbox allows you to draw a rectangle from the center, rather than from the outermost point.
Rectangle with rounded corners
The next item on the list of geometric shapes. It is clear that it differs from the usual one by rounding the corners. Accordingly, the settings for this figure and the rectangle are almost identical. The fillet radius can be specified in the corresponding field in the options bar.
Ellipse
The parameters are the same as a rectangle, only instead of a square you can draw a circle. To do this, in the geometry settings window, check the Circle box or hold down the Shift key while drawing.

Polygon
With this tool you can draw a triangle, dodecahedron, icosahedron, star, or any shape that contains from three to one hundred sides. Their number can be set in the Party input field located on the parameters panel.
The geometric settings window is noticeably different from previous figures.

- Radius. This field specifies the radius of the future polygon.
- Smooth outer corners. If the checkbox is checked, then the corners are rounded; if not, the corners are sharp, as in a classic polygon.
- Star. Check the box if you want to receive a star as output.
- Depth of rays. This input field specifies how long the rays will be.
- Smooth internal corners. Check this box if you want the inside corners to be rounded, as shown in the image below.

Line
Use this tool to create truly straight lines - freehand is simply not practical. To achieve maximum accuracy, configure the geometric parameters in the appropriate window.

- Start. If the checkbox is checked, instead of a line you will get an arrow that will be drawn at the location where you clicked the mouse button.
- End. Select the checkbox to add an arrow to the end of the line.
- Width. Indicated as a percentage relative to the thickness (it can be set in the parameters panel in the field of the same name).
- Length. It is calculated in the same way as width - in relation to thickness, as a percentage.
- Curvature. The value ranges from -50% to 50% and determines how much the widest part of the arrow will be curved. The figure shows arrows with curvature of 0%, 30% and 50% (from top to bottom).

Free figure
In order not to create a separate tool for each of the dozens of remaining shapes, the developers have combined them here. All elements of the parameters panel are already familiar to you, except for the most important one - the Shape button, clicking on which opens the shape selection window.

If you click on the gear located on the right side of the window, a menu of additional options will open, containing categories of shapes.


Thanks to the tools discussed, you can literally draw a huge number of shapes in just two clicks, which would take quite a long time to create manually.
In the vast majority of cases, you will be drawing vector shapes. Unlike pixel shapes, vector shapes are flexible, scalable and independent of image resolution, which means we can set them to any size we want, edit and scale them as much as we need without losing quality, and even print them in any format. size also without loss of quality!
Whether they're shown on screen or in print, the edges of vector shapes always remain crisp and clear.
To make sure you're drawing vector shapes rather than paths or pixels, select the Shape option from the Tool Mode Views in the Options Bar:
Selecting the Shape option from the Options Bar
Filling a shape with color
The next step we typically do after selecting the Shape option is to select the color to fill the shape, in Photoshop CS6 and above, this is done by clicking on the Fill field in the Options Bar:

Click on the button in the options bar to open the shape fill properties dialog box.
This action opens a window that allows us to select one of four in various ways form, each of which is represented by one of four icons located along the top of the window. The purpose of the icons, starting from the left edge:
- No color(No Color) - white rectangle with a red diagonal line, no fill
- pure color(Solid Color) - fill with solid color
- Gradient(Gradient) - fill with a gradient
- Pattern(Pattern) - fill with a Photoshop pattern (pattern)

Various methods form filling
No Color
As the name suggests, selecting this option will leave the shape with no fill, with empty pixels inside. What is it for? Well, in some cases you may only need the circuit itself. Also, often you only need a stroke with transparent pixels inside.
Below is a simple example of what a form looks like without a color fill. All we see is the main outline of the form, which is called “Path”. The outline only appears in the Photoshop document, so if you save your work as a JPEG or PNG, or print it, the outline will not be visible. To make it visible, we must add a stroke to it, which we will look at how to add next:

Rectangle shape without fill or stroke.
Solid Color
To fill your form with a solid color, select the Solid Color option, second icon from the left:

Option "Solid Color" to fill the shape with a solid solid color
With the option active, select a color for the shape by clicking on one of the color swatches. Colors you've recently used in Photoshop will appear above the main swatches:

Select a color by clicking on the swatch.
If the color you need is not among the samples presented, click on the “Color Picker” icon located in the upper right corner of the window:

Click on the Color Picker icon to select your own color.
A color picker dialog box will open, select a color from it and click OK to close the Color Picker after selecting the color you want.
As you can see in the figure below, after these actions we have the same form, only now the form has a color:

A figure filled with color.
Gradient fill
To fill your shape with a gradient, select the Gradient option. Then click on one of the thumbnails to choose a preset gradient, or use the gradient strip thumbnail below to create your own gradient variation.

Select a ready-made one or create your own gradient to fill the shape.
Here's the same shape, only now it's filled with a gradient:

A shape filled with one of Photoshop's preset gradients.
Filling with a pattern (Patterns)
Finally, the pattern fill option allows us to fill the shape with one of Photoshop's preset patterns.
Click on one of the thumbnails to select a pattern. There are not many pattern options preinstalled in Photoshop; selecting, loading, and installing a fill pattern is described in detail.
Below is the same shape, this time filled with a pattern:

The same shape, only this time filled with a standard Photoshop pattern.
If you're not sure what color, gradient or pattern your body needs yet, don't worry. As we'll see later, you can always come back to edit the shape later and change the fill type.
Add a stroke to a vector shape
This option has been available in Photoshop since version CS6. By default, Photoshop won't add a stroke to the edges of the shape, but adding one is as easy as adding a color fill.
To add a stroke, click on the appropriate option in the options bar:
Option to add a stroke.
This opens a window with options where we can choose the stroke color, as well as set many other options.
At the top of the window we have the same four icons for choosing the fill type for the stroke line, these are No Color, Solid Color, Gradient and Pattern. The default option is No Color. I'll choose the Solid Color type. Select and assign a stroke color in exactly the same way as a fill color, as described above.
Changing stroke thickness
To change the stroke thickness, use the input box located directly to the right of the color swatch rectangle in the Options Bar. By default, the thickness is set to 3 pt. But you can specify other units of measurement if you click on this input field with the right mouse button, a drop-down list of units of measurement will open. I almost always select pixels:
Change the stroke width and units.
Align Edges Option
To the right of all the others, in the options bar there is the "Align Edges" option. When you enable this feature (it's on by default), Photoshop will align the position of the stroke edges with the pixel grid, resulting in a sharper image.
The option will be active only if the stroke unit is pixels.
Additional stroke options
By default, Photoshop draws the stroke as a solid line, but we can change this by clicking the Stroke Options button in the Options Bar:
Button in the window for selecting additional properties - selecting a stroke - solid, dotted, dotted, etc.
This opens the Stroke Options window. In this window we can change the line type from solid to dotted or dotted. In addition, there are three additional stroke options:

Advanced Stroke Options Dialog Box
Option "Align"(Align) allows us to choose whether the stroke will be located inside the path, outside or in the middle.
Next option "Ends"(Caps) only works if we have selected a dotted stroke. We can change the appearance of the ends of the segments.
- the stroke ends at its border given length and the end is rectangular
- the end has a semicircular shape and protrudes half the width beyond the border of a given stroke length on each side
- the end is rectangular in shape and protrudes half the width beyond the specified stroke length on each side
"Angles"(Corners) allow you to change the appearance of the corner at the junction of the stroke lines. Coals can be sharp (default), rounded, or beveled. This option works if the stroke is located outside or in the middle of the path. If the stroke is inside the path, the corners always remain sharp.
Clicking on the button at the bottom of the "More Options..." window opens another window where we can set the length of strokes and breaks between strokes. Here's an example of a rectangular shape with a fill and a dashed stroke with different stroke lengths:

A stroke within a shape that uses two types of strokes—line and dot.
Hello, dear readers of my blog. The easier the task, the more difficult it is to solve in Photoshop. There are a thousand articles about or creating the effect of black eyes, but how to draw a circle, square or rhombus - go figure it out! Today I will solve this injustice.
A comprehensive article about geometric figures for Photoshop - how to draw them yourself, what additional tools you can download for a more effective result, as well as many other equally interesting and useful information.
We draw ourselves
IN Adobe Photoshop There are several tools that allow you to draw shapes. Just some of them hide some secrets. Now I will tell you about them. So, I If you want to learn how to do it like in my drawing, then I recommend the article, there is nothing easier than making the same one.
So, in the toolbar on the left you can find a rectangle, ellipse, polygon, line or any shape. You may not see additional tools, but you found one of them, just hold down the left mouse button for a split second or click once on the right mouse button. A menu with additional shapes will immediately appear.

To start, I'll select a rectangle. As soon as I finish drawing, an additional menu will pop up on the left. Here you can select the size by width and height if you need to maintain exact dimensions. Just below is a menu with a fill for the shape itself - you can choose no fill, a solid color, a gradient or a pattern.

A little to the right is the stroke menu - you need to determine its width and whether it will be present at all; if you want, make it monochromatic, fill it with a gradient or, again, with a pattern.

To turn a rectangle into a square you need to hold down the Shift button while drawing the shape.

Pressing the Shift button turns an ellipse into a circle.

Also in the list there is such a figure as a polygon. You decide the number of sides yourself. You can enter any value - 3 to make a triangle, 7, 10 and so on.

I won’t pay much attention to the lines; this thing is not difficult to figure out on your own. The only thing worth warning is that holding Shift makes the line strictly vertical or horizontal.
Free figure
We are left with an arbitrary figure. What it is?

On the very right side of the top menu you can see ready-made shapes. Various arrows, squares, lightning bolts and so on.

To use the keyboard shortcut Ctrl+T.

How to add new ones
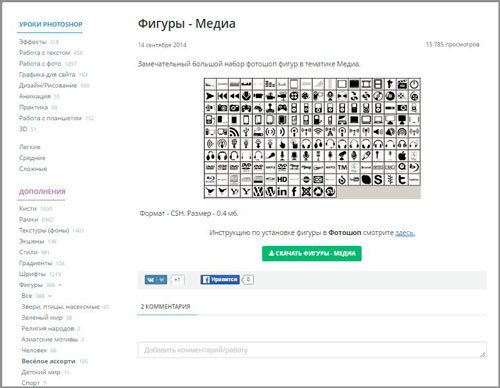
Adding new shapes is not difficult. A lot of free figures can be downloaded from the site photoshop-master.ru . There are about 400 sets with figures - people, patterns, spiders, abstraction, cars, chairs, fire, flowers and much more.

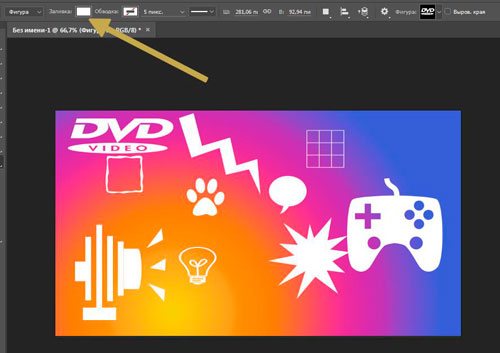
I’ll show you how to install them using “Media” as an example; they will be useful to me in the future. So, I download the file.
Just wait 15 seconds. No pre-registration is required.

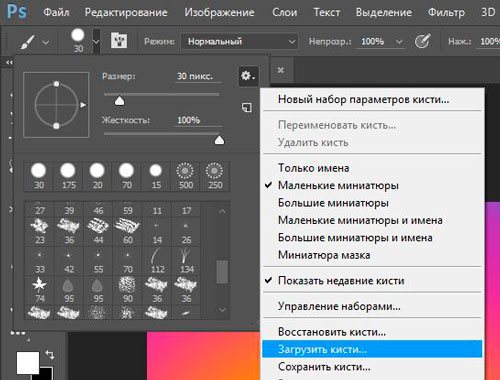
Now open the archive and drop the file in CSH format somewhere where it can be easily found.

Now open the shapes in Photoshop and click on the nut on the right side. In the list that opens, select “Load Shapes.”

Now find the file that you unzipped not long ago. By the way, after you're done, the file can be deleted from your computer. You won't need it anymore. Everything was copied to the desired folder.

You can use shapes. Don't forget about the fill, thanks to which you can change the color of the shapes, as well as the stroke.
In addition to shapes, you may also need brushes. They can also be downloaded from the website Photoshop-master .

You can load the required set in the same way as when working with shapes. Open your brushes.

Click on the nut and select “Load”.
Work with them yourself. There is nothing complicated here. They are slightly different from the figures.

Google to the rescue
Another way to draw a figure is to use the work of others. You'll need Google and its Images section. You will find out why exactly he is very soon. So that the figure has transparent background, and it fits harmoniously into your composition, it is required. This is what you need to look for: png triangle, circle, oval, and so on.

If you are doing work for yourself, then, in principle, you could use Yandex, but if the project is being created for commercial purposes, then Google will be very useful. Open “Tools”, then “Use Rights” and select the desired type - use or use and change.
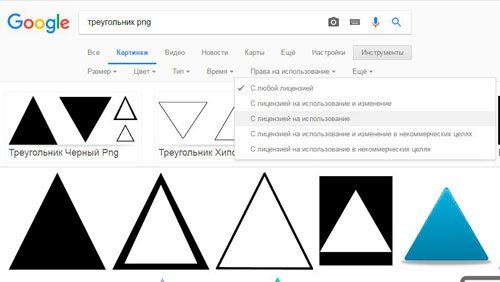
Next, open the picture after you have found something suitable. This important condition. The drawing should be located on this square-checkered background. If it's just white, then it's not a png. You will understand the difference when you download. In principle, there is nothing wrong with learning from your mistakes.

This is what the PNG will look like. The checkerboard filled with my background.

If you want to learn more about the program, I can recommend the course to you « Photoshop from scratch in video format » . It is suitable for complete beginners. There is a lot of useful information here about the tools and when each is suitable.

The Internet is full of lessons that you can learn from, but it is one thing to blindly repeat after the author and quite another to meaningfully achieve a goal, knowing what you will have to use for this. This is a completely different level.
It's good to have tools in the program that allow you to draw circles and squares, but what if we need to draw a more complex shape? What if we wanted to add a heart to a wedding photo or invitation, or draw a dog or cat for a pet store logo? How about using flowers, leaves, snowflakes, musical notes, or a copyright icon in your drawings?
In fact, Photoshop works with all of these shapes and more and allows us to add them to an image with the same ease that we added circles and squares. In the program, all these more complex shapes are called custom shapes, and we can draw them using the Custom Shape Tool, which we will learn about in this tutorial.
Free Shape Tool
The Free Shape tool is located on the toolbar in the same section as the other tools in the Shapes group. By default, the Rectangle Tool ( Rectangle Tool), but if you click on it and hold the mouse button down for a few seconds, a pop-up menu will appear listing other tools that are also available in this section. The Free Shape tool is at the very bottom of the list:
Click and hold the Rectangle Tool icon, then select the Free Shape Tool from the menu that appears.
If you already have one of the Shapes group tools selected, you can quickly switch to the Free Shape tool in the Options panel, where there are six icons representing the Shapes group tools. The Free Shape tool icon is the last one on the right (it looks like a blob):
If you already have another tool in the Shapes group active, you can select the Free Shape tool in the settings panel
Selecting the shape of an arbitrary figure
After selecting the Free Shape tool, we need to decide on the shape of the shape we want to draw. In the settings panel, to the right of the Free Shape tool icon, a preview window will appear, which will display a thumbnail of the shape that is in this moment selected:
The preview window displays the arbitrary shape we have selected
To select a different shape, click on the preview window. This action will open the palette " Free shapes", where all the shapes currently available for selection will be presented. In fact, Photoshop works with much more big amount arbitrary figures than the limited number that was initially presented in the palette. We'll look at how to load other arbitrary shapes into the palette next:

To open the Custom Shapes palette, click the preview window
To select a shape, simply click on its thumbnail, then click on the button Enter(Win) / Return(Mac) to close the palette. Or double-click on the shape thumbnail, which will select the shape and close the palette itself. I'll select a heart shape:

Select a heart-shaped shape from the "Custom Shapes" palette
Choosing a color for a shape
After choosing the shape of the figure, you need to choose a color for it. This can be done by clicking on the color swatch icon located to the right of the word “Color” in the settings panel:
Click on the color swatch icon to select for an arbitrary shape desired color
The program will immediately open the color palette where we can select the desired color. Since I decided to draw a heart shape, I will choose the color red. To close the color palette, click OK when you select the color you want:

From the color palette, choose a color for a heart-shaped figure
Selecting the Shape Layer option
As I mentioned in the last tutorial, Photoshop allows us to draw three types of shapes using the Shapes group of tools. We can draw vector shapes that are resolution independent and can be scaled without losing quality (this is the type of shape we would draw in Illustrator program). We can also draw paths, which are just outlines of shapes, or we can draw pixel shapes, which the program fills in with colored pixels. In most cases, we draw vector shapes, and to be able to do this, we need to select the Shape Layers option in the settings panel. It's the first icon in a group of three icons located toward the left edge of the Settings panel:

To draw vector shapes, select the "Shape Layer" option in the settings panel
To draw a shape, click in the document window to define starting point and then, while holding down the mouse button, drag the mouse cursor in a direction away from the starting point. As you move the cursor, the program will show you a thin outline of the future figure:

Click to define the starting point and then drag to draw the shape
Release the mouse button to finish drawing the shape, and the program will immediately fill the shape with the color you selected in the settings panel:

Photoshop will fill the shape with color when you release your mouse button
Drawing a figure with correct proportions
Notice that my heart shape looks a little distorted. It is wider and shorter than I expected to see. This happened because, by default, Photoshop does not try to save correct proportions(or in other words, the aspect ratio) of a figure in the process of depicting it. I'll press Ctrl+Z (Win) / Command+Z (Mac) to undo the action and try to draw the shape again.
To draw a shape with the correct proportions, position the cursor in the document window and, while holding down the mouse button, begin dragging the cursor and drawing the shape as usual. While doing this, press the Shift key and continue to hold it down as you move the cursor. As soon as you press (and hold) the Shift key, you will see that the outline of the shape has the correct proportions:

To draw a shape with the correct proportions, hold down the Shift key while moving the cursor
When you're happy with the size of the shape you've drawn, release the mouse button, and then release the Shift key (make sure you release the Shift key last). The program will fill the shape again with the selected color:

Release the Shift key only after you release the mouse button
I'll press Ctrl+Z (Win) / Command+Z (Mac) again to undo, and then select a different shape by clicking the shape preview box in the Settings panel to open the Shapes palette. This time I'll focus on the image of musical notes:

Click on the musical notes thumbnail to select a shape
In order to draw musical notes, I'll position the cursor in the document window to define the starting point and then, while holding down the mouse button, drag the mouse cursor in a direction away from the starting point. Once I start dragging the cursor, I'll press and hold the Shift key to lock in the correct proportions of the shape and continue drawing the image:

As I move the cursor, I'll hold down the Shift key to keep the shape's proportions correct
I'll then release the mouse button to finish the painting process, and Photoshop will fill the shape with the same color I chose for the previous shape:

The new shape will be filled with the same color as the previous one
Change the fill color of a drawn shape
What if I want my new figure to be a different color from the previous one? I could have just chosen a different color in the settings panel before I painted new figure. However, we can also easily change the color of an already drawn shape. Each new custom shape you draw is placed on its own shape layer in the Layers panel, and each shape layer has its own color swatch icon that represents the shape's current fill color. In order to change the color, you just need to double-click on the color swatch icon:

To change the current shape color, double-click the shape layer color swatch icon
Photoshop will re-open the color palette where we can select a new color. I'll choose purple:

Select a new color for the figure from the color palette
Click OK when you're ready to close the Color Picker, and this will allow Photoshop to change the shape's color for us:

We can change the color of a vector shape at any time
Loading additional shape sets
As I already mentioned, Photoshop works with a much larger number of custom shapes than the limited number that is initially provided to us. We just need to load additional shapes into the palette. We can do this by opening the Shapes palette in the Options panel and clicking on the small arrow in the top right corner of the palette:

Click on the small arrow in the upper right corner of the shapes palette
This action will open a menu with various parameters, at the very bottom of which there will be a list additional sets shapes installed in Photoshop. Each of these sets is a collection of figures united by a common theme, for example, “Animals”, “Music”, “Nature”, etc. Some of the sets only appeared in Photoshop CS5 (which is the version I use), but most of the sets are available in any recent version of the program:

All these additional sets of shapes are installed in the program, but they must be loaded into the palette manually
If you know which set of figures you need, you can select it by clicking on the corresponding set name in the list. However, it's easier to load all the shape sets at once. We can do this by selecting the name "All" at the top of the list of sets:

Select the name "All" to load all additional sets of forms
After this, a dialog box will appear and you will need to decide whether to replace the current custom shapes with new ones or add shapes to the existing ones. Select "Append" in the window, which will allow you to save the original shapes and add new ones to them:

To load new shapes when saving the original shapes in the palette, select “Add” (Append)
And now if we open the shapes palette by clicking on the preview window in the settings panel, we will see a variety of new shapes from which we can select the ones we need. I've expanded the shape palette a bit so that more miniatures can be seen. To view all thumbnails of the shapes, use the scroll bar on the right side of the palette:

The Shapes palette is now loaded with all the additional shapes available in Photoshop
Below are some examples of shapes that we can now draw in the program:

The Shapes palette now reflects all the additional shapes available in Photoshop
Despite all the variety of ready-made freeform shapes provided in the program, it may happen that even after downloading all the sets, we will not be able to find the image we need for the special design we are working on. And in this case, Photoshop will be an indispensable assistant for us, because it allows us to create any shape ourselves. To learn how to create, save, and use your own collection of custom shapes, check out our Create Your Own Custom Shapes tutorial!
And now we're done! We looked at how you can use the Free Shape tool to add a complex shape to your document. In the next tutorial, we'll explore the differences between vector shapes, paths, and pixel shapes!
Photoshop is a raster image editor, but its functionality also includes the ability to create vector shapes. Vector shapes consist of primitives (points and lines) and fill. In fact, this is a vector path filled with some color.
Saving such images is possible only in raster formats, but, if required, the working document can be exported to vector editor, For example, .
The tools for creating vector shapes are located in the same place as all other tools - on the toolbar. If you want to become a real professional, then the hotkey for calling any of these tools is U.

This includes Rectangle", "Rectangle with rounded corners", "Ellipse", "Polygon", "Free Shape" and "Line". All these tools perform one function: they create a work circuit consisting of reference points, and fill it with the main color.
As you can see, there are quite a lot of tools. Let's talk about everyone briefly.
- Rectangle.
Using this tool we can draw a rectangle or square (with the SHIFT).
- Rectangle with rounded corners.
This tool, as the name suggests, helps to draw the same figure, but with rounded corners.
The fillet radius is preset in the options bar.

- Ellipse.
Using a tool "Ellipse" circles and ovals are created.
- Polygon.
Tool "Polygon" allows us to draw polygons with a given number of angles.
The number of corners is also adjustable in the options bar. Please note that the setting contains the parameter "Parties". Don't let this fact mislead you.

- Line.
With this tool we can draw a straight line in any direction. Key SHIFT in this case, it allows you to draw lines at 90 or 45 degrees relative to the canvas.
The line thickness is adjusted in the same place - in the parameters panel.

- Any figure.
Tool "Free figure" gives us the ability to create shapes free form, contained in a set of shapes.
The standard Photoshop set containing arbitrary shapes can also be found in the top tool settings panel.

You can add figures downloaded from the Internet to this set.
General Tool Settings
As we already know, most of the shape settings are found in the top options bar. The settings below apply equally to all instruments in the group.

The following settings allow you to perform various, rather complex, manipulations with figures, so let's talk about them in more detail.
Shape Manipulation
These manipulations are possible only if at least one shape is already present on the canvas (layer). Below it will become clear why this happens.

This item allows, after performing one or more previous operations, to combine all the contours into one solid figure.
Practice
The practical part of today's lesson will be a set of chaotic actions aimed only at seeing how the tool settings work in action. This will already be enough to understand the principles of working with figures.
So, practice.
1. First, let's create a regular square. To do this, select a tool "Rectangle", hold down the key SHIFT and pull from the center of the canvas. You can use guides for ease of use.

2. Then select a tool "Ellipse" and settings item "Subtract front figure". Now we will cut out a circle in our square.

3. Click once on any place on the canvas and, in the dialog box that opens, enter the dimensions of the future “hole”, and also check the box next to the item "From the center". The circle will be created exactly in the center of the canvas.

4. Click OK and we see the following:

The hole is ready.
5. Next we need to combine all the components, creating a solid figure. To do this, select the appropriate item in the settings. In this case, this is not necessary, but if the circle extended beyond the boundaries of the square, our figure would consist of two working contours.
6. Change the color of the figure. From the lesson we know which setting is responsible for filling. There is another, faster and more practical way to change colors. You need to double-click on the thumbnail of the layer with the shape and, in the color settings window, select the desired shade. In this way you can fill the shape with any solid color.

Accordingly, if a gradient fill or pattern is required, then we use the parameters panel.
7. Let's set the stroke. To do this, let's look at the block "Hatch" in the options panel. Here we select the stroke type "Dotted line" and use the slider to change its size.

8. Set the color of the dotted line by clicking on the adjacent color box.

9. Now, if you completely turn off the shape fill,

Then you can see the following picture:

Thus, we went through almost all the settings of the instruments from the group "Figure". Be sure to practice simulating various situations to understand what laws raster objects in Photoshop obey.
The figures are notable for the fact that, unlike their raster counterparts, they do not lose quality and do not acquire torn edges when scaled. However, they have the same properties and can be processed. You can apply styles to shapes, fill them in any way, and create new shapes by combining and subtracting.
Skills in working with shapes are indispensable when creating logos, various elements for websites and printing. Using these tools, you can convert raster elements into vector ones and then export them to the appropriate editor.
Figures can be downloaded from the Internet, or you can create your own. Using shapes you can draw huge posters and signs. In general, the usefulness of these tools is very difficult to overestimate, so pay attention Special attention learning this functionality of Photoshop, and they will help you with this.


