Some time after the first turn on, too much information accumulates on the phone and there is simply no free space left for new files. Owners of budget Android devices especially often encounter this problem. But not everything is so simple, all phones have several types of memory, and first you need to figure out what each of them is responsible for, and only then clean the gadget of unnecessary files and irrelevant information. What ways are there to clean up or increase storage capacity?
Types of memory on Android devices
Each of the memory departments has its own tasks and characteristics, which we will now look into:
If the internal and external memory becomes completely full, you will no longer be able to place anything on the device. It is also possible that the phone will begin to freeze, slow down and refuse to launch applications.
If the RAM or ROM is completely full, the phone will start to freeze, slow down and stop opening applications. Also, many devices have a function that automatically reboots and disables some applications when the RAM or ROM is heavily loaded.
How to view statistics on the memory load of a smartphone or tablet
First, let's check how much and what kind of memory we have left by following these steps:
 Open settings
 Go to the “Memory” section
 Memory usage information
 Press the "Menu" button to view data about RAM and ROM
 The button at the bottom of the screen contains information about the available and total memory of RAM and ROM
How to clear device memory
Since everyone faces this problem sooner or later, there are several cleaning methods, each of which is used for a specific memory.
Using built-in applications
First of all, let's use what the developers of your smartphone came up with to clear the internal and external memory by following these steps:
 Go to settings
 Go to the “Memory” section
 Click on the “Cache” button
 Confirm cache deletion
 Go to the “Miscellaneous” section
 We mark applications whose files you don’t mind deleting
 Click on the garbage can icon to delete data
Video tutorial: leave what you need, delete what you don’t need - how to properly clear memory in Android
To clear RAM and ROM, follow these steps:
 Hold down the "Menu" button to open the list of running applications
 Click on the broom icon to close all applications at once
 Open the phone settings
 Go to the “Applications” section
 Go to the “Working” section
 Selecting applications that can be stopped
 Click the “Stop” button
 Click on the special icon to go to the list of cached applications
 Stopping unnecessary applications
Video tutorial: clearing RAM on an Android device
Freeing up storage space manually
This method involves transferring files and programs from internal memory to external memory, since usually the phone’s built-in memory is noticeably smaller than that which can be additionally installed using an SD card. You can transfer pictures, videos, e-books and files that are not involved in maintaining the functionality of the phone to external memory. In general, transfer everything that is not related to the operating system.
 Open Explorer
 Go to internal memory
 Select file to transfer
 Click on the scissors icon to cut the file
 Go to the MicroSD section
 Insert the cut file using the “Insert” button
You can also transfer part of the application to external memory by following these steps:
 Open the phone settings
 Go to the “Memory” section
 Check the box next to MIcroSD
 Reboot the device
Using a computer
Don't forget that you can use your computer as an external drive. To transfer files from phone to PC, follow these steps:
 We connect the phone and computer using a USB cable
 Let's go to the contents of the phone
We expand the capabilities of the gadget using cloud technologies
In recent years, such a branch of the Internet as cloud technologies has been actively developing, allowing you to upload a file to the cloud via an Internet connection. It goes like this:
 Install the Yandex.Disk application
 Upload the necessary files to Yandex cloud servers
We work with third-party programs
In the Play Market you can easily find many free programs that help you clean your phone in a couple of clicks. Now we will look at the most popular and practical of them:
Clean Master will free your storage from unnecessary information
Probably one of the most famous applications, and not only in its category, as it has more than 5,000,000 installations. Clean Master offers a complete cleaning of the device from temporary files, cache, damaged and empty folders, browser history and other garbage. Its capabilities also include automatic closing of unnecessary applications and a built-in antivirus. The application has a nice and convenient interface that allows you to clean your device with just two clicks of the “Analysis” and “Clean” buttons. Installation link from Play Market -
 Install the Clean Master application
System monitoring in Android Assistant
Also deservedly located in the top Play Market program (https://play.google.com/store/apps/details?id=com.advancedprocessmanager&hl=ru), which has a very wide list of features:
 Installing the Android Assistant application
Total Commander will help you structure folders and files
This application is designed to organize all the files on the device. Total Commander will allow you to pack and unpack folders with their contents in rar and zip formats. Its capabilities also include editing and transferring the contents of the phone from place to place or to another device. Installation link from Play Market -
 Installing the Total Commander application
How to increase internal memory on Android
If clearing the memory did not solve your problems, then it’s time to think about upgrading your device.
First, get an SD card. At the moment, their cost depends on the amount of memory. That is, an 8 GB card will cost twice as much as a 4 GB card. Try to buy a card with more memory than you currently need, so that you can move it into a new phone in the future without having to buy a new one.
Secondly, install the FolderMount application from the Play Market (https://play.google.com/store/apps/details?id=com.devasque.fmount&hl=ru) and the 360root application, which will give your device root rights (download it can be found on the official website of the developer http://360root.ru).
 Press the button to give the phone root rights
 Open the application
Video: combining folders
Thirdly, let’s figure out how to increase the device’s RAM. This can be done using special programs that create a swap file. For example, Ram Manager.
 Install the RAM Manager Free application
 Give the application root rights
 Select one of the modes
Ram Manager operating modes:
How to avoid cluttering your phone and save system resources
To avoid problems with free device memory in the future, you should follow simple rules:
The performance of the device directly depends on the free space. If the memory is clogged, then you cannot avoid freezes and reduced phone performance. Remember that any computer device requires constant care and protection from viruses. Only if you are careful and careful with your gadget will it serve you for a long time and with high quality, constantly satisfying your needs.
Lack of free space is a problem that almost all smartphone users face. This problem is especially relevant for users of budget phones, as well as phones without SD memory card support. In this article we will talk about how to clean your Android phone of unnecessary files and thereby free up some space in the device’s memory.
Cleaning unnecessary files using SD maid
SD maid is one of the best applications if you need to clean your Android phone of unnecessary files. This application can delete files that are left over from already deleted applications, as well as temporary files, logs, unnecessary databases and much more.
In order to use this application, install it on your Android phone from the Play Market. After that, launch this application and click on the “Update” button opposite the “Trash” section.
After this, the SD maid application will begin searching for unnecessary files in the memory of your device. After the search is completed, the number of files found, as well as their size, will appear next to the “Trash” section. In our case, 14 files were found with a total volume of as much as 874 megabytes. In order to clean your Android phone of these unnecessary files, just click on the “Trash” button.

If you do not trust the SD maid application and want to see which files have been marked by the SD maid application as unnecessary, then you need to open the side menu and go to the “Trash” section.

Here you can view all the files and decide whether to delete them or not.

If you purchase the paid PRO version of the SD maid application, you can delete unnecessary files automatically on a schedule.
Manual cleaning of unnecessary files.
You can also clean your Android phone of unnecessary files manually. To do this you will need a file manager. For example, you can use the File Manager (Explorer) application. This file manager is convenient because it divides images, audio, video and documents into separate groups. Also, File Manager (Explorer) clearly separates the internal memory of the device and the SD card. Thanks to this separation, the confusion that occurs in other file managers is eliminated.
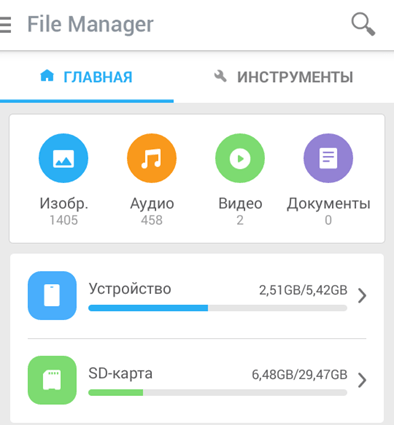
File Manager (Explorer) also allows you to view recently added files.

So, in order to clean your Android phone of unnecessary files, launch the file manager and carefully examine the device’s internal memory and SD card. Browse folders such as Bluetooth, Movies, Music, Documents, Download, Pictures and Sounds. These folders often contain old files that are no longer needed and can be deleted.
It should be noted that you cannot delete files whose purpose you do not know. This can lead to errors in the operation of applications and the Android operating system itself.
Over time, the internal memory of a mobile device becomes clogged, resulting in quite noticeable malfunctions. In addition, the gadget can prohibit subsequent saving of photos and downloading additional applications. To restore functionality, you need to understandhow to clear phone memory on Androide, perform cleaning as soon as possible. Today there are several ways to solve the problem.
How to clear phone memory on Android with a special program
One of the most popular programs today is Clean Master. More than 8 million users have already appreciated its functionality. This is an impressive figure, which confirms the justification of the choice. Figure out,how to clear memory on Androidwith the help of special software it is not difficult. You need to install and run the program. Next you need to do the following:
open the program;
on the main page find the “Garbage” tab;
run a determination of the amount of free space that can be obtained;
check the marked files. Perhaps you still need some of them. Such files must be unchecked to indicate subsequent deletion;
start the cleaning procedure. Upon completion, a corresponding system notification will appear.
Figure out,how to clean an android phoneUsing the Clean Master program is absolutely simple. This is a very useful application that should not be removed from your device. It will allow you to maintain your smartphone at the peak of its functionality, without much difficulty.
Many owners of mobile devices often notice that system performance begins to decline over time. This is due not so much to the resource load as to the lack of free space in the device’s memory. Let's look at a few basic ways to help clean files (on your phone or tablet) to free up additional memory.
The simplest method for clearing phone contents using Android devices as an example
Experts call a general factory reset as the simplest and most effective way to clean any device. All mobile gadgets have this function, regardless of the operating system installed on them.
Let's take Android as an example. To perform a full reset, you need to enter the settings menu, and then use the backup and reset section. There is one nuance here. If you check the box next to the auto-recovery line, after resetting and rebooting the device, the applications that were installed before will be installed again on the device. If this is not required, the mark is not placed. And after rebooting the system, the user will receive a “clean” system. This procedure also has a downside to the coin. After all, during the reset process, all accounts will be deleted. Therefore, they must first be remembered or written down.
How to clear phone memory manually?
As a rule, in most cases, the memory of a smartphone or tablet is “eaten up” by the presence of too many photos, music and videos. These files themselves are quite heavy. They are the ones that need to be removed. Not everything, of course, but only what clutters up the internal storage. As a last resort, if you do not want to delete such information, you can simply transfer it to a removable memory card. Or send it to your computer using a USB cable.
How to clean an Android phone without connecting to a PC? As easy as pie! For example, you can use “Album” to delete photos, and the corresponding applications for other files. Another point is related to the presence of installation distributions in the form of APK files on the device. If you do not plan to use such objects, you need to get rid of them. However, this only applies to cases where the installation components were not downloaded from the Market (at the end of the installation they are deleted automatically), but were downloaded from another source or from a computer. Finally, it is advisable to delete SMS messages, leaving only the most necessary ones. And also clear the call log. All this also takes up space, and quite a lot.

Another aspect in solving the problem (how to clean your phone) is related to an extremely full cache. You can delete such data from the memory section where the corresponding line is selected.
How to clean your phone: removing and moving software
Many of us love to install mobile applications. And they are not always installed on the memory card from the same “Market” or another service. By default, installation is performed on the internal drive. But some applications take up quite a lot of space. How in such a situation? The answer is simple: either remove the programs or move them to an external card.
First, you should make sure that the device supports the mode of transferring applications from internal storage to external storage, and take a look. You need to find out if it is possible to install applications directly onto a memory card. To transfer programs to external media, you can use the system's own tools. For Android devices, this is the settings menu for going to the memory section. At the very bottom there is a line for transferring applications to the card. If this feature is supported, there is no problem.

Otherwise, you can use special utilities like APPS2SD. However, on devices with transfer support initially disabled, you will first have to install “superuser” root rights. And it is not a fact that the transfer will be possible.
Using antiviruses
Now a few words about another burning issue. Unfortunately, this cannot be done manually. After all, the user does not always know what kind of virus could have penetrated the system, what it is called, where its files are located, etc.

In this case, you cannot do without special software. Today you can find a fairly large number of such applications. Not all of them are equivalent in their work. However, according to many experts and users, the most powerful are utilities like 360 Security, mobile analogues of Dr. Web and ESET Smart Security and many others. At the same time, such applications provide not only the identification and removal of virus threats, but also continuous protection in the future.
Optimizer programs
As many have already noticed, manually cleaning your phone or tablet of debris takes too much time. And many people simply don’t want to delve into device settings. In addition, with such methods you can easily remove something unnecessary. Especially if you look for files not in file managers and then try to get rid of them.

But even in this case, there is a universal solution - to use special optimizer utilities that are capable of performing complete cleaning automatically or on demand. Most of them have standard tools for cleaning caches, outdated APK files, message and call logs, transferring programs to external media, as well as tools for deleting too large files (at the user’s request). And the most important thing is that they are able to terminate processes that are using too much RAM. Thus, the owner of the gadget, as it were, kills two birds with one stone: it cleans the device of debris and speeds up the operation of the operating system installed on it.
In practical terms, the best results are shown by utilities like CCleaner, 360 Security, etc. By the way, many of them also have built-in anti-virus modules and startup control sections, when you can disable the launch of unnecessary or unused processes when the device starts.
Conclusion
Here is a summary of all the information on how to clean your phone or tablet. From the point of view of the practicality of the above methods, the most reasonable and optimal solution is still the use of special optimizer programs. In this case, the processes associated with comprehensive cleaning of the device will be both faster and safer. But, if you need a complete one (the external card is not taken into account, since the information is not deleted from it), you cannot do without resetting the settings to the factory state.
When considering devices that run on the Android operating system, a problem always arises related to the constant filling of memory. At the same time, quite often there are no useful applications, media files and documents on the device, and the internal memory is almost completely or half full.
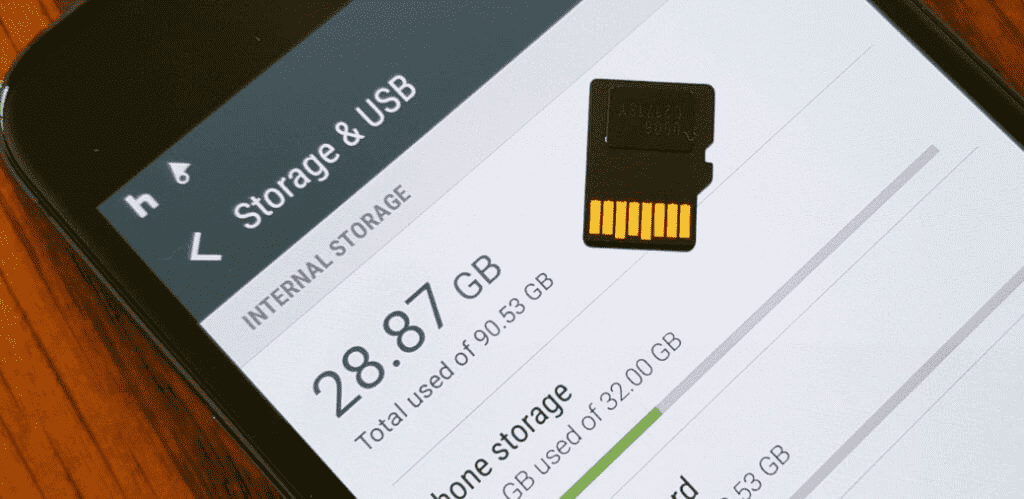
Android system allows you to delete unnecessary files via PC
This is due to the clogging of the device’s memory with various information that is collected from various applications. Errors when creating a third-party application, the very features of the operating system and many other points force us to look for an answer to the question of how to clean Android through a computer. Let's look at several ways to delete information, as well as the features of its placement on internal memory.
The operating system itself, when receiving information from various applications, sorts it into certain folders. An exception is the situation when files are saved manually. Also, do not forget that you need to delete only those files that you know. If you do not have an Android device, download an Android emulator on our portal.
Android is an open mobile operating system that gives access to internal files. Removing some may cause the operating system to not work.
 When cleaning your Android device, it is important not to delete system files
 - Media– a folder containing various media files. Quite often, files are sent here that the system did not detect or have an unusual extension.
- Folder Music dedicated to music that is downloaded from the Internet and many other sources
- Movies used by the system to save videos. At the same time, captured videos can be saved in the same folder.
- Sounds can also be used to save sound files that can be used by the system to operate various functions.
- Bluetooth– the folder in which downloaded information is saved via the transmission method in question.
- DCMI can be used by the system in various cases.
- Download is the folder in which all downloaded files from the network or through other sources are saved. In some cases, there is a possibility that the file will not end up in this folder after downloading, but will be redirected to another. It all depends on the features of the operating system and the installed system settings.
 Information to be deleted from an Android device is located in certain folders
 It is these folders that we will consider when cleaning the device, since the rest may store system information, the deletion of which will cause problems with the mobile operating system.
We clean the computer
To begin with, we note that you can delete most of the information from the device without a computer. To do this, just download a special program that works as a file manager.
In this article we will look at how to clean your phone from your computer.
The process of deleting information is presented as follows. First you need to connect the device to the computer, for which you use a regular cable. Quite often, the device will require installing drivers, but they are not needed to open the internal memory. At the same time, we note the need to have an anti-virus program, since a virus can move from one device to another.
After connecting, all folders become open. Please note that the computer may not see some folders because they are marked as hidden directories. Therefore, you should set the "Show hidden folders" setting on your computer.
How to remove garbage?
There may be quite a lot of junk on the device, which will take up free space and create quite a lot of problems. Garbage is information that accumulates in the cache from the browser, running applications, and so on. Therefore, it is recommended to carry out periodic cleaning in order not only to free up memory, but also to speed up the operation of all applications.
On the Internet you can find quite a few applications that can remove junk from Android. However, applications that are installed directly on the device itself are more effective.
An application like this scans folders for outdated files, which are then deleted. However, we note that many such programs only pretend to clean up memory. Therefore, you can more effectively clear the internal memory of the device through a computer.
Cleaning up trash on your own is quite difficult. To do this, you need to know the path and type of file permission. At the same time, there is a high probability that system files may be saved in the same folder, the deletion of which will lead to incorrect operation of the application and the operating system itself.


