Of course, one of the simplest and most frequently used elements in drawing is the line. Program Adobe Photoshop is no exception. Especially if you plan to seriously study the field of website design.
One of the advantages of the Photoshop program is the interchangeability of actions. You can achieve the same result with many different different ways. Now we will study several options for command sequences with which we can make a line in Photoshop.
Let's start by creating a new document. A document of 1000 by 1000 pixels is quite suitable for us. Detailed description Creating a new document in Photoshop can be found here.
Let's start with the line tool. We will find it on the tank panel.
Now let's set the characteristics of our future line.
Let's set the line thickness. I decided that a thickness of 4 pixels would suit me. If you wish, you can choose its style. I'll make do with the simplest ones.

Let's decide on the color. You will also find the primary color selection icon on the sidebar. By clicking, a window for choosing a color is called up.

Well, that's it now! Let's draw. Click on the work area and draw a line with the mouse.

Now our line is a smart object. You can turn it into a regular layer in the layers window using the “rasterize layer” command.

The line is ready. As you can see, drawing a straight line in Photoshop is very easy. We have discussed an elementary method, which, despite its convenience, has a number of limitations. Let's take the second one apart and draw a line using the pen tool.
It should be noted that in this case it is worth changing the settings of the brush or pencil to suitable ones in advance, because your line will repeat these outlines. Therefore, let's set up the pencil tool together. Select it in the sidebar. And click on the work area.

Set the following pencil settings. How to choose a color is mentioned above.

In the sidebar, look for the pen tool.

We make two clicks on the work area. It should be noted that if you want to make the line smooth and strictly horizontal or vertical, hold down the shift key while clicking.

Click on the line with the left key. In the drop-down list, select the “outline outline” command.

We trace the outline and click again with the left mouse button. Select the “delete contour” command.


So, the line is ready! In just five minutes we learned two ways to draw straight line in Photoshop.
MS Word can be used not only to work with text, but also to create drawings. Of course, its set of tools is much inferior to specialized programs, but if you need to add to a document a simple picture or a figure, then Word’s capabilities will be sufficient.
Enable the Draw panel
You can draw in Word in two ways: manually and using templates.
Many users do not know about the ability to use tools for drawing, similar to those found in standard Paint. The thing is that they are hidden by default and to start working with them, they must be enabled. It is also worth noting that the manual drawing function has become available only in latest versions"Vorda."
To enable the Draw panel, select Options from the File menu. Then in the dialog box that opens, click on the “Customize Ribbon” line. Among the main tabs in the right column, check the box next to "Drawing" and click OK to apply the changes.
How to draw in Word?
After turning on the "Drawing" panel, a corresponding tab will appear in the document, after clicking on which the following tools will become available:
- "Select" - allows you to select an already drawn element.
- “Draw with your finger” - allows you to draw arbitrary lines in Word.
- "Eraser" - removes unnecessary objects or elements.
How to draw in Word using these tools? To do this, select "Draw with your finger" and draw the desired line on the touch screen. If you are using a regular screen, you use the cursor to draw the line.
In addition to these tools, Word has a small selection of pens available. They differ from each other in line type and color. If you need to set the color and thickness of already created lines, this can be done using the appropriate tools on the panel.
The Transform group tools are needed for editing text and creating notes. For example, you can use Freehand Editing to underline a word, circle part of the text, add an arrow, or highlight errors.
The Convert to Shapes feature allows you to create an object from a sketch. After this, the drawn element can be moved, resized, rotated, or applied other manipulations available for shapes.
The last tool of the group allows you to enter the required symbol or mathematical sign.
How to draw shapes in Word?
In addition to drawing by hand, MS Word has a fairly wide selection of shapes that you can use to create simple illustrations for text.

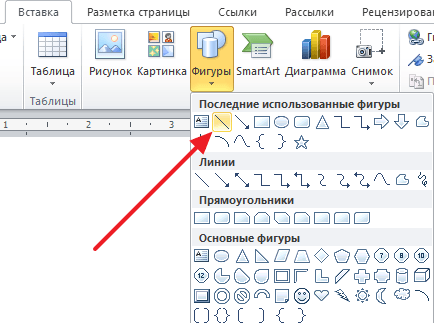
Before you can create a drawing from shapes, you need to add a drawing area. To do this, first in the "Insert" tab, click on the "Shapes" item. Then click on the "New Canvas" line in the pop-up menu. This action will add a drawing area to the page. Its dimensions can be changed by dragging one of the corners of the area in the desired direction.
Working with Shapes
After creating the canvas, the “Format” item will be added to the top panel with basic drawing tools.
After clicking the "Shapes" button, a window will open with big amount objects. These will include lines, arrows, circles, standard shapes, stars and flowcharts.
How to draw lines in Word using these shapes? First you need to select the line you are interested in, then move the cursor to the area to draw and stretch the line to the desired length by holding down the mouse button. In the same way, you can draw arrows in Word and other elements.

There are two additional buttons to the right of the Shapes menu. If you select the first one, a drop-down menu will appear. The "Change Shape" line from this menu will allow you to completely replace the current object with another. The "Start Modifying Nodes" line allows you to modify the shape you have selected at specific points.
Another button next to the Shapes menu allows you to add text. After clicking on it, a field will appear in the indicated place in which you can enter the desired text. It can be moved if necessary.
Adding styles and effects
The Shape Styles tool group allows you to select the fill and outline color of the created shape. To do this, use the corresponding button to the right of the standard shape styles.
It is not necessary to use the standard one color scheme for shapes, it can be replaced by clicking on the "Other colors" line. A gradient or texture can also be used as a fill for a shape.
Using the Shape Effects key, you can modify the selected object by adding a shadow, highlight, emboss, smooth, or rotate.
The WordArt Styles tool lets you apply an effect to text that you insert using the Add Text Box feature.

The Arrange tool provides a number of options that let you reposition a shape, rotate it, align it, or add text wrapping. This feature also allows you to overlay shapes on top of each other.
The Resize tool allows you to change the width and height of an object. If desired, you can install exact value these settings or change them manually.
As you probably already understood, the Word text editor is a multifunctional program, and, perhaps, at first it is very in vainly underestimated by many users. Of course, in some cases it is still better to use the same Excel, but, in general, Word is able to cope with many tasks.
With its help, you can always draw up a document beautifully, making it seem deliberately businesslike, or vice versa, making it informal. You can work with tables, change the text style, etc. In addition, the Word interface is thought out to the smallest detail; it allows you to find in a matter of seconds necessary tool for work. By the way, you can even draw a line in Word if you suddenly need it. Actually, we’ll talk further about how to draw a line in Word.
Method one
In fact, in almost any controversial situation that arises in Word, there are several options for getting out of it. And this is very good, because each user can choose what he likes and suits him best. So, let's start with the first method, in my opinion, very simple and understandable to everyone.
Let's imagine that you have typed some text and you need to highlight it with an underscore. To do this, we do this: select the text, then in the “Home” tab on the toolbar we find the “Font” block. There are three buttons: bold, italic and underlined, and if you also need it, you can do this through another menu. Accordingly, just click on the last button, as shown in the screenshot below.
Method two
This method is even more functional. It will come in handy in situations when you want to draw one or more lines in any area of the sheet, and it doesn’t matter whether it’s horizontal, vertical, crosswise, or something else. Do this:
- There is an "Insert" tab in the toolbar, open it.
- There is an “Illustrations” block, which has a “Shapes” button.
- By clicking on it, find a straight line among the proposed ones. Click on it the moment you need to insert a line into the text. Note that you will have to specify two points: where it will start and where it will end.

Method three
This text editor provides another tool that is useful for quickly creating lines. To draw a line, place the cursor in the desired location, then click on the “Borders” button, which is again located in the “Home” tab. After this, a horizontal line should appear across the entire width of the sheet. 
I hope you liked one of these ways to draw a line in Word. Choose any one and feel free to experiment!
Video to help
When designing text documents, it is not uncommon to need to draw a line, for example, in order to separate one part of the text from another. In the Microsoft Word text editor, there are several options for solving this problem.
In this article we will look at three of the most simple ways draw a line in Word. The material will be relevant to everyone modern versions Word. Including Word 2007, 2010, 2013 and 2016.
Method No. 1. Inserting a dash or underscore.
Perhaps the easiest way to draw a line in Word is to use a dash or underscore. By inserting a large number of such characters in a row, you will get a horizontal line. For example, to draw a line using a dash sign, simply hold down the CTRL key and, without releasing it, press the minus key on the additional keyboard block. Then hold this key combination until you get the line of the length you need.
In a similar way, you can draw a line using an underscore. To do this, hold down the SHIFT key and the underscore key. Then you need to hold down these keys until a line of the desired length is drawn.

This method of creating lines is convenient because such a line is easy to draw and easy to remove. If the line turns out to be unnecessary, then it can be deleted just like any other text.
Method No. 2. Inserting a finished line.
Another way to draw a line in Word is to use the button to create borders. This button is located on the “Home” tab and it allows you to quickly draw a line anywhere in the text. All you need to do is place the cursor where you want the line to be, click on the button and select “Horizontal Line”. As a result, a horizontal line will be drawn at the selected location on the page.

The advantage of this method is that the line drawn in this way can be changed. The line can be made thicker, thinner, longer or shorter. To do this, you need to select the line with the mouse, after which its size can be adjusted by moving its corners. In order to delete such a line, you just need to select it and press the Delete key.
Method number 3. Inserting a shape.
On the Insert tab, there is a Shapes button that allows you to insert shapes into your document. various figures. Among other things, there is a figure in the form of a line. To insert it into the document, click on the “Shapes” button, select the line and draw a line of the length you need in the document.
The advantage of this method is that such a line can be placed at any angle. In order to delete such a line, you just need to select it with the mouse and press the Delete key.


