Attach a piece of paper to the photo and translate it. Simplify your hair into patches, enlarge your eyes and create large highlights in your pupils. Anime portrait is ready. But this is enough if you want to know how to draw yourself in
You have read a description of the process of creating many cartoon characters. But the anime style has enough nuances and special details. Manga characters immediately catch the eye, and it is impossible to confuse them with any other regular cartoon characters. Learn this and drawing anime portraits will be easy for you.
Facial expression
Do you want to convey emotions, but don't know how? Drawing a face in anime style is one thing, conveying it is another. Emotions are drawn quite simply, one might even say, with symbols.
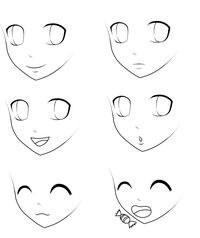
For example, pink lines on the cheeks show that the hero is embarrassed, a wide open mouth with a grin when talking - he is angry, two arcs instead of eyes - the eyes are closed, and, most likely, the character is experiencing pleasure.
However, without studying this “ABC”, you can easily guess the hero’s state of mind. If the person in the portrait is smiling, look at how it is depicted in anime style and do the same.
Dynamics
It's easy to draw a head from the front. But it's boring and gets boring quickly. How to draw yourself in anime style so that your head is dynamic? Imagine that your head is a ball. Draw a line exactly in the middle where the eyes will be located. Now rotate this ball along with the line to change the angle of movement.

Draw lines for the nose and lips and then draw in the details of the face. The work should always be done by outlining the shapes. Draw it in detail - and it turns out that the result is not the movement that you would like.
Main mistakes
Anime in portraits follows general rules. The nose, eyes, mouth, ears take their position on the head. If you can’t draw a regular head, it’s too early for you to think about how to draw a portrait in anime style. Mastery depends on experience.
Draw more sketches, practice. This helps in identifying errors and eventually correcting them. So, instead of opening a tutorial on how to draw an anime portrait every time, go through the list of common mistakes that you should be aware of and try to eliminate them.

Are the eyes evenly spaced along the line? Many beginning artists fail to draw identical eyes; they don’t know what to do with it or how. Drawing yourself in anime style isn't just about making your eyes the size of a galaxy. After you draw them, mark the extreme points below and above and draw lines through them. This will help you find out if the eyes are drawn evenly.
Is your chin centered between them? Draw a line down the center of the face between the eyes and make sure the chin is on this line. It should also cross the mouth and nose. In the center, third or fourth - it depends on the perspective in which the head is located.
Are the ears level with the eyes? The top point of the auricle is located at the level of the eyebrows. The earlobe is in line with the tip of the nose. But these are individual values, so there may be deviations from the given rules - take this into account.

Watch anime based on manga by different authors so you don’t have to worry about how to draw yourself in anime style. Learn different styles of manga and enjoy watching them at the same time. Many otaku (avid anime fans), without studying the principles, make a good “anime” drawing the first time.
I will try to express my thoughts accurately and simply, despite the fact that I am aware of my stupid habit of explaining everything in too much detail :)
So. These are the three who were ruthlessly chosen to become victims of my artistic abilities. I apologize in advance.
3 golden rules in drawing:
Find images of the person you will be drawing from different shooting angles. Despite what you might think, a face can change a lot depending on the angle you look at it from!
- Find your character's distinctive features! Eyes are always the most important part when determining character, but the nose, mouth, and other facial features are also equally important. Think about it: what makes your character so unique? Since you will be simplifying his or her face, it is very important to emphasize who he or she really is.
- Compare with another character. For example, if you are unsure about the process of drawing his/her eyes, try comparing his/her eyes with the eyes of another person! Believe me or not, you will immediately notice the differences and then working with the character will become even easier.
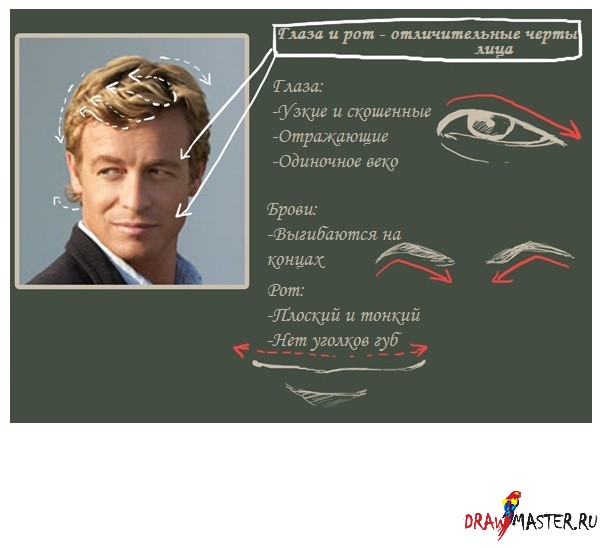
Cillian Murphy / Robert Fisher Jr.
Set of images. Collect photos from different perspectives.

And for God's sake, look for BIG photos. These images were taken as an example for the lesson, I actually can hardly see his face in these pictures :)
Identify facial features!
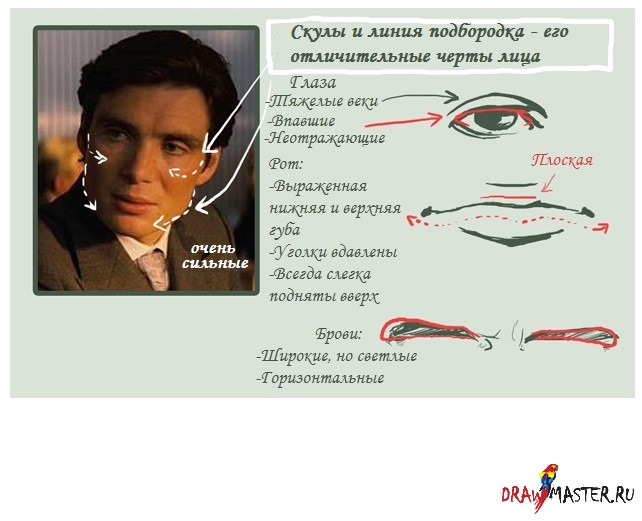
Rest:
Light shadow under the eyes
-Eyes and eyebrows are set close together
-The bridge of the nose is straight. Triangular.
-An angular back of the head
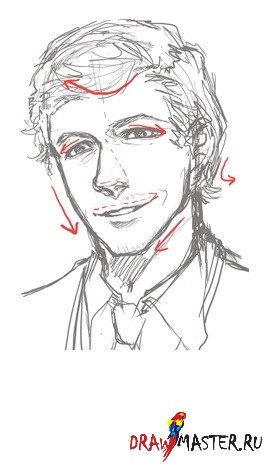
Make a sketch
Not forgetting everything described above, start drawing a sketch. Since this is NOT realism, don't be afraid to highlight or exaggerate certain aspects. In this case, I made his eyes larger and his cheekbones more pronounced.
Also: don’t forget about emotions! A person’s face sets the initial perception of him by others. Murphy's Fisher looks serious, cautious, and perhaps even a little tired and worried. In order to convey all this, I arched his eyebrows a little, the line of his lips is vague, and his eyes look tired.

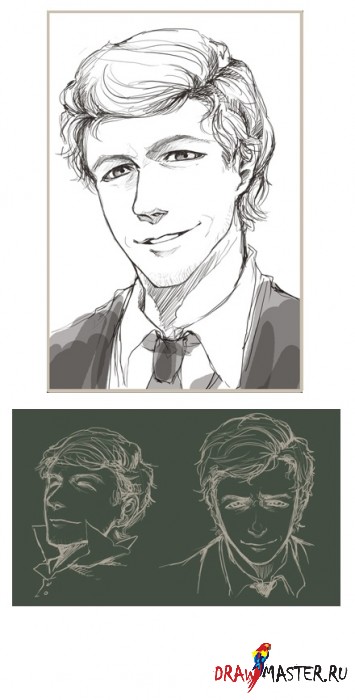
Lineart and shadows
It's very difficult for me to get the right facial expression without applying eye shadow.
I use shadows to make his eyes more expressive (make them sunken), highlight his cheekbones, hair movements, triangular nose, etc. Oh yes, and his lips :)
I can say that the work is more or less finished. You ALWAYS need to concentrate on the eyes, I don’t even know how else to convey the importance of this xD I repeat that it is the eyes that define a person, regardless of how well or poorly drawn the rest of the facial features are. If you ruin the eyes, you will ruin the whole portrait.

Benedict Cumberbatch / Sherlock Holmes
I've already described the process, so I won't go into detail this time unless it's absolutely necessary.
Collect photos.
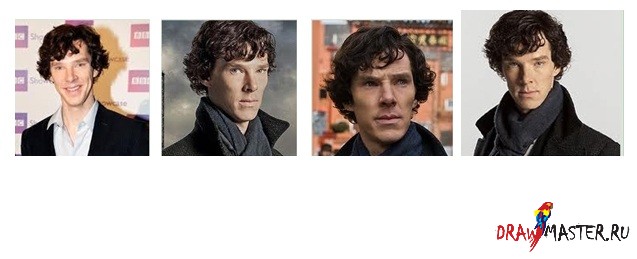
Identify facial features

Rest:
Rounded nose
-Hair is quite curly
-The face is significantly lengthened and narrowed
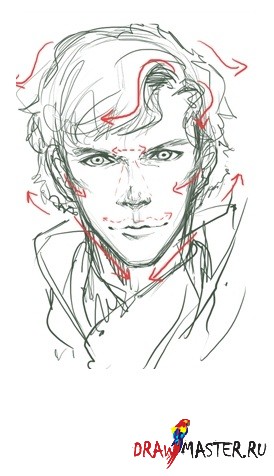
Make a sketch
In this particular case, Benedict as Sherlock looks confident, anxious (mostly due to his intense gaze) and perhaps a little cynical. And so if I draw him with a cheeky grin, it will match his character. Extend your lip line a little to highlight it!
Lineart and shadows
Something is wrong here, maybe I edited his eyes poorly.
Or is it because I went too far with the shadows and that's why he looks a little older than usual xD
When I think about it, it starts to make sense: Benedict is naturally fair-skinned. I'm not even talking about the fact that he's not that old. This means that the number and thickness of lines must be kept to a minimum, otherwise too much shadow will create the appearance of wrinkles.
I was in a bit of a hurry here, so it looks a little rough. Perhaps if I traced it again, the portrait would look better =v=

Click on the picture to view the image in full size and 100% quality.
Simon Baker / Patrick Jane
This place was originally reserved for Hugh Laurie (House) :), but I thought that I was drawing too many men with high cheekbones, not to mention House's character, which is LITERALLY 99% COINCIDENT WITH BENEDICT'S CHARACTER >_>
So here's Simon Baker. I love his smile.
Collect photos.

Identify facial features
Rest:
When she smiles, bags appear under her eyes
- Dyed hair (creates a noticeable contrast)
- The hair on the back of the head always curls
Make a sketch
Baker's Patrick is quite open, friendly, cheerful, and based on the fact that he smirks rather than smiles, he looks ironic and cunning.
And if I make his smile a little lopsided, it will only enhance this effect.
Don't forget that he has a beard (at least draw it on his cheeks), even though it is so light that it is practically invisible. If I don't draw a beard, he will look too young.
Lineart and shadows
In the end, I didn't draw the stubble above the lip. Everything looks great anyway, so I left the drawing as it is.
Also, since his smile is perhaps his calling card, don't be afraid to add folds on the sides of his lips. This is such an outstanding feature of his face >u
In general, that's all.
Did I mention that I adore his smile?
Click on the picture to view the image in full size and 100% quality.
Of course, if I had more time, I would give more examples xD If you have questions, ask them and I'll see how I can help you!
Oh, and I apologize for not including portraits of women in this lesson. Perhaps if any of you are interested, I will tell you about them another time.
Thanks for reading! Hope this helps you!
One last note for everyone, especially for those who draw in anime style:
In general, those of you who want to learn how to draw realism, you need to get rid of the fear that you are afraid of “distorting the characters.” And I am sure that many of you understand what we are talking about, especially those who preferably draw in the anime style.
That is, no matter how beautiful a person is, HE WILL NEVER BE PERFECT. What I mean is that if you don't draw folds or wrinkles or anything else, he or she will look like a 10 year old :)
I know this can be very difficult to adapt at times as it MAY look wrong if you add such natural details. But remember that it's all about practice. At first, I was just like any of you, too cautious when it came to drawing real people. But once I realized that Leonardo DiCaprio looked like he'd had botched plastic surgery somewhere in Korea because I neglected the shadow under his bottom lip...well, I finally realized it.
The old saying never goes out of style: the master's work is feared.
So as long as you can accept that not everyone looks like Sephiroth or Cloud, then you can draw adequately =v=
And guess what? I think I'm on a roll, so I'll expand on my thoughts a bit below:
Make the mistake of looking at a human face and ASSUMING that it is the standard oval face so often drawn.
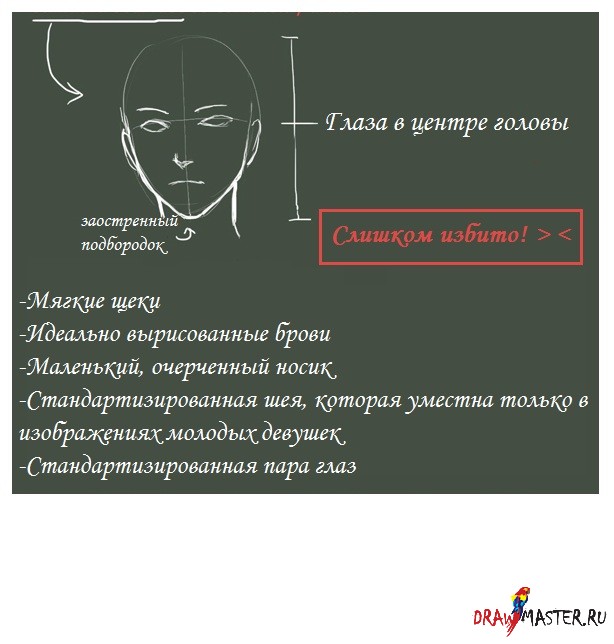
"But but but... it would look pretty weird if I drew him the way he really is. I mean, if I draw a very long face or pronounced cheekbones or..."
Perhaps if you imagine Benedict Cumberbatch with such a standardized face as shown above, you will understand what is REALLY wrong with him. He will look like a teenager!
“I can’t draw a nose the way it is in reality! This prevents me from adding a hump/nostrils and the nose turns out ugly and completely different from the one I copied from.”
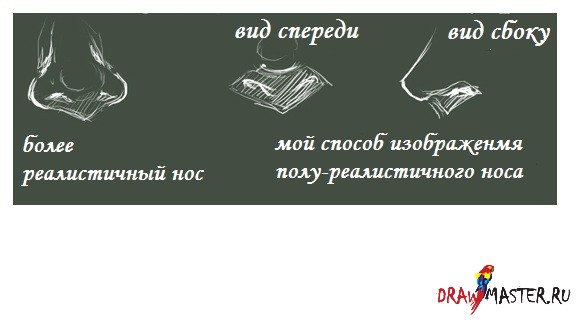
Surely most people will agree with me that the nose is the most difficult part in a realistic drawing and even I am not good enough at drawing it. If you don't control how much pressure you apply to the handle, especially on the sides of your nose, you'll end up with a very strange nose. Again, the usual thing: practice, practice and more practice!
If you want, you can start by copying my method for drawing noses, in which you shade the dark area under the nose. In this case, there is no need to draw wings. This will only work for semi-realistic drawings. Of course, it's always better to find your own way of depicting realism, but never avoid them completely!
In this tutorial I will tell you how I turned the amazing Christina Ricci into an anime character.
Step 1
First of all, you need to find a photo with high resolution, the higher the better. Here, for example, I used a photo measuring 2272 by 1704 pixels.
Note:photo in source materials measuring 1664 by 2496 pixels
Step 2
Duplicate the background and make it smaller - this will be the basis of the image. Do not remove the original as we will be using parts cut from it in subsequent steps.

Step 3
Cut out the eyes from the original image and place them on your workspace. To accurately position the eyes on the base layer, I usually lower the opacity of the eye layer and match the inner corners of the two pairs of eyes. Place the layers well on top of each other so that the transition is not visible. I use brush(brush) with opacity set to Pressure(Press), then I apply Gaussian Blur(Gaussian Blur) with a small radius. This process can take a long time, so it's best to be patient :)

Oops! I think I lost part of my eyebrow due to the size difference. In this case, I'll just copy this part from the original, reduce it in size, position it and change the blending mode to Darken(Blackout).

Step 4
Then copy the area with the nose and make it smaller. Place this layer under the eye layer and adjust the position - for example, I'm making sure I've positioned the nose correctly along the philtrum. Because of the new size, the nose needs to be rotated just a little bit clockwise (for this image), which makes the nostrils look a little uneven. I'll take advantage Liquify(Plasty) to fix it.

Step 5
Time to adjust your chin. To begin, duplicate the lower part of the chin with the neck and lift it. Next, copy the original image (from Step 2) and use Liquify(Plastic) to align the layer with the chin. Then duplicate the part with the lips, reduce it in size and move it down. Smooth out the sharp transitions that appeared as a result of our previous actions.

Step 6
Now her face looks too wide, we need to fix that. Make a copy of all layers (Shift + Alt/Opt + Ctrl/Cmd + E). Duplicate the left side of her face along with her chin to the right and slightly up. Smooth out the transition.

And now we need to fix the neck area. As before, duplicate the required area from the merged layer and change it using the tool Distort(Distort) so that it matches the edges. Smooth out.

Duplicate all layers again, soften the angularity of the chin, and make the lips a little fuller using Liquify(Plastic).

Step 7
I really don't like dark shadows under her eyes and near her nose, so I get rid of them with Levels(Levels) and blending mode Lighten(Lighter). I use a tiny brush (2-3 pixels) to gently lighten the pixels while zooming in very close.

Step 8
Next, I want to make her lips shiny. Create a layer Curves(Curves) with blend mode Screen(Screen) and paint the sparkle with a brush you're comfortable with, then use a translucent brush to paint in the sparkle.
Then, duplicate the last merged layer and use Surface blur(Surface Blur) with a small radius. Desaturate the layer. Use Plastic Wrap(Filters - Artistic) ( Filter - Filter Gallery - Imitation - Cellophane packaging). Play with the sliders until your lips look wet. Change the layer blend mode to Vivid Light(Bright Light), set the opacity to your liking. Use a layer mask Hide All(Hide All) and leave the effect on the lips.

Step 9
Let's make the eyes brighter. I usually start with an adjustment layer Exposure(Exposure) (of course, we only need the effect on the iris, so use a mask), blend mode Overlay(Overlap). I add Color Balance(Color Balance) (as Clipping Mask), Blend Mode Color(Color). And to finish, let's add some glitter with an opaque white brush on a new layer, blend mode Overlay(Overlap).

Step 10
Time to add some bright makeup on a new layer.

Step 11
Now we will change the hair color to a more interesting one. To start, I painted the color on the same layer as the makeup and added some color variation for the highlights and shadows.
Looks a little dull so I boosted the light with a layer Levels(Levels) and added some little bright highlights.
To achieve this I created a new layer setting the blending mode to Screen(Screen) and opacity to 75%, and then painted with a brush with the following settings Spacing(Interval) 60%, Size Jitter(Size Variation) 100%, Pen Pressure(Pen pressure). Add to layer Outer Glow(External Glow), here I used the following settings: opacity 75%, color - white, size - 5 pixels, Spread(Range) - 0%, Range(fluctuation) - 31%, tick in the box Anti-aliased(Smoothing).

Step 12
I could have stopped there, but I decided to add cat ears to her:D
I found matching ears and cut and pasted them. You don’t have to worry about it and leave the fur while clarifying the outline, but simply draw it later. I won't go into detail about this process as there are plenty of tutorials on the internet on adding wool. I'll just say that I combined Smudge Tool(Finger) and brush painting, both using hair brushes.
Now that her ears are nice and fluffy, I need to adjust the color. Exposure(Exposure) will make the ears bright, and with Color Balance(Color Balance) (Blending Mode - Normal(Normal)) color can be adjusted. I didn't like the color of the skin inside my ears so I used Levels(Levels), blend mode Screen(Screen) to make it soft pink. Finally, I added more colors for the highlights and shadows on a new layer.

Step 13
Adding details - hooray! :D I decided to add decorative elements to the face and hair. Let's add rhinestones to the face and plastic flowers to the hair. Of course they need to add shading, raise it a little Exposure(Exposure) and add glitter on a new layer. I also added some color to the eyelashes and eyebrows to match the hair on the color layer. And, of course, I couldn't resist adding glitter to my lips and around my eyes.

Step 14
Almost finished, just finishing touches left. Use Levels(Levels) to darken her right human ear so that it is not visible. Her left eyebrow casts a strange shadow closer to the bridge of her nose, and to fix it, I used Levels(Levels) and a tiny (about 2 pixels) brush set to pressure - this is how I brightened the area. Also reduce her shoulder to make her body look smaller.

Step 15
Lastly, I want to add some shine to the eyes, lips and hair. Create a stamp layer, click Filter - Other - High Pass(Filter - Other - Color Contrast). Choose a low value so that only clear outline lines are visible. Change the blending mode to Vivid Light(Bright light), set Opacity(Opacity) to 75%. Create a mask and leave the effect only on the eyes, lips, and here and there on the hair.
Ready! :)
Already drawn +69 I want to draw +69 Thank you + 1161
On this page we have collected many step-by-step lessons, thanks to which anyone can now draw an anime girl’s face with a pencil. All you need is paper, pencil and desire.
How to draw an anime girl's face step by step (detailed lesson)
- Step 1
There were many lessons on drawing a specific picture, but there was not a single lesson that would help you draw your own unique anime. And so, for the approaching three hundredth lesson, I decided to make a special lesson on how you can draw a face for your anime girl. We start with the contour of the face. Many people have a problem with the shape of the face, but I found the easiest way to draw a face. Draw an oval. From the edges of the oval we draw two lines down so that they meet.
- Step 2
Then we draw the location of the jaw arch with a dotted line just above the point of contact of the line. We draw straight lines to the dotted line and from the dotted line we draw lines to the resulting point. The arc can be drawn higher, but know that the higher the arc, the larger the chin.

- Step 3
Draw the shape of the face. All unnecessary lines were erased. Draw lines to construct the eyes and mouth. Let's start drawing the eyes. What kind of eyes are there in general?

- Step 4
Anime eyes, it seemed. they just don’t draw like that. This is a whole science. After reading several articles, I picked up what the eye would look like in reality and how it would look in anime style.

- Step 5
It all depends on the little things. For example, from the location of the lower and upper, from the level of the corners of the eyes, each eye is individual and remembering everything... is extremely difficult, so I took standard eye shapes. But just drawing eyes is not enough. We need to give them emotions. Emotions are given not only by the shape of the eyes, but also by the eyebrows. They also play an important role.

- Step 6
Many people don’t know how to draw eyes at all. It's simple! The main thing is to understand and practice ^^. We draw any shape of the Upper eyelashes, we draw the lower ones at any level.

- Step 7
We decide on the shape of the pupil. It can also be done by anyone, but do not forget that the pupil should not go beyond the eyelash line, I took an oval pupil. P.S. You don’t have to draw like me. If you take something of your own, you will better understand how it is drawn.

- Step 8
Now is the time to make room for the sparkle in the eyes. Draw small circles. You can have several, you can have one big one. The main thing is that they cover the pupil (at least a little). P.S. Crying enthusiastic or loving anime girls have more sparkle in their eyes.

- Step 9
Draw the pupil.

- Step 10
We begin to paint over the pupil. It is best to do this with the darkest pencil.
- Step 11
Shade the lower part of the eye. Without touching the reflection on the eye. Please note that the light part of the eye consists of two shades.

- Step 12
Now let's shade the upper part of the eye. The pencil is slightly lighter than the pupil, but darker than the bottom of the eye. Did you know that the creators of anime borrowed from Walt Disney to convey emotions through the eyes?

- Step 13
When drawing an eye, make sure that the distance between the eyes is not too small, but not too large. Lines will help you draw the eyes the same. We drew the eyes perfectly. I should draw a mouth.

- Step 14
The mouth is one of the leaving emotions. Every emotion has its own mouth^^

- Step 15
Well, the mouth is not so difficult. Just as you already know from the traditional expressions of emotions (smile, tears), anime has its own unique icons like a drop on the hero’s head characterizing the stupidity of the events taking place or the redness of the cheeks, the so-called embarrassment of the character, etc. And by the way “Chewing handkerchiefs” (character disorder) as we call it, is unique to anime and does not occur anywhere else.

- Step 16
Let's move on to the most difficult part of the lesson - HAIR. Yes, yes, it’s very difficult... but still, an anime girl looks stupid without hair. There are many varieties of hair. Some are shown in the photo. P.S. when creating your character, you can take these hairstyles

- Step 17
In general, drawing hair begins with bangs. We draw each strand as if superimposing them on top of each other. But notice that the hair is drawn just above the outline of the head.

- Step 18
Draw the bottom part of the hair. I could have used ponytails, I wanted long hair.

- Step 19
Shade the hair with any pencil. Use an eraser to create shine on the hair. The drawing is ready. Now it's your turn to draw your anime girl. I wonder who will be more original? lesson prepared by moonflower. P.S. I comment on each drawing.


